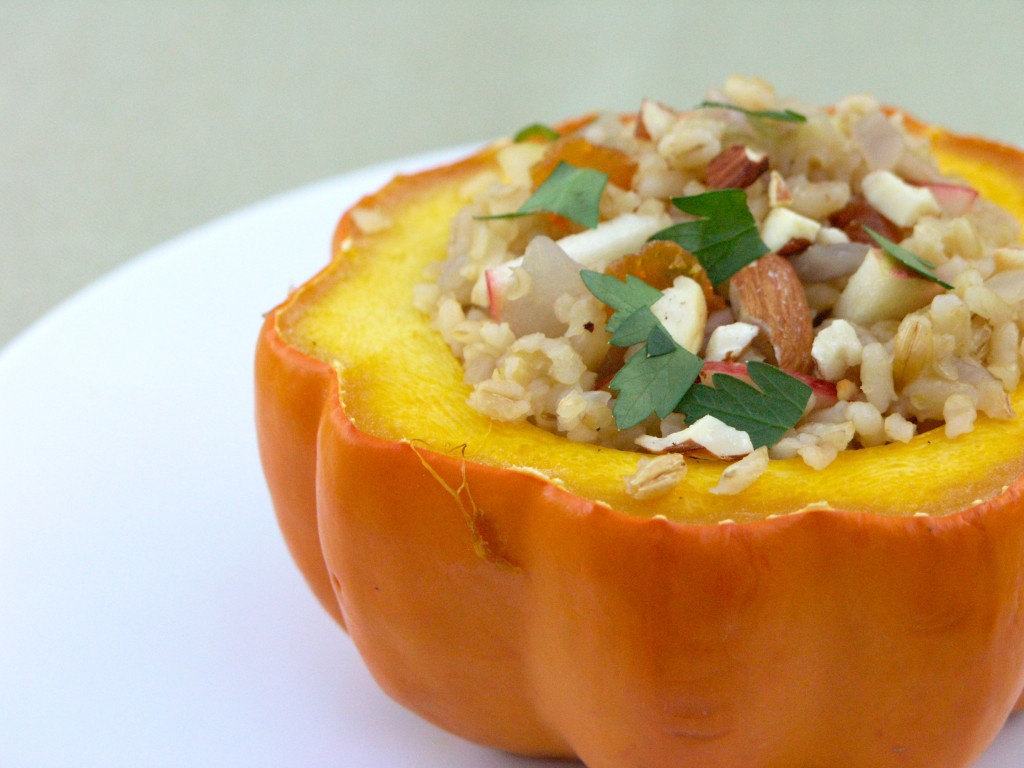
Here is a dish elegant enough for Thanksgiving or an autumn dinner party, and hearty enough to serve as a vegetarian (vegan) main dish. Favorite fall flavors of apple, squash, and nuts come together in this healthy, whole grain pilaf. Feel free to substitute your favorite grains. Try it with millet, farro, wheatberries or wild rice. Even lentils would be a lovely addition. Substitute fresh sage or thyme for the parsley, if you prefer. Substitute pear for the apple. Try it in a pumpkin. The possibilities are endless.
Roasted, Stuffed Acorn Squash: Barley-Bulgur Pilaf with Caramelized Apple and Almonds
Fall flavors come together in this hearty (vegan) side dish - elegant enough for a dinner party, yummy enough for any night.
Author: Amy Wilson
Recipe type: Hearty Vegetarian Main Dish or Side Dish
Serves: 4
Ingredients
4 Medium Acorn Squash (I chose a variety that was a lovely orange color, with smooth skin but any variety will do)
2 Tbsp olive oil
1 medium onion, diced
2 cups vegetable stock
¼ cup pearled barley
¼ cup brown rice
¼ cup bulgur
1 apple (on the sweeter side, like Honeycrisp or Braeburn), sliced thinly
2 Tbsp chopped almonds, toasted
¼ cup dried apricots, sliced thinly
¼ cup chopped fresh parsley
salt and pepper to taste
Instructions
Preheat oven to 400˚F. Cut each acorn squash in half and scoop out the seeds. Place on a rimmed baking sheet and add water to the pan so that the squash skins don't get scorched. Add a little dab of butter to each acorn squash. Bake for about 45 minutes to an hour until the squash are cooked through, but not collapsing.
While the acorn squash are baking, prepare the pilaf. In a medium saucepan, heat the 2 Tbsp of olive oil over medium heat. Add the chopped onion and sautée until onions have softened and started to brown, about 8 minutes. Pour in 2 cups of vegetable stock and bring to a boil. Add the pearl barley, reduce heat and cover. The pearl barley will simmer for a total of 45-55 minutes. After 10 minutes of cooking, add the brown rice. Continue to simmer, covered on low. When 15 minutes remain, add the bulgur.
In a separate frying pan, over medium heat, heat a bit of olive oil. Then add the apple slices, chopped almonds, and apricots. Toss to coat and sautée for a 3 minutes or until apples start to soften and brown. Remove from heat. Preheat oven to 375˚F.
Once the grains are cooked through, drain any remaining liquid and toss in the apple mixture. Toss in the chopped parsley, reserving some for garnishing later. Season with salt and pepper.
Divide the mixture evenly between the acorn squashes. Place the stuffed squashes on a baking sheet and bake in the oven for 15 minutes. Remove and garnish with the remaining fresh parsley and serve immediately.
As some of you know, I started blogging a bit for Mollie Stone’s Markets, my favorite grocery store. They have an amazing new line of infused olive oils that I have been experimenting with. This latest recipe makes use of the Lemon Infused Olive Oil. I made this lentil salad for a going-away party for friends of ours who are moving to Europe. Just when we’re going to have healthcare here after all. Oh well. To see the entire recipe, check out the post on the Mollie Stone’s Blog!
I equate summertime picnics with these kinds of salads: lentil salad, orzo salad, corn and bean salad and so on. They travel well, hold up during a picnic and are nutritious. They also take advantage of what’s in season. Here are just a few from the archives:
My friend Raquel is the master of the wild rice salad. She tosses it up in huge quantities for party buffets at her house and there’s never any left over. I’ve been meaning to do a version of my own and today was the day. The only difference between my version and hers, is that I’ve added an orange juice-based vinaigrette – just a wee-tiny bit, because this salad can even stand on its own without any vinaigrette, but I love orange and cranberry flavors together, so I thought it would only make this great salad greater.
Hey, it’s vegan and gluten-free. Can’t beat that.
Wild Rice, Cranberry and Toasted Almond Salad with a hint of Orange Serves 4 as a side
Ingredients
2 cups cooked wild rice (still warm)
3/4 cup dried cranberries
1/2 cup toasted almonds slivers
1. Cook rice according to package directions (it takes about 45 minutes). Meanwhile, toast the almonds in a frying pan with no oil over medium high heat for about 5 minutes or until just starting to brown.
2. While the rice is still warm, toss it with the dried cranberries and the almonds. This will allow the cranberries to swell and their flavor to meld.
3. While the rice mixture is cooling, whisk together the ingredients for the vinaigrette until an emulsion is formed. Once rice mixture has cooled to room temperature toss the vinaigrette with the rice and mix thoroughly. Refrigerate and serve chilled.
Buy a bag of lentils at Safeway for $1.49, or spend $8 for a fancy box of French Le Puy Lentils at Whole Foods. Either way, you can create a myriad of healthy salads that will keep in the fridge for about a week and work as main dishes, sides or snacks. Put the lentil salad on top of a bed of lettuce or the add arugula for bite. Roll the lentils up in a whole wheat tortilla for a healthy bean wrap. Serve warm with fish, like Salmon or Mahi Mahi. The possibilities are endless.
To prepare the lentils, follow the directions on the side of the package. Do not pre-soak lentils. They cook pretty quickly. Typically, for a 16 oz bag of lentils, bring 8-10 cups of water to boil in a large pot. Add the lentils and simmer gently for 25-30 minutes. For salads, you want the lentils to maintain a little bite so that they don’t get too mushy. Start checking them at 25 minutes to get the texture just right. A 16-oz bag of lentils will yield about six cups of cooked lentils.
Heirloom Tomato-Basil Lentil Salad
Heirloom Tomato-Basil Lentil Salad
Serves 4 as a side
Ingredients
2 cups cooked lentils
1 large or 2 small heirloom tomatoes, diced into small cubes.
2 Tbsp minced shallots or scallions
1/4 cup minced fresh basil and additional leaves for garnish
2 Tbsp balsamic vinegar
6 Tbsp extra-virgin olive oil
1/4 teaspoon black pepper
1 Tbsp of Crumbled Feta (optional) – I left it out because I like to try to be vegan when I can
Method
1. For the vinaigrette, whisk together the olive oil and vinegar into an emulsion. Toss lentils, tomatoes, shallots, minced basil, and oil vinegar to combine. Season with pepper and garnish with basil leaf and feta if using. Serve chilled.
Tarragon-Mustard Vinaigrette Lentil Salad
Tarragon-Mustard Vinaigrette Lentil Salad
Serves 4 as a side
Ingredients
2 cups cooked lentils
1/2 red bell pepper, diced
2 Tbsp red-wine vinegar
1 Tbsp minced shallot or scallions
Salt and pepper to taste
6 Tbsp extra virgin olive oil
2 tsp Dijon mustard
1 Tbsp minced tarragon
Method
1. Whisk together the vinegar, shallots, salt, pepper, olive oil, mustard and tarragon. Toss with red bell pepper and lentils to combine. Garnish with tarragon leaves. Serve chilled.
Lemon Dill Lentil Salad
Fresh Lemon-Dill Lentil Salad
Serves 4 as a side
Ingredients
2 cups cooked lentils
1/2 red bell pepper, diced
1/4 cup fresh dill, minced
2 Tbsp fresh-squeezed lemon juice
1 Tbsp minced shallot or scallions
Salt and pepper to taste
6 Tbsp extra virgin olive oil
Method
1. Whisk together lemon juice, shallots, salt, pepper, and olive oil. Toss with lentils, red bell pepper and fresh dill to combine. Garnish with sprigs of dill.
You say Garbanzo Bean, I say Chickpea, but in India, it is “Chana.”
Chana Masala is one of the most popular Indian dishes. Since it’s vegan and spicy, it falls into the category of “dishes my husband likes.” I hope you enjoy it too.
Chana Masala Serves 4-6
Ingredients
1 1/2 tablespoons vegetable oil
1 whole cardamom pod
1 whole cinnamon stick
1 whole Bay Leaf
A few whole cloves
1 tsp whole cumin seeds
2 medium onions, diced
2 cloves garlic, minced
2 teaspoons grated fresh ginger
1 teaspoon ground turmeric
1 15-ounce can of diced tomatoes
chopped green chilis
1 teaspoon garam masala
1/4 tsp chili powder
1/2 tsp ground coriander
1/4 tsp turmeric
1/2 tsp cumin powder
2 (15-ounce) cans chickpeas, rinsed and drained
Salt to taste
Squeezes of lemon juice
Fresh cilantro to garnish
Method
1. Heat oil in a large skillet. Add whole spices (cadamom pod, cinnamon stick, Bay Leaf, whole cloves, cumin seeds) to the pan and sautée for 2 minutes over medium-high heat. Add onion and sautée until softened and browned, about 8 minutes. Add garlic, ginger and turmeric. Stir to combine. Sautée for a minute or two.
2. Add the canned tomatoes and green chilis. Simmer until thickened slightly, about 3 minutes. While tomatoes are simmering, mix together the garam masala powder, chili powder, ground coriander, turmeric, and cumin powder. Add this mixture to the simmering tomatoes and stir to combine.
3. Add the chickpeas. If the dish is getting dry, add up to 2/3 cup of water. Simmer uncovered for 5-10 minutes or until chickpeas are soft, but not mushy. Season with salt.
4. Fish out the Bay Leaf and cinnamon stick. Serve over rice. Squeeze lemon on top and garnish with lots of fresh cilantro.
Here is a version of Chana Masala demonstrated by ShowMeTheCurry. Their version involves using tea bags to enhance flavor and color. Cool!
On a recent trip to Spain, I had the chance to sample, once again, one of my favorite Spanish dishes: Tortilla Española, or Spanish tortilla. Here in the US, we associate the word tortilla with that a round flatbread that wraps up a burrito, but in Spain, it refers to an omelette-type dish, eaten in bars, at room temperature during the early-evening snack (tapas) time. I like Spanish Tortilla any time of the day: at brunch, for an afternoon snack, or even for a simple dinner. Cooking it just right can be difficult, though, so I have spent the last few months perfecting mine and now I am ready to share it with all of you.
The Spanish Tortilla enjoys a long history. Throughout the Mediterranean and the Near-East, there are countless variations of what one might call an omelette. It is believed that the dish originated in Persia as the kookoo sabzi and then gradually moved west. In Turkey, it became the kaygana. In Italy, it evolved into the frittata. In France, it became the omelette and in Spain, it is the Tortilla Española or at times, the Tortilla de Patata.
Spanish tortilla is one of those ubiquitous national dishes that inspires strong views on how to make it perfectly and authentically. Of course, because it varies throughout Spain, there is no right answer. I like to make it with a relatively high ratio of eggs to potatoes. I also slice the potatoes thinly using a Mandoline rather than cutting them into cubes. Most recipes you’ll see for Tortilla Española will include onion, and in this version, I have used the more subtle shallot, but I like it with yellow onions as well.
Of course, the biggest question surrounding the preparation of a Spanish Tortilla is whether to flip it or broil it to finish cooking the top side. Traditionalists insist that you must do the flip: slide the tortilla onto a plate, flip it over and slide it back into the pan. But, if you have an ovenproof skillet, you can simply insert the skillet under the broiler and watch carefully while the top finishes.
All of the ingredients below are “to taste.” Do you want the potatoes to crisp up before cooking them in the eggs? Use more oil and crank up the heat for the last few minutes of potato-cooking time. Do you want a heftier dish? Reduce the number of eggs and let the potatoes dominate. Do you want to incorporate more onions into the dish? Finely chop a couple of tablespoons of onions, or shallots, or even leeks, and fry them with the potatoes. The important thing is to experiment until you’ve found your perfect tortilla and then you can have a strong opinion too.
Sliced Yukon Gold Potatoes
Spanish Tortilla Serves 8
Ingredients
2 lbs Yukon Gold potatoes (the low starch content keeps them from getting mushy)
¼ cup olive oil (more or less)
½ cup shallots, minced finely
2 tsp salt
Freshly ground pepper
10-12 eggs, beaten
Method
1. Peel potatoes and slice them thinly using a Mandoline if you have one, or a good sharp knife. Sprinkle the potatoes with half of the salt. Over a medium-high flame, heat the oil in a 12-inch sautée pan, preferably one that has sloped sides. Sautée the potatoes and shallots gently until the potatoes are just fork tender, about 25 minutes. Don’t allow them to get too brown. Be patient. It’s important that the potatoes are completely cooked. Remove from heat.
2. Beat the eggs in a large bowl. Add the potatoes and shallots and toss to coat with the eggs. Sprinkle with remaining salt. Wipe out or clean your sautée pan. Add a little bit more oil and heat the pan until very hot. Pour in the egg and potato mixture and let set for about 1-2 minutes. The high heat will help create a layer of cooked egg that will make it easy for the tortilla to slide out of the pan. Once the edges have set, reduce the heat to medium-low and let the mixture cook for 8-12 minutes.
3. When the tortilla is ready to be cooked on the other side, it will be firm on the bottom and still a little runny on top. Slide the pan under a pre-heated broiler and cook until the top has set and just started to brown, about 3 minutes, checking often. If you would like to try the flip instead, invert a plate into the pan, flip it over and then slide the tortilla back into the pan. It’s not as hard as it sounds as long as you have created that cooked egg layer and your pan is not too heavy. Let it cook on the second side for about 3-5 minutes. Then flip back out onto a plate for serving.
4. Once the tortilla has been removed to a serving plate, allow it to cool to room temperature, as it is traditionally served that way. It’s a great dish for parties. To add it to a buffet table, cut it into squares and insert a toothpick to make it easy for guests to enjoy. Yours will look just like the Spanish Tortilla in a tapas bar in Madrid.
For over 80 years, the Thrasher’s French Fries stand at 401 South Atlantic Avenue, in Ocean City, MD, has served as a kind of gatekeeper to the famous boardwalk. At Thrasher’s, the potatoes are cut fresh, fried twice, doused with vinegar, and served in buckets. Big buckets. With only three sizes available (16 oz, 32 oz and 53 oz buckets), the smallest serving you can buy is a pound. But, there is something about these fries that makes them so addictive that a pound often is not enough and Thrasher’s fans are adamant. These are the best fries on the planet. Always a line of people waiting for their fries
With more than eight decades of frying and over 22,000 fans of the unofficial facebook page, who’s to argue? In 1933, Thrasher’s weathered a hurricane that not only destroyed vast sections of the boardwalk, but actually severed off Assateague peninsula to create the now-famous Assateague island across the inlet. Thrasher’s then went on to survive the Great Depression, two World Wars, Reaganomics, and the “freedom fries” era. Featured in countless magazine and newspaper articles, like the Woman’s Day 8 Best Boardwalk Food in the U.S., and inevitably found in the comments section of any web article about the “best fries,” these fries inspire a fanaticism usually reserved for politics and religion.
So, when I was heading back to my native Maryland Eastern Shore, I knew that it was time to make a pilgrimage to the place where I first learned what a French fry is supposed to taste like. Sure enough, there is something irresistible about these fries. They aren’t particularly crispy, but the flavor is pure potato. In fact, Thrasher’s is so proud of the fresh potato flavor, they don’t provide (or even allow) ketchup.
NO KETCHUP.
Katherine Bunting-Howarth of Delaware remembers using so much vinegar once, she soaked a hole through the bottom of the bucket and she’s not the only who considers the vinegar to be an essential element of the Thrasher’s experience. 939 people on facebook have “liked” the Thrasher’s facebook update, “[…] diggin’ the Apple Cider Vinegar with no ketchup!” and dozens more have added their two cents.”
OC, MD 3073 miles
After returning to California, more than 3000 miles away, I began to wonder. Can I recreate true Thrasher’s French Fries at home? I know the basic ingredients: Russet potatoes, peanut oil, salt and vinegar. But can I get that same balance of tender and crispy? And can I reproduce the rich, potato flavor? I set out to find the answer. But it would not come directly from the source. Thrasher’s is part of the Bayshore Development Corporation which also owns the Jolly Roger amusement parks. My attempts to reach someone at Bayshore willing to talk about Thrashers Fries were unsuccessful. Buddy Jenkins, chair of the board of the Bayshore Development Corporation, has always been secretive about the magic of these fries. According to a 2004 Washington Post article, Jenkins said, “We have a process that I certainly don’t intend to divulge,” but that the secret involves a “recipe and cooking times.”
Well, a recipe and cooking times were just what I set out to develop. I knew that part of what makes boardwalk fries, boardwalk fries is that they are soaked in a brine solution before they are fried twice, so I knew that I would try brining the potatoes as part of the solution. But how hot should the oil be? How long should the fries, well, fry? To find some answers, I turned to The Food Lab at SeriousEats.com. In May, J. Kenji Lopez-Alt set out to determine what makes a McDonald’s french fry so darn good and I have applied some of his learnings to this project. But Thrasher’s French Fries are not like McDonad’s French Fries. They’re thicker for one thing, and they’re served in buckets; they’re never frozen, and, must I say it again? They’re eaten with vinegar, not ketchup. But, they do need to come out with a crispy exterior and a fluffy, fully-cooked interior and that is where the “recipe and cooking times” come in. In his article, Lopez-Alt discovers that McDonald’s actually blanches its fries in nearly-boiling water before frying them, so I decided to add this step to my process as well. Blanching them at 170˚F rinses off excess sugars and starch which in turn prevents over-browning later. It also strengthens the cell walls of the potato so it doesn’t completely lose its structure during the frying process. Again, Lopez-Alt explains all of this really well here.
Following the multi-step process of brining, blanching, frying, cooling, frying meant that I could enjoy something approaching a bucket of Thrasher’s French Fries without having to leave the state of California. And that, my friends, is worth a day’s effort. Are you with me on this one? If you are, read on for the complete recipe.
Homemade French Fries
My best attempt at recreating Thrasher’s French Fries at Home Serves 2 (or one, really)
Ingredients
4 Russet potatoes, peeled and sliced into 3/4-inch thick slices
Peanut Oil, enough for fries to be submerged
Sea Salt
Apple Cider Vinegar (or malt vinegar, if you prefer)
For the brine
2 quarts water
1 cup salt
Tools
I don’t have a lot of deep-frying tools in my kitchen. No wire basket, no electric fryer. But the one instrument that is indispensable for this recipe is a Candy/Deep Fry Thermometer, like the one pictured here:
Russet Potatoes
Method
1. Mix the water and salt in a large glass bowl. Stir to dissolve salt. Add potato slices and allow to sit for 30 minutes. Drain in a colander and rinse.
2. In a large stock pot over medium heat, bring a bath of water to 170˚F. Remember, the boiling point of water is 212˚F, so you don’t want to let it boil. There will just be a few bubbles. Add the potatoes and let them sit in this warm bath for 17 minutes. Continue to check the temperature periodically to ensure that you are spot on. Remove potato slices to a paper towel-lined cutting board or cookie sheet and allow them to dry. They must be completely dry before submerging them in the hot oil, so do what you need to do to ensure that they are dry.
3. In a dutch oven or heavy-bottom pot, heat the peanut oil to a whopping 400˚F. Beware. Hot oil is hot. Wear protective clothing and make sure you do not allow any drop of water to fall into the hot oil bath. It will splatter and burn you. Don’t ask me how I know this. Carefully lower about 1/3 of the potato slices into the oil and allow them to fry for 80 seconds. Make sure they are not sticking to each other during this process. If you notice them starting to turn brown, remove them immediately. During this stage of the process, they should only just begin to take on a golden color. Remove them to a paper-towel lined surface and repeat with two more batches. Allow the oil to come back to the proper temperature between batches. This is what they look like after the first frying session:
After the first fry
4. Allow the fries to cool for at least 30 minutes. Then, bring the oil back up to a temperature of 375˚F. Again, in batches, allow the fries to cook for 3 – 4 minutes. Watch carefully so that they don’t get too brown. Remove them to a paper-toweled lined surface and salt immediately. They can be kept warm in a 200˚F oven on a parchment-lined cookie sheet while you are frying the other batches, but I found it wasn’t necessary because everything moved so fast.
5. Serve in paper-lined cups (I used tall coffee cups) and sprinkle with salt and, of course, cider vinegar! Enjoy immediately. Perfect French Fries at Home
What are your memories of Thrasher’s French Fries? What tips do you have for making the best fries at home? What boardwalk food do you love the best? Share your memories, tips and opinions in the comment section below.
Over the past six days, I’ve shared each course of a five-course dinner I cooked for my husband’s recent birthday party. Looking at the array of photos below, would it occur to you that this is a collection of vegan, gluten-free recipes? Think of it. No cheese. No pasta. No fish or fowl. If you had asked me on my husband’s birthday last year whether I could (or would even want to) make a dinner like this, I would have answered, “no,” flatly. Now, I can barely imagine eating any other way. Well, almost barely.
Yes, we are happily joining the national craze of eating in a sustainable, healthful way. In fact, just yesterday, I planted a whole pallet of seeds which means we’re joining the garden-at-home craze too. Count on a whole host of blog entries about this new adventure. When I was on the outside looking in at this fad, I thought it was a bit of overblown malarky, and, well, just a fad. Now that I’m joining in, I can feel myself transforming into an evangelist. I guess 38 per cent of Americans (the number of people who had a vegetable garden last year) can’t be wrong. Well, sometimes they can, but not this time.
Seeds germinating after just 24 hours
I absolutely must thank Viviane Bauquet Farre for her inspiration and help on this birthday dinner project. If you haven’t seen her blog yet, you are really missing out. You can find her at food and style and please, go “Like” her facebook fan page. Viviane creates the most original and beautiful recipes. She also produces some of the highest quality cooking instructional videos on the web. See them all on StreamingGourmet.com. It took me months to figure out that her recipes are vegetarian, so they will appeal to you whether you are a vegetarian, a vegan, an omnivore or someone determined to subsist on truffles and scotch. Seriously. Thanks again, Viviane!
Recently, I was at Mollie Stone’s market in Greenbrae, CA where there is a sizable bulk foods aisle and I was gazing at all of the varieties of gluten-free grains available there. In my kitchen, I have a shelf with glass canisters filled with staples and I just love the beauty of all the different-colored grains, beans, and pastas lined up next to each other. So when I saw these beautiful grains at Mollie Stones that I hadn’t tried in years, I just had to have them. Pearl millet and quinoa were the two I chose that day and I thought, ‘Why not make a pilaf?’
Once I returned home, I consulted the one book in my collection that was guaranteed to include a quinoa and millet pilaf: Annemarie Colbin’s 1989 book, The Natural Gourmet: Delicious recipes for balanced, healthy eating. If you’ve been following this blog at all lately, you will know that our family (specifically my husband) has renewed its efforts to engage in balanced, healthy eating. The last time I tried to do such a thing was 1990, and I have moved this book with me from place to place ever since.
Rich in vitamins and minerals, as well as protein, both of these grains are gluten-free and deserve a place at everyone’s table.
For tips on how to make sure that your quinoa doesn’t taste bitter, see this post, How to Cook Quinoa over at my good friend Viviane Bauquet Farre’s blog, food and style.
Quinoa and Millet Pilaf adapted from the recipe by Annemarie Colbin in her bookThe Natural Gourmet
Serves 3-4
1 Tbsp extra virgin olive oil
1 small onion, diced
1 medium carrot, diced
½ tsp ground cumin
1 clove of garlic, peeled and bashed
½ cup millet
½ cup quinoa (rinsed well)
2 ½ cups vegetable stock
Sea salt to taste (about 1/2 tsp)
Fresh curly parsley to garnish
Method
1. Rinse the quinoa well. To do this, put the quinoa in a fine-mesh strainer and place a bowl underneath. Rinse with cold water while rubbing the quinoa between your fingers. The water will become cloudy. Drain, and repeat this process with fresh water two more times. Strain excess water and set aside.
2. Heat the olive oil in a saucepan over medium heat. Add the onion and sauté for about 4 minutes, or until soft. . Add the carrot sauté for another 4-5 minutes. If you need another touch of olive, don’t hesitate to add just a teeny bit more. Add the cumin and garlic and sautée for another minute. Now we are going to toast the grains so that they have a rich, nutty flavor. Add the millet, and sauté for 5 minutes, stirring frequently. Now add the quinoa and sauté for 2 to 3 minutes more. Again, stirring frequently to coat the grains with the olive oil, aromatic vegetables and spices, and to prevent burning.
3. Add the vegetable stock and salt and bring to a boil. Reduce heat, simmer and, covered for about 30 minutes, or until the water is absorbed. Fluff before serving and garnish with fresh parsley (or fresh cilantro sprigs would do well here too).
I’ve been working on perfecting roasted root vegetables for awhile. Getting them to come out of the oven crispy on the outside and creamy on the inside is no small feat. Should you parboil first? How hot should the oven be? I’ve gone back and forth about the parboiling question. For years, I’ve been too lazy to bother and I thought that I was getting by just fine. That all changed the other day, when I followed the recipe in Jamie Oliver’s latest book, Jamie’s Food Revolution: Rediscover How to Cook Simple, Delicious, Affordable Meals. He got me to parboil again and I don’t think I will ever go back.
Click on the book to see more:
The other revelation? Heat the olive oil, along with the smashed garlic cloves and rosemary in the roasting pan first, on the stove top. Then toss the vegetables in the heated, flavored oil to coat (before roasting in a 400˚F oven). The vegetables roast evenly, and the flavor diffuses throughout.
See the nice browning on the potatoes? That comes as a result of scuffing up the potatoes while draining them in the colander. Scuffing the potatoes increases the surface area exposed to the warm air, shortening the time for moisture to evaporate the starches (sugars) to caramelize and turn brown.
And of course, don’t break the cardinal rule: make sure the vegetables are not overcrowded. Overcrowding in the roasting pan leads to “steaming” which produces limp, soggy vegetables that can’t brown. Make sure there is only one layer of vegetables and adequate space between them.
Hearty roasted root vegetables perfect for Thanksgiving and throughout the autumn and winter months.
Author: StreamingGourmet/Amy
Recipe type: Side dish
Cuisine: British
Serves: 4-6
Ingredients
2 medium Idaho potatoes
6 parsnips
6 carrots
1 bulb of garlic
3 sprigs of fresh rosemary
sea salt and freshly ground black pepper
olive oil
Instructions
Preheat your oven to 400°F
Peel the vegetables and halve any larger ones lengthways. Break the garlic bulb into cloves, leaving them unpeeled, and bash them slightly with the palm of your hand. Strip off the rosemary leaves from the stalks.
Put the potatoes and carrots into a large pan – you may need to use two – of salted, boiling water on a high heat and bring back to the boil. Allow to boil for 5 minutes, then add the parsnips and cook for another 4 minutes. Drain in a colander and allow to steam dry. Take out the carrots and parsnips and put to one side. Fluff up the potatoes in the colander by shaking it around a little – it’s important to ‘chuff them up’ like this if you want them to have all those lovely crispy bits when they’re cooked
Put a large roasting pan over medium heat and either add 2 Tbsp of olive oil. Add the garlic and rosemary leaves. Put the vegetables into the tray with a good pinch of salt and pepper and stir them around to coat. Spread them out evenly into one layer – this is important, as you want them to roast, not steam as they will if you have them all on top of each other.
Put the baking dish in the preheated oven and cook, stirring the vegetables occasionally, until they are tender and golden brown, about 45 minutes.