My kids (8 and 5) absolutely adore pizza. Not broccoli pizza. But pizza with cheese, a little red sauce (not too much) and shredded grilled chicken. This pizza dough works like a charm. The rye flour gives it a rich, nutty flavor that I absolutely love. Using the Reinhart method of slow rising in the fridge and minimal kneading means I can make it in the morning while we’re all getting ready for the day, have rise in the fridge while we’re at work and school and then voila: it’s ready to go when we return home.
The dough does need to sit out for an hour after being refrigerated, but if you pop it out of the fridge as soon as you walk in the door, it’s about ready to go when the oven is preheated and the fixin’s are ready.
Dark Rye deepens the flavor of this pizza crust. Sweet and nutty, this dough satisfies adults and children alike!
Author: Amy Wilson/StreamingGourmet
Recipe type: Bread
Cuisine: Italian
Serves: 6
Ingredients
2 cups dark rye flour
2 cups Animo Caputo "00" flour
1 Tbsp honey
2 tsp salt
1 tsp instant yeast
2 Tbsp olive oil
1¾ - 2 cups of warm water
Instructions
Combine all ingredients with the mixing paddles of your stand-up mixer. Allow to rest for 5 minutes.
Swap in dough-hook and need on a medium setting for 5 minutes. The dough will still be rather sticky.
Separate dough into two pieces and place each in an oiled freezer bag. Place the bags in the refrigerator (or in the freezer if you don't intend to use them with 48 hours). When you are ready to use the dough, remove it from the refrigerator at least 1 hour before it's time to bake it. The dough needs to come to room temperature (in the bag so that it doesn't dry out).
Roll the dough out into a large circle on a pizza pan that has been sprayed with a little nonstick cooking spray. Bake in an oven that has been preheated to 450˚F for about 5 minutes. Then add the sauce and toppings and bake for an additional 10 minutes or so.
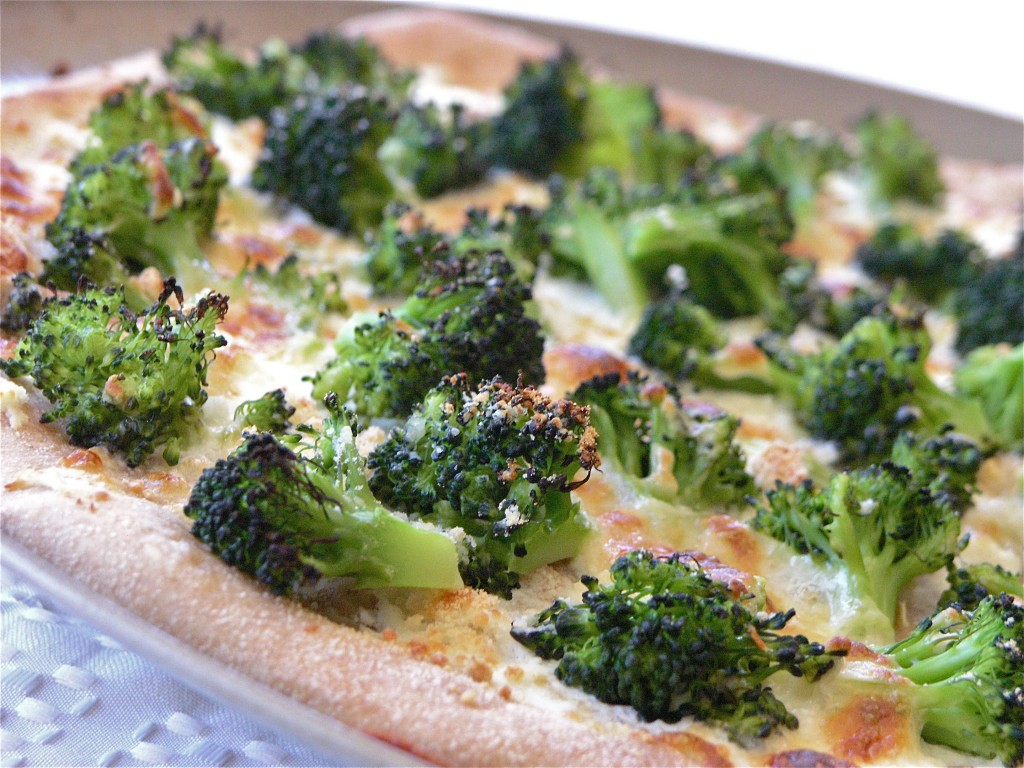
I must admit. I am a total broccoli addict. I eat broccoli every day. Roasted. Steamed. With cheese melted over it on a potato and this way: on a white pizza. This is pretty guilt free. As long as you don’t eat half the pizza, like I sometimes do. But because low-fat ricotta stands in for most of the cheese, the calorie count on this dish is not terrible.
I was first introduced to white pizza in college outside of Philadelphia. Renato’s in Swarthmore used to make an awesome pizza with ricotta, Mozzarella, and lots of garlic. I’m pretty sure there was broccoli on that one too. So basically, I wanted to recreate that pizza here.
I’ve been eating this broccoli pizza almost once a week for about a month now, so I figured it was time to do a post.
I use freeze-dried garlic in this recipe, because it’s so much faster to just sprinkle it over the pizza, than it is to chop fresh garlic. The flavor is great. I don’t miss the fresh garlic at all. I use Litehouse brand, but you can find this other brand at Amazon:
You can make the crust yourself, as I used to do a lot (I just realized I’ve never posted by pizza dough recipe, which is weird), but lately, I’ve just been buying whole wheat pizza dough at the grocery store. Mollie Stone’s now carries Il Fornaio pizza dough in the frozen section. It tastes just like my homemade version, so I’ve been hard pressed to go to all the trouble of making it from scratch. Just make sure that you let the dough sit out long enough to come to room temperature, because if you’re not careful, you can run into the problem of having the toppings cook before the dough is ready, and then it just sticks to the pizza pan like crazy.
To help with making sure the pizza doesn’t stick, I use a nonstick, perforated pizza pan like this one available at Amazon.com (just click on it). I also spray it with a little nonstick spray:
2 heads of broccoli, chopped into florets (about 3 cups)
1 Tablespoon freeze-dried garlic
¾ cup reduced fat ricotta cheese
½ cup shredded part-skim Mozzarella cheese
Salt to taste
Instructions
Preheat the oven to 500˚F
If you have purchased frozen pizza dough, make sure it thaws overnight. Then let it rest on the counter for at least 20 minutes before shaping it into a pizza.
While the pizza dough is resting on the counter, you can steam the broccoli. Put the florets in a medium saucepan with 2 cups of rapidly boiling water. Steam for 3-4 minutes. Watch carefully. When the broccoli is ready, it will be bright green still, and tendercrisp. It is better for it to be undercooked than overcooked. Remove from the heat and drain completely. Then rinse with cold water to stop the cooking process and drain again. Pour the broccoli out onto some paper towels. You don't want to transfer any water to the surface of the pizza.
When you are ready to shape the dough, put a couple of tablespoons of flour (semolina or wheat) onto a large cutting board. Coat the dough ball with the flour. Flatten the ball into a disc. Then with your fingertips, work your way around the edges, stretching it all out as you go. Put your fist in the middle of the growing circle and let the sides stretch down. Move your arm up and down to help it stretch out. Then work your fingers around the edge of the circle one more time.
Spray the pizza pan with a little nonstick cooking spray and spread the circle of dough onto the pan. With the back of a spoon, spread the ricotta evenly over the pizza. Then sprinkle with the dried garlic. Arrange the broccoli pieces over the surface evenly. Sprinkle with the Mozzarella. Season with salt.
Bake in the oven for 10-15 minutes. Watch carefully. If the cheese starts to brown too quickly (before the crust has had a chance to brown), back off the heat a little bit. When the cheese and the crust are just starting to brown, remove from the oven and let cool for 2 minutes. Then slice and serve immediately.
Pumpkin month continues here at StreamingGourmet. I love to make savory pumpkin dishes and this is one of my favorites. You can use this sauce with Gnocchi or Ravioli stuffed with squash or pumpkin, or penne, shells or spaghetti. You can make a vegan version (see the link at the bottom) or you can load it up with butter, cream, and cheese. Either way, go easy on the nutmeg. A pinch goes a long way. You could add a little cinnamon, but I don’t like it when these sauces start to taste like pie. We’ll get to pie later.
Pasta with Pumpkin Sauce Serves 4
Ingredients
1 lb pasta (spaghetti or penne or shells)
1 Tbsp olive oil
2 garlic cloves, minced
2 tsp chopped fresh sage or 1 tsp dried sage
1 large onion, chopped
2 large carrots, finely diced
1/2 cup white wine
I cup canned puréed pumpkin
3/4 cup vegetable stock
1 tsp salt
Pepper to taste
1/2 cup heavy cream
1/4 tsp grated nutmeg
1/4 cup fresh grated Parmesan cheese
Additional Parmesan cheese for garnish
Additional fresh sage for garnish
Method
1. Heat the oil in a heavy-bottom stock pot over medium-high heat. Add the garlic and sautée for one minute. Add the sage, onion, and carrot and sautée until softened and slightly browned, about five minutes. Add the white wine and simmer until reduced by half. Add the pumpkin and vegetable stock and stir well to combine. Season with salt and pepper. Reduce heat to medium-low. Simmer uncovered for 10 minutes.
2. While the sauce is simmering, cook your pasta according to package directions.
3. Once the sauce has simmered, reduce the heat even further. Add heavy cream and nutmeg. Stir well and heat through for about 3 minutes. Add Parmesan cheese and stir. Add pasta to the pan and allow the sauce to soak in. Spoon into bowls. Garnish with additional Parmesan cheese and sprigs of fresh sage.
In late 2009, All-Clad launched a new line of cookware that is available only at Williams-Sonoma (online and in-store). As part of the launch, All-Clad contacted food bloggers and asked them to test and review one pan of their choosing. I chose to test the 3-quart sauté pan.
I’ll be honest. I normally don’t splurge on All-Clad. Before receiving the complimentary sauté pan in the mail, I owned just one All-Clad pan; it is one I would not want to go without, mind you, but still. It is the All-Clad LTD 11-Inch Square Nonstick Grille Pan, available at Amazon.com. It enables me to grill indoors and simplifies the cleanup immeasurably. I love it.
But this is my first time cooking with a stainless steel-interior All-Clad pan. The d5 technology improves upon All-Clad’s previous pans, because they’ve welded together not 3, but 5 layers of metal to create an incredibly stable, evenly-heating pan. Representatives from All-Clad assured me that this pan heats so evenly and holds heat so efficiently that I would not need to turn up my gas burner to high. In fact, they warned against it. I wanted to put this notion to the test by cooking something that requires high, even, sustained heat, so I decided to sear scallops.
All-Clad d5 Sauté Pan
Searing Scallops to Perfection
The trick to getting the perfect seared scallop is to start with a well-heated pan and ensure that your scallops are completely dry. Remember when you learned in grade school that the boiling point of water is 100˚C? Well, that means that water cannot reach a temperature higher than that. Steam can, but water can’t. So if the scallops are full of water, they’re going to be stuck at a measly 100˚C, which is not hot enough to produce a nice, caramelized sear. So pat those babies dry. And, if possible, buy scallops that haven’t been sitting in a brine getting water-logged in the first place. That means you’ll need to ask the man behind the fish counter for “dry scallops.”
Now that you’ve patted the scallops dry, season them with a bit of sea salt and freshly ground pepper on both sides and heat the pan. I decided to heat the d5 pan over medium-high heat (instead of high heat), because the All-Clad representatives were so convincing that the new technology warranted it. After the pan itself was good and hot, I added grapeseed oil, (because of its neutral flavor and high smoke point) and let it pre-heat as well. Sure enough, the pan performed perfectly. I knew that the temperature was right as soon as I added the scallops and I heard just the right kind of sizzle. The scallops got a nice sear going right away and the pan did not drop its heat when the three were added. Also, all three seared at the same rate.
Brown for about two minutes on first side
There was enough oil in the pan to just coat the bottom entirely and I added only three scallops so that they wouldn’t get too crowded. If you crowd scallops in the pan, they will steam each other which prevents them from getting a good, crispy sear.
After about 2 minutes, I flipped the scallops and saw the sear I was hoping to see. I let them cook for only another minute or two. It’s important not to overcook scallops and they cook very quickly. They should still be ever-so-slightly-translucent in the middle when you take them off of the heat. If you overcook them, they will become rubbery. So after about 90 seconds, I removed them from the heat and transfered them to a paper-towel-lined plate.
Be careful not to overcook scallops
Since I wanted to serve the scallops over pasta with a garlic, white wine sauce, I set to work preparing the sauce in the same pan. (The pasta had already cooked and was draining in the colander). Here’s how I pulled together the sauce in just a few minutes:
Garlic and White Wine Sauce Serves 1-2
Ingredients
1 Tbsp butter
2 cloves garlic, peeled and finely chopped
1/3 cup dry white wine
Salt and pepper to taste
1 Tbsp fresh lemon juice + a few scrapes of lemon zest
1 Tbsp fresh parsley, chopped
Method
1. Reduce heat in the pan. You don’t want to burn the garlic. Add the tablespoon of butter and let it melt. Add the garlic and sauté until fragrant, about one minute. Add the wine and simmer until thickened, about 3-4 minutes. Add salt and pepper, the lemon juice and zest and toss. Add about 2 cups of cooked pasta. Toss to coat. Remove from heat. Toss in most of the parsley then pour onto a plate. Place scallops on top. Garnish with additional parsley. Enjoy immediately.
Scallops seared to perfection
So, in conclusion, I do recommend splurging on a d5 pan. Pick one you know you’ll use again and again for recipes that require a little finesse. If you want your pan to be just the right, even temperature while sautéing meat or vegetables or whipping up fragile creamy sauces, I do think it’s worth spending a little more for a pan that will last a lifetime. I was surprised and delighted to learn that these pans are dishwasher safe. And, the new, larger handles even stay cool while you’re cooking. What’s not to love?
Disclaimer: While I did not receive money to write this review, All-Clad did provide me with a complementary pan and asked that I participate in an informational web conference, where I had an opportunity to share my feedback and ask questions. I was not required to write this post.
Want to know more about how to get the temperature of your pan just right? Watch this instructional video from Rouxbe.com. I was totally mesmerized when I watched it.
For more of the highest quality instructional videos are around, visit Rouxbe.com. Rouxbe offers over 200 step-by-step video recipes and about 250 cooking tip videos with their free basic membership. There are also a few free sample cooking school lessons to try out the cooking school content but the rest of the cooking school requires a Premium Membership. Try it free for 14 days.
The Dungeness Crab season is in full swing here in the Bay Area and while my appreciation for Dungeness Crab is limited by my upbringing on the Eastern Shore of MD (Chesapeake country, blue crabs), I can’t resist this pale imitation once a year, so when I saw the price had dropped to $5.99/lb at Mollie Stone’s, I jumped. I paid $9.50 for a single crab which yielded about 1 cup of crabmeat.
Last year, I made a crab-picking video which has been playing continuously ever since on my livestream channel. You can check it out here: Livestream.com/StreamingGourmet It’s embarrassing for me to watch and I can’t stand the sound of my own voice, so although I host StreamingGourmet (the blog and video site) I don’t make very many videos. I felt compelled to demonstrate how easy it can be to yank big chunks of crab meat out of the back fin of a crab, though, since it can be a little intimidating. I like to confess that I picked dungeness crab on my very first date with my (now) husband, so if he can fall in love with me with crab juice dripping down my chin and crab meat wedged in my fingernails, then we’ll probably be fine when we’re 65.
Dungeness Crab
Dungeness Crab Mac-n-Cheese Serves 3-4
Ingedients
1/2 lb penne
Olive oil
1 cup heavy cream
1 cup shredded sharp cheddar cheese
1 cup shredded Gruyére cheese
1 tsp salt
freshly ground pepper
freshly grated nutmeg
1 Tbsp butter
1/4 cup chopped onion
1 large clove of garlic, minced
1 cup crab meat
1/2 cup white wine
1/2 cup Panko bread crumbs
1/4 cup grated Parmesan cheese
a few dabs of butter
Method
1. Prepare penne according to al dente package directions. When drained, toss with a bit of olive oil to keep it from sticking together while you prepare the other elements of the dish. Set aside.
2. Preheat oven to 350˚F.
It’s best if you work on steps 3 and 4 simultaneously. Read them through to see what I mean.
3. In a medium saucepan, slowly bring the cream to a boil. Allow it to thicken and reduce by half, watching carefully not to scald the cream or let it boil over. Turn off the heat and let it cool for about a minute. Then add the cheddar and Gruyére cheeses in small batches, incorporating each batch before adding the next. Try not to over stir the mixture as this could make it stringy. Halfway through adding the cheese, you can pop the heat back on low, but be careful to keep the heat as low as possible while still promoting the melting process. Heat that is too high will cause the cheese fats to separate from the proteins. If that happens, there’s no going back. After the last batch of shredded cheese is incorporated, add salt, pepper and nutmeg to the sauce. Turn off heat and let sit, stirring occasionally.
4. While the milk is simmering and reducing, (before you are melting the cheese into it) prepare the other part of the sauce: In a medium saucepan, melt the butter over medium heat. Add the garlic and onion and sautée until onions are softened, but not browned, about 4 minutes. Add wine and simmer to reduce wine by half, about 15 minutes. Add crab meat and continue to simmer until wine has reduced by half again. Remove from heat.
5. Stir the wine & crab meat mixture into the cheese sauce until fully combined. Spray a casserole dish with nonstick cooking spray. (You could also prepare this dish in individual serving-sized gratin dishes). Add pasta to the casserole dish and then pour the wine/cheese sauce over the pasta and toss to combine. Top with bread crumbs. Dab with butter and sprinkle Parmesan cheese across the top.
6. Bake for 20-25 minutes, or until bubbly. If the top is not browned by the end of the baking process, stick it under the broiler for a few minutes. Let cool for 5 minutes and then enjoy immediately.
Day 22 of 31 days of pumpkin and I am really moving out of my comfort zone now. I’ve never made gnocchi before, or any fresh pasta for that matter, but I was inspired by a beautiful cookbook I have, A16 Food + Wine, the cookbook for the restaurant A16 in the Marina district of San Francisco. It’s called A16 after the highway in Italy between Naples and Canosa. The book is a beautifully designed and photographed tome that I am just getting into, but when I spotted a recipe for Ricotta Gnocchi, I thought, “I could put pumpkin in that,” and that’s what I did. And it worked.
Choosing the sauce to go with pumpkin gnocchi was a no-brainer: it has to be a sage cream sauce. Pumpkin and sage, they’re like Abbot and Costello, Brad and Angelina, Click and Clack (you know, the Tappit brothers).
I got it into my head the other day that I just had to make marbled cupcakes. I don’t know why. I scoured the internet for techniques but in the end, I just invented my own. I needed to use what I had on hand in the pantry and I didn’t have any buttermilk or orange peel or almond extract or baker’s chocolate or lots of other things that the recipes were calling for. So I improvised. I made two batters: one was a version of Mark Bittman’s (again?!) Golden Layer Cake batter from How to Cook Everything and the other was a pre-packaged brownie mix batter to which I added an extra egg. The extra egg in the brownie batter made it light enough to co-exist with cake batter in a cupcake. I spooned the golden batter into the cups first then added a large dollop of chocolate brownie batter. Then I simply swirled a knife through with a circular and upwards motion. Once baked and cooled, I iced them with a basic butter cream frosting and added some sprinkles. I don’t have any cake decorating tools, so my icing job looks pretty amateur (at best), but I’m learning.
1. Cream the butter until smooth. Add sugar gradually and continue to cream for 3-4 minutes. Add the eggs, one at a time, incorporating each one completely before adding the next. Then beat in the vanilla extract.
2. In a separate bowl, combine flour, baking powder and salt. Alternate adding the flour mixture and the milk into the butter mixture, incorporating each completely before adding the next.
Chocolate Brownie Batter
1. Follow the instructions on the packaged brownie mix, but add one extra egg.
Assembling the Cupcakes
1. Preheat the oven to 350˚F. Spray two cupcake pans with cooking spray and insert paper cupcake liners.
2. Spoon in enough vanilla batter to fill about halfway up each cupcake liner. Then spoon in a heaping tablespoon of the chocolate batter. Take a knife and swirl it through the batter with an upward motion at the end. Don’t stir too much or the batters won’t remain delineated.
3. Bake in the oven for 25-30 minutes. An inserted toothpick should come out clean. Cool on rack. When completely cool, ice with a simple buttercream frosting.
Buttercream Frosting
1 stick butter, softened
1 lb package of confectioners sugar
1/4 cup milk (more or less)
2 tsp vanilla extract
1. Cream the butter. Alternate adding sugar and milk, beating everything to a smooth, creamy texture. Beat in vanilla. Adjust thickness by adding milk or sugar, but remember that putting it back in the refrigerator will also thicken it up.
My four-year old is a very picky eater. If he could have macaroni and cheese at every meal, he would. So I’ve taken to hiding healthy foods in the mac-n-cheese to ensure he’s getting enough nutrition. This version worked pretty well. If I were making it for myself, I would have used stronger cheeses like (you guessed it) Gruyére, and I would have added other punchy flavors like garlic or nutmeg. But I wanted this dish to go down without a fuss, so cheddar ruled the day.
I didn’t conceal from him the fact that I was concealing healthy foods in his macaroni and cheese. In fact, I enlisted his help during the broccoli and cauliflower grinding process. He loves to push the button. We used my new Cuisinart mini chopper. It’s a snap to pull out, use, and clean up.
Available at Amazon - Click here
My son
Broccoli Chopped in the Mini Prep
Macaroni & Cheese with Broccoli and Cauliflower Serves 4
Ingredients
1 1/2 cups broccoli florets
1 1/2 cups cauliflower florets
1 tsp olive oil
1/2 lb elbow macaroni
3 Tbsp butter
2 Tbsp flour
1 1/4 cup whole milk (or heavy cream to make it really decadent)
2 cups shredded sharp cheddar cheese (we had fun shredding ours in a vintage Mouli)
1 tsp salt
1/2 cup bread crumbs
1 Tbsp melted butter
Broccoli & Cauliflower sautéeing
Method
1. Preheat oven to 350˚F. Put broccoli florets into food processor and grind into teeny weeny pieces. Remove to a bowl. Repeat with cauliflower.
2. Heat olive oil in a skillet over medium heat. Add broccoli and cauliflower and toss. Basically, we’re browning these vegetables just a little bit to enhance the nutty sweet flavors they bring to the dish. After a few minutes, turn off the heat and leave for later.
3. Bring salted water to boil in a large pot and boil the macaroni. Since you’re going to be baking this dish, you can shave off a minute from the boiling time recommended on the package.
4. In the meantime, for the roux, heat the milk in a saucepan to almost boiling. Remove from heat for later. Melt butter in a heavy-bottom saucepan. Add flour and whisk continuously. Sautée flour for 3 minutes. Don’t let it brown or it will get bitter. Add the warm milk in a steady stream and whisk continuously. Simmer gently (no boiling!) until thickened, about 2 minutes. Add shredded cheese in small batches, incorporating each batch completely. Season with salt. Add broccoli and cauliflower and stir until well combined. At this stage, you have a kind of broccoli-cheddar cream soup. You could use this sauce for lots of different things. I put it over a baked potato and it was awesome.
5. Mix bread crumbs and melted butter in a small bowl.
6. To assemble, pour macaroni into a baking dish that has been sprayed with non-stick cooking spray. I used this small Le Creuset dish. Stir in the sauce, coating all of the macaroni completley. Top with the buttered bread crumbs. Bake uncovered for 25 minutes or until bubbly. If topping is not already browned, you can put it under the broiler for a minute at the end.
Le Creuset. Available at Amazon
Want to see a bunch more macaroni and cheese ideas? Check out this video collection at StreamingGourmet.com:
Looking for more broccoli recipes? Check out ComfyCook’s collection of Broccoli recipes collected from BSI participants around the blogosphere.
I confess. I was at Costco the other day. That’s where I found a 32oz clamshell of California blueberries for $6. I adore blueberries, so I bought them without a second thought. (Actually, I did check to make sure that they were grown nearby, which they were). I had recently also purchased pre-made pie crusts thinking I might make a chicken pot pie, but when I got home and saw them in the refrigerator, it was only a matter of minutes before I was putting them together with the blueberries in pie formation.
I’ll admit, I’m intimidated by making my own crust. I do do it, but on this busy day, the thought of being able to basically dump 2 lbs of blueberries into a pre-made crust and have a pie an hour later was totally satisfying.
I consulted my well-used copy of Mark Bittman’s How to Cook Everything to find a recipe. I was relieved to have the fresh lemon on hand that it calls for. I’ve also become a big fan of grating my own nutmeg with a microplane grater, by the way. So sure enough, my idea of making a pie really fast was going to become a reality with little stress or strain.
It’s funny. Now that I’ve watched so many of Bittman’s videos, I can hear his voice in my head when I read the instructions in his cookbook. It’s such a relaxed and reassuring voice, like, “Anyone can cook, and most everyone should.” (which is the first sentence of the Introduction to the 1998 edition of How to Cook Everything).
Blueberries
Ingredients
5 cups blueberries, picked over, briefly rinsed, and lightly dried
1/2 to 1 cup sugar, depending on your taste and the sweetness of the berries, plus a little for the top of the pie
2 tablespoons cornstarch or 3 tablespoons instant tapioca
Pinch salt
1/4 teaspoon ground cinnamon
Pinch ground allspice or nutmeg
1 tablespoon freshly squeezed lemon juice
1 teaspoon minced lemon zest (optional)
1 recipe Pie Shell for a Two Crust pie (I used Pillsbury pre-made shells)
2 tablespoons unsalted butter, cut into bits
Milk as needed
Method
1. Gently toss the blueberries with the sugar, thickener, salt, and spices. Stir in the lemon juice and optional zest and pile into the rolled-out shell, making the pile a little higher in the center than at the sides. Dot with butter. Cover with the top crust. Decorate the edges with a fork or your fingers, using any of the methods illustrated on page 686 (of How to Cook Everything). Refrigerate while you preheat the oven to 450˚F.
2. Place the pie on a baking sheet and brush the top lightly with milk; sprinkle with sugar. Use a sharp paring knife to cut two or three 2-inch long vent holes in the top crust; this will allow steam to escape. Place in the oven and bake for 10 minutes. Reduce the heat to 350˚F and bake another 40 to 50 minutes, or until the pie is golden brown. Do not underbake. Cool on a rack before serving warm or at room temperature.
It’s moving day for friends of mine and since they have four children aged 8 and under, I thought it would be nice to bring them dinner at the end of this stressful day. For a family of six plus a grandmother and an au pair, I knew that it would impossible to cook too much, so I decided to make a giant lasagna (and salad and bread). Raquel is health conscious and her children happily eat vegetables, so I decided to pull all of the health levers I could with this recipe: whole wheat pasta, lots of spinach, low-fat cheeses and of course, 99% fat free ground turkey. I made an extra one for my family and I can tell you, it tastes great. Even my picky 4-year old said, “Mommy. I like it.”