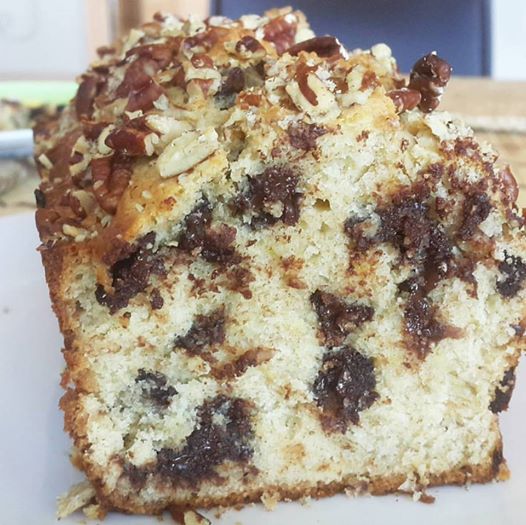
Now that it’s Fall, I’m back in the baking mood, mostly baking with pumpkin. But two sad, black bananas on the counter prompted this recipe today. It’s delicious and moist! Especially when still warm from the oven.
Cream the butter and the sugar. Add the eggs one at a time and beat until creamy. Add the two ripe bananas and beat until frothy. Add the vanilla. Stir in the dry ingredients until fully incorporated, but don't over mix. Stir in the chocolate chips.
Pour batter into prepared baking pan. Sprinkle chopped pecans on top. Bake for 50 - 60 minutes until golden brown on top. Let cool for 15 minutes before removing from the pan.
These are the lightest, fluffiest cupcakes ever. It must be the buttermilk, my new favorite baking ingredient.
Ingredients
3 cups all-purpose flour
1 Tbsp baking powder
1 1/2 tsp baking soda
1/2 tsp salt
2 tsp ground cinnamon
1/4 tsp ground allspice
1/4 tsp ground nutmeg
1/4 tsp ground ginger
1 1/2 cups sugar
3/4 cup (1 1/2 sticks) butter, softened
3 extra large eggs
1 can (15 ounce) pure pumpkin
1 cup buttermilk
Maple Frosting (recipe below)
1. Preheat the oven to 350°F. Line 24 muffin tons with paper and spray with cooking spray
2. Combine flour, baking powder, baking soda, salt, cinnamon, allspice n nutmeg, and ginger in a medium bowl and set aside. In the bowl of a stand mixer, beat the butter for 3 minutes until fluffy. Add eggs, one at a time, and combine each one well.
3. In a separate medium bowl, stir together the buttermilk and the pumpkin. In alternate batches, add the pumpkin and buttermilk mixture and the du ingredients to the butter mixture, combining well after each addition. Spoon batter into prepared cups, 3/4 of the way full.
4. Bake for 20 minutes or until a toothpick comes out clean. Cool for 10 minutes before removing from pan to cool completely.
Maple Frosting: Beat 1 1/2 sticks of softened butter. Add a large slug or two of Vermont Maple Syrup and 1 tsp of vanilla. Beat until blended. Gradually add 3 1/2 cups of powdered sugar, beating until creamy and fluffy. Add a tablespoon of milk if you need to soften the Frosting.
5. Put the Frosting into a piping bag or a ziplock bag with a corner cut off and pipe in circles into the cupcakes. Top with sprinkles.
This rich, chocolate cake is actually derived from a Weight Watchers recipe that takes advantage of low-fat buttermilk, egg whites, and dark chocolate to produce deep flavor with reduced fat. My problem with reduced-guilt dishes like this one is that it’s difficult for me to exert portion control, and the slight decrease in fat and calories is usually overcome by my propensity for eating the whole thing. Oh well. This moist, flavorful cake (without frosting, no less), was a delight.
Enjoy rich, flavorful chocolate cake without the guilt.
Author: StreamingGourmet/Amy
Recipe type: Dessert
Serves: 24
Ingredients
2 cups all-purpose flour
1¼ cups sugar
2 tsp baking powder
1 tsp baking soda
½ tsp salt
½ cup unsweetened cocoa - I used Hershey's
1.5 ounces semisweet chocolate, chopped - I used Scharffen Berger 70%
½ cup boiling water
1 cup low-fat buttermilk
⅓ cup canola oil
1 large egg
1 large egg white
1 Tbsp. vanilla extract
¾ cup mini chocolate chips - I used Nestlé Semi-Sweet Chips
Instructions
Preheat oven to 325˚ F. Spray a 10-inch Bundt pan with nonstick cooking spray.
In a medium bowl, mix the flour, sugar, baking powder, baking soda, and salt.
In a small, heat-proof bowl, mix cocoa and chopped chocolate. Pour boiling water over the cocoa mixture, stirring until chocolate is completely melted.
In a large bowl, whisk together the buttermilk, oil, egg, egg white, and vanilla extract. Then stir in (slightly cooled) cocoa mixture. Finally, add the flour mixture, stirring with a wooden spoon until just mixed. Fold in the chocolate chips.
Pour the batter into the prepared bundt pan. Bake for 45-50 minutes until a toothpick inserted into the center of the cake comes out clean. Let cool in pan for 10 minutes. Invert onto a serving plate and carefully lift off the pan. Let cool completely before dusting with powdered sugar (through a fine-mesh sieve).
Some of my readers may know that I started working at Common Sense Media early this year. Well, last week, I attended the annual holiday cookie swap for the first time, and there was one cookie that completely knocked me out. They were chocolate-pistachio sablés that had these salt crystals on top which made all of flavors jump right off the cookie. I had to find out who had brought these amazing a little treasures and what the recipe was. Well, parenting editor, Caroline Knorr had brought them and she happily agreed to do a guest post here on StreamingGourmet after I approached her about it. Thank, Caroline! – Amy/StreamingGourmet
Chocolate-Pistachio Sablés for the Annual Holiday Cookie Swap Caroline Knorr
The annual cookie swap at Common Sense Media is a festive — and dare I say — ultra-competitive event. We have so many talented bakers in our office that you really have to be at the top of your game to stand out. When I received my December issue of Bon Appetit, there were cookies on the cover, and I immediately pounced on the holiday baking feature, assuming that anything I chose from that section would attract attention.
I had actually made that issue’s caraway-rosemary shortbread a few times, thinking that I’d make them for the cookie swap, but though I loved them, I really wanted to make something chocolately for the party. I decided upon the chocolate pistachio sables partly because the recipe made A LOT — we have over 50 people in the office and my biggest fear is cookie shortage — and because the assembly was slice-and-bake logs and I thought it would be faster and more fool-proof than cutting shapes or doing drop cookies.
As for ingredients, I used Ghirardelli cocoa and bittersweet baking chocolate. I had to make a few substitutions because my grocery store didn’t have raw pistachios or maldon salt and the clock was ticking. I had to make do with roasted, salted pistachios in the shell and a sea-salt grinder. I was concerned that this combination would ruin the delicate interplay of salty and sweet flavors in the sables, so I compensated by sprinking on some coarse sanding sugar along with the salt.
The process was fairly simple once the logs were rolled. I was only able to chill them for about 3 hours, which was totally fine. I didn’t use a serrated knife, as the recipe specifies, because I discovered a sharp chef’s knife resulted in a cleaner edge. The only issue I ran into was that a few of the cookies were so crumbly when they came out, they fell right off the rack. That may have been due to the fact that I didn’t roll the logs tight enough — and that was because I didn’t want to make them too tough. No worries, though, my family was happy to eat the broken pieces!
On the day of the swap, I was still concerned that the cookies would be too salty for some tastes ( I loved them, though, but I LOVE salt). If you can find raw pistachios or at least unsalted ones, I would recommend using them or do what I did and sprinkle sugar on top along with the salt.
-Caroline Knorr
½ cup unsweetened cocoa powder (Ghirardellie or Hershey's Special Dark will work)
¾ tsp kosher salt (option if using salted, roasted pistachios)
¼ tsp baking soda
1¼ cups (2½ sticks) unsalted butter, room temperature
1¼ cups (lightly packed) light brown sugar
1 tsp vanilla extract
1 large egg white
5 oz. bittersweet or semisweet chocolate, chopped
1 cup unsalted, shelled raw pistachios, coarsely chopped
Flaky sea salt (such as Maldon)
Instructions
Sift together flour, cocoa powder, kosher salt, and baking soda in a medium bowl.
In the bowl of a stand-mixer, beat butter, brown sugar, and vanilla on high speed until light and fluffy. It will take about 4 minutes.
Gradually add dry ingredients while mixing on low just to combine.
Add egg white and mix on low to combine as well.
Fold in chocolate and pistachios with a spoon.
Divide dough into 4 pieces and roll each into a ball. Roll each piece into an 8”-long log about 1½” in diameter. If it feels crumbly, mush the dough together more firmly. Wrap tightly in parchment paper and chill until firm, at least 4 hours. (The colder your dough, the easier it will be to slice. If you're rushed for time, you can also use the freezer.)
Preheat to 350°. Working with 1 log of dough at a time and using a serrated knife, cut logs into ¼”-thick rounds and transfer to a parchment-lined baking sheet, spacing ½” apart.
Sprinkle cookies with sea salt and bake, rotating baking sheet halfway through, until set around edges and centers look dry, 10–15 minutes.
These Chocolate Espresso Brownie Cookies take things to a new level by bringing the fudginess and chocolatiness of brownies, to a cookie – and don’t forget the chips! Since these cookies have a higher ratio of chocolate to flour than average, the batter is not at all firm. You must use parchment paper, and basically spoon drop the batter (which will spread) onto the cookie sheet.
The softness of the cookies does make them more challenging than usual to remove from the pan once cooked, so allow them to cool first before even trying.
It’s all worth it for that melt-in-your-mouth, death-by-chocolate taste.
3 oz semi-sweet (62%-70% Scharffen Berger) chocolate, chopped into bits
2 cups semisweet chocolate chips (Guittard are great)
1 stick unsalted butter
3 eggs
1 cup + 2 Tbsp sugar
2 tsp espresso powder
¾ cup all-purpose flour
⅓ tsp baking powder
¼ tsp salt
Instructions
Preheat the oven to 350ºF.
In a double boiler (I put a pyrex bowl on top of a pan of boiling water), combine the chocolate, half of the chocolate chips and the butter, stirring until melted. Remove from heat and set aside.
In the bowl of a stand mixer, whisk the eggs, sugar and espresso powder on high speed until very thick, about 3 minutes.
Slowly add the melted chocolate mixture to the bowl, whisking just until combined.
In a separate bowl, mix the flour, baking powder and salt.
Add the dry ingredients to the wet ingredients and mix with a spoon until just combined. Stir in the remaining chocolate chips.
Spoon heaping tablespoons of batter about 2 inches apart onto a parchment-lined baking sheet. The batter will be looser than normal cookie dough batter and will spread a bit. Sprinkle with sprinkles. Refrigerate batter between batches.
Bake for 10 to 12 minutes, or until the cookies are cracked and puffed on top.
Remove from the oven and allow to cool before transferring to a platter.
For one, I’ve doubled the quantity so that you can use a larger pan (and make more at a time). The larger pan slows down the baking rate a bit, and I think helps keep everything moist. Also, this recipe calls one more egg than the average recipe. Eggs make batters more cakey, and normally, I wouldn’t want my chocolate brownie recipe to be too cakey. If it’s cakey, then it’s not fudgy, right? We’ll the balance of chocolate, butter, flour and eggs in this recipe seems to hit it just right. They’re fudgy and dark, but they hold together well.
One of the other secret ingredients in this recipe is the espresso powder. In the same way that vanilla functions, the espresso gives the chocolate flavor additional depth and complexity. It doesn’t make it taste like coffee, it just anchors the chocolate flavor.
Lastly,the chocolate chips give these brownies texture and additional chocolate umph.
Finally, the perfect chocolate brownie. High quality ingredients make the difference.
Author: StreamingGourmet/Amy
Recipe type: Dessert
Serves: 36
Ingredients
1½ cups all-purpose flour
½ tsp salt
2 Tbsp cocoa powder (I used Hershey's Special Dark cocoa powder)
8 ounces (2 sticks) butter
1½ tsp espresso powder
9.7 oz Scharffen Berger® 70% bittersweet chocolate baking bar, broken into pieces
¼ cup of Guittard® Real Semi-Sweet Chocolate Chips
1.5 cup granulated sugar
½ cup light brown sugar, packed
6 large eggs
2 teaspoon vanilla extract
1½ cup Guittard® Real Semi-Sweet Chocolate Chips
Instructions
Preheat the oven to 350⁰F. Spray a 9x13-inch rectangular baking pan with nonstick cooking spray.
Mix the flour, salt, and cocoa powder together in a bowl; set aside.
In a double-boiler (I put a pyrex bowl on top of a saucepan with boiling water, combine the butter, chocolate espresso powder and stir over low heat until all is melted and combined.
Take the chocolate mixture off the heat and add the sugars, mixing until combined.
Transfer the chocolate mixture to a large mixing bowl. Add the eggs, one at a time and mix thoroughly.
Add vanilla and stir to combine.
Add the flour mixture and stir just until blended. Gently stir in the chips.
Pour the batter into the sprayed pan and push the batter into the corners with the back of a spoon.
Bake the brownies for 35-40 minutes or until a toothpick inserted in the center comes out with a few moist crumbs. Do not overbake. Cool completely on a wire rack.
Now that it almost October, I’m starting to go pumpkin crazy again. This month’s issue of Fine Cooking features Holiday Pumpkin Desserts on the cover, and I was inspired by a Bundt cake featured inside. I adapted this recipe from that one, pumping up the spice a bit and making other little tweaks. The result is a moist flavorful pumpkin cake that was a hit at the church coffee hour this morning. Bundt cakes are so rewarding because they always come out looking great and aren’t that difficult to pull off. Powdered sugar is the perfect finish and a lot easier than frosting!
The filling includes crystallized ginger mixed in with the cream cheese and sour cream. Don’t skip it. It makes it have real zing. To finely chop it, I just dumped it in this MiniPrep:
And to grind the nutmeg, I used a microplane grater, like this one:
Pumpkin Spice Bundt Cake with Cream Cheese
Pumpkin Spice Bundt Cake With Peekaboo Cream Cheese Filling
12 oz. cream cheese, softened (1.5 packages of Philadelphia)
½ cup sour cream
½ cup granulated sugar
½ tsp. ground ginger
¼ tsp. salt
2 large eggs
1 tsp. pure vanilla extract
½ cup finely chopped crystallized ginger (I used a Cuisinart Mini Prep to chop mine)
2¼ cups unbleached all-purpose flour
2 tsp. salt
2 tsp. baking powder
1 tsp. baking soda
1 Tbsp. ground ginger
1 Tbsp. ground cinnamon
½ tsp. freshl ground nutmeg (I use a microplane grater)
½ tsp. ground cloves
1 15-oz. can pure pumpkin purée
1½ cups granulated sugar
¾ cup vegetable oil
4 large eggs
2 tsp. pure vanilla extract
Confectioners’ sugar, for dusting
Instructions
For the cream cheese filling:
In a stand mixer beat the cream cheese, sour cream, sugar, ginger, and salt on medium speed until well combined.
Add each egg, one at a time, beating after each addition until mixed thoroughly.
Chop the crystallized ginger in a Cuisinart MiniPrep. It will glom together because it's sticky, but don't worry. Once added to the cream cheese mixture, it will distribute.
Add the vanilla and the crystallized ginger to the cream cheese mixture and blend. Transfer to a bowl and set aside.
For the cake:
Preheat the oven to 350°F. Spray a Bundt pan generously with nonstick cooking spray.
In a separate bowl, mix the flour, salt, baking powder, baking soda, ginger, cinnamon, nutmeg, and cloves.
In the bowl of the stand mixer, blend the pumpkin, sugar, oil, eggs, and vanilla until smooth.
Add the ⅓ of the dry ingredients, and whisk until well blended. Then add another third and blend and repeat.
Fill the prepared Bundt pan with about half of the cake batter.
Stir the filling to distribute the chopped ginger.
Create a trough in the batter with the back of a large spoon and then try to pour the cream cheese filling into the trough. Don't worry if it spills over.
Spoon the remaining batter on top and spread to evenly over the top.
Bake until a sharp knife inserted to the bottom comes out clean, about 50 to 60 minutes.
Cool on a rack for 10 to 15 minutes and then invert onto a serving plate and remove the cake pan.
Cool completely.
You can refrigerate the plastic-wrap covered cake for up to 2 days.
When ready to serve, dust the cake with confectioners’ sugar.
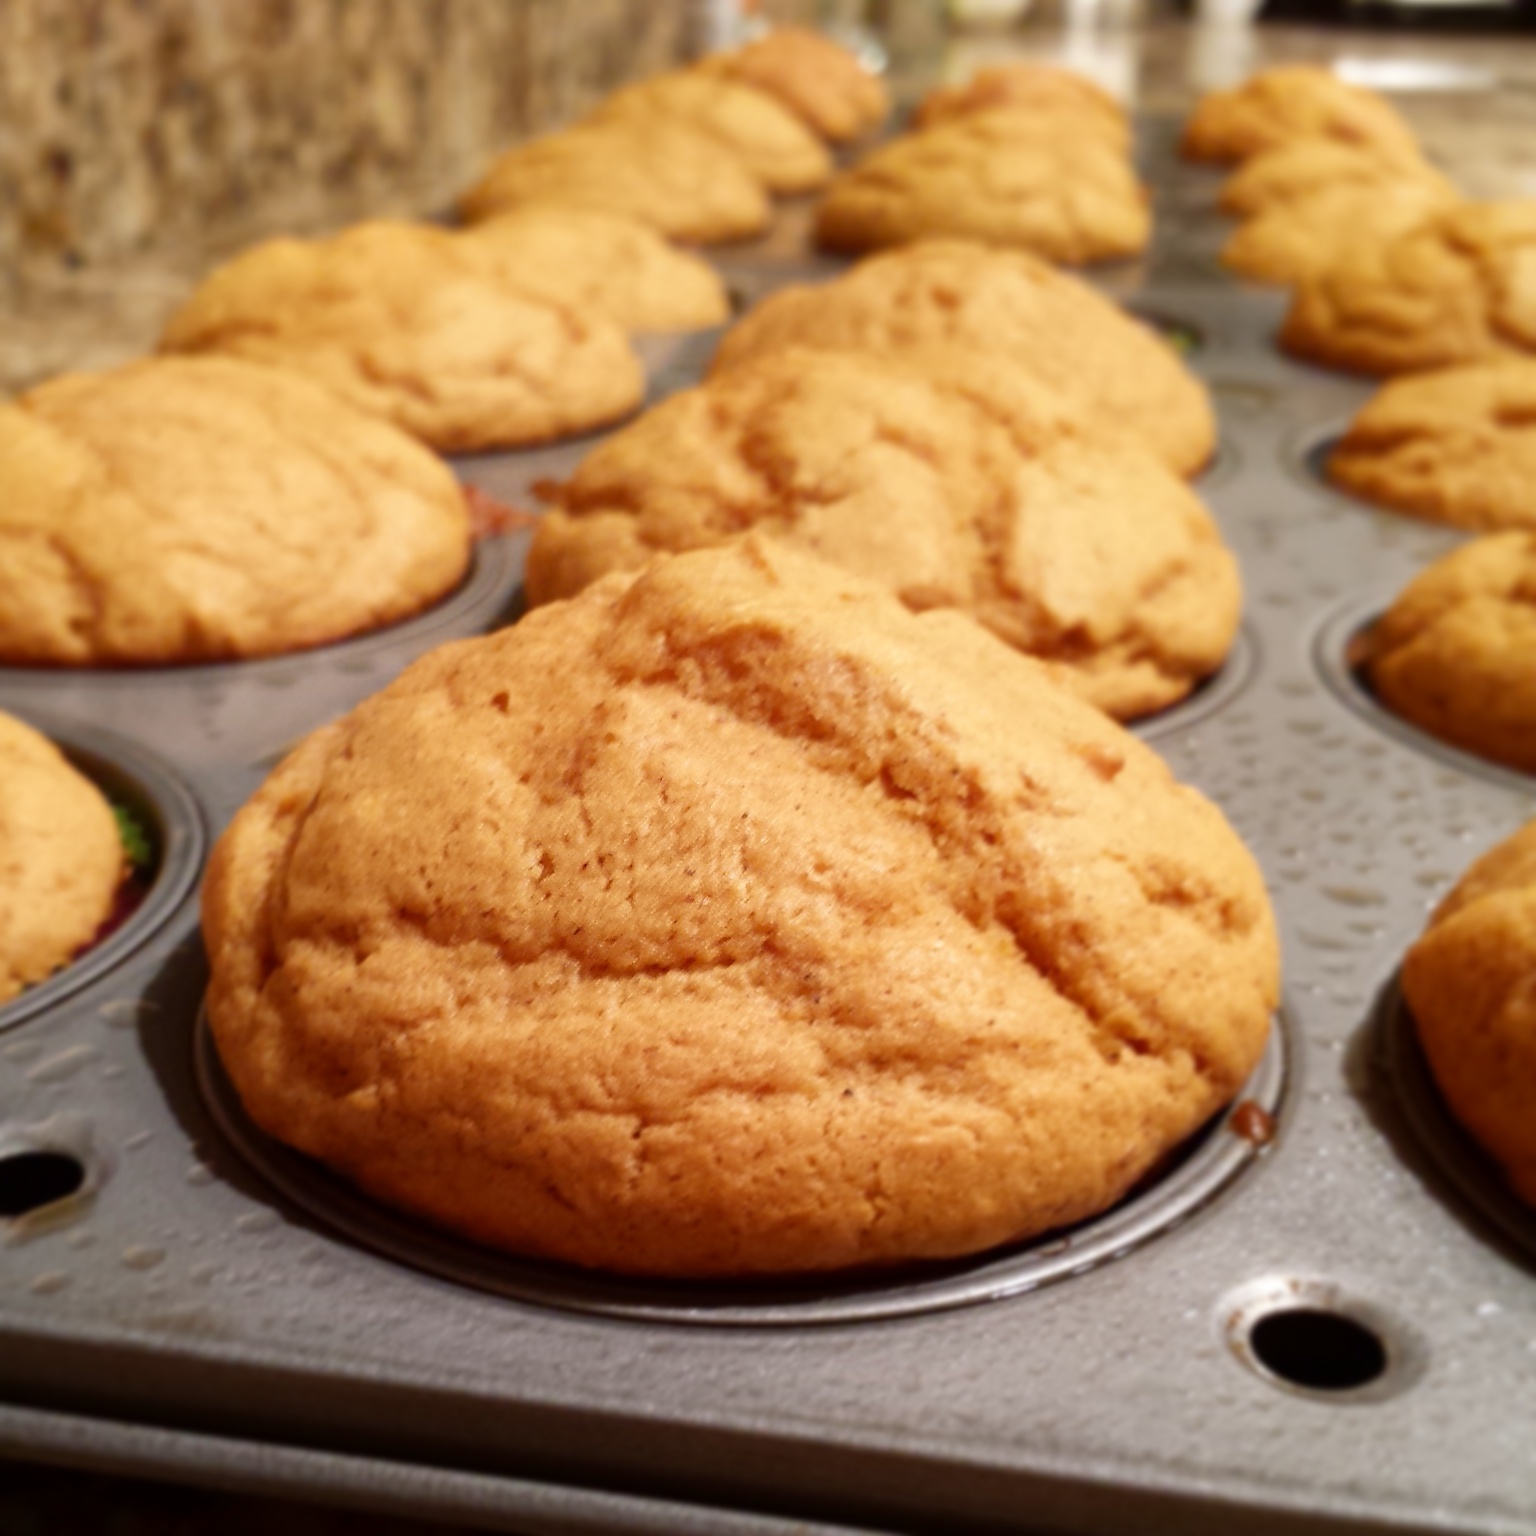
Fall is my favorite time of year and these cupcakes are just what I need to get in the mood. The shadows are lengthening and out here in San Francisco, the air is more humid than usual and it’s warmer. When I lived on the East Coast, the arrival of Fall was all about feeling a cold nip in the air. Here in San Francisco where the summers are freezing, it’s quite the opposite. The weather heats up as the leaves are turning brown.
Spiced Pumpkin Cupcakes with Cinnamon Cream Cheese Frosting
Preheat the oven to 350˚F. Line cupcake tray (24) with paper liners.
In a standing mixer, cream the butter, granulated sugar and brown sugar on high speed until fluffy.
Add eggs and vanilla and mix at a medium speed until well blended.
In a separate bowl, mix the dry ingredients. Add about a third of the dry ingredients to wet, alternating with the milk, until all are incorporated. Add pumpkin puree and mix well.
Fill cupcakes two-thirds full and bake for 18 – 22 minutes, or until a toothpick comes out clean.
Remove from oven and let stand for a couple of minutes. Then remove from muffin tin and let cool completely.
To make the frosting:
Let the cream cheese and butter soften before creaming them together on high speed with a mixer. Cream in the sugar, vanilla and cinnamon until smooth and light. Chill in the fridge overnight (or at least for a few hours) to let it set.
Spread on cupcakes and garnish with a pinch of cinnamon.
As summer draws to a close, it’s time to pause one last time and acknowledge the plum. All summer long, they have been a staple in my weekly CSA box and I have been thinking I must make an upside-down cake.
This one is particularly easy. I made it before work this morning while also packing lunches and preparing breakfast for my two kids. Slice the fruit and mix the batter. That was about it.
The great news is the cake come out light and fluffy and the plums work their own magic so the end result is delicious. I’ve added twice the normal amount of vanilla in this recipe which made the flavor of the cake really pop.
I can’t believe I haven’t already made carrot cake a million times, since I love to make Zucchini Bread, and of course, am always making Pumpkin Bread, but this is the fist time I’ve done a post about Carrot Cake. I like my carrot cake without raisins or nuts, so some will say that this is a stripped down version of carrot cake, but the flavor was great and it was moist too, so I’m sticking with this version.
I took a shortcut with the carrots and used a bag of shredded carrots I bought at the grocery store. I did pop the shredded carrots into my Cuisinart Mini Prep to make them even smaller, but it was super easy to start with the carrots already shredded.
To make the carrot with icing, I set a side two different reserves. One I added red and yellow food coloring to make orange and the other one, I added green. I put these into two sandwich bags and cut a little corner off. I squeezed the orange icing out back and forth to make a snaky carrot shape and then repeated for the green part.
No nuts. No raisins. This is a cakey carroty carrot cake.
Author: Amy Wilson
Recipe type: Dessert
Serves: 20
Ingredients
1½ cups vegetable oil
2 cups granulated sugar
4 eggs
2 Tbsp Pumpkin Pie spice
1 tsp salt
2 tsp baking soda
2 cups All-Purpose Flour
3 cups finely grated carrots
For the icing:
½ cup butter, softened
(1) 8-ounce package cream cheese, softened
¼ tsp salt
2 tsp vanilla
2½ cups confectioners' sugar
Additional milk as necessary
Instructions
Preheat the oven to 350°F. Spray a 9" x 13" pan with cooking spray (or two 9-inch round layer pans) .
Beat the eggs into the oil and then beat in the sugar, salt, and spices. Mix the flour with the baking soda, and stir in. Add the carrots and mix until just blended. Pour into the prepared pan(s).
Bake the cake(s) for 35 to 40 minutes, or until an inserted knife comes out clean. Allow to cool completely before frosting.
For the frosting:
Beat the butter and cream cheese together until smooth.
Add the salt and vanilla and beat in with the sugar.
Add a teaspoon of milk if the frosting is too stiff to spread; add additional sugar if it's too thin.