After completely overdoing it at the office cookie swap in December, I decided to pull myself together and start eating mindfully. I’m feeling a lot better and have even lost 10 lbs without feeling like I’m trying that hard. I’m eating super healthy foods in quantities that my body needs to not feel full. I’ve cut down on caffeine too and rarely have dairy or refined sugar. But I don’t feel deprived. I’m going to see how far this approach can take me.
I’ve turned to Pinterest to find new inspiration for recipes and have started a board called “Getting Healthy in 2014” Come follow along!
I decided to adapt the recipe for a dinner party I was planning that was going to be super healthy and have the theme of mustard running through all three courses.
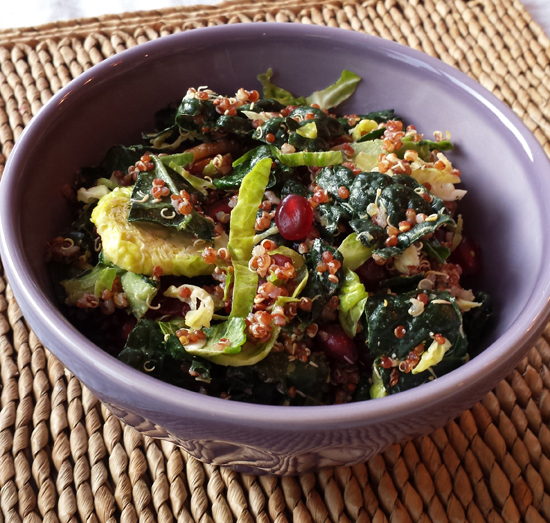
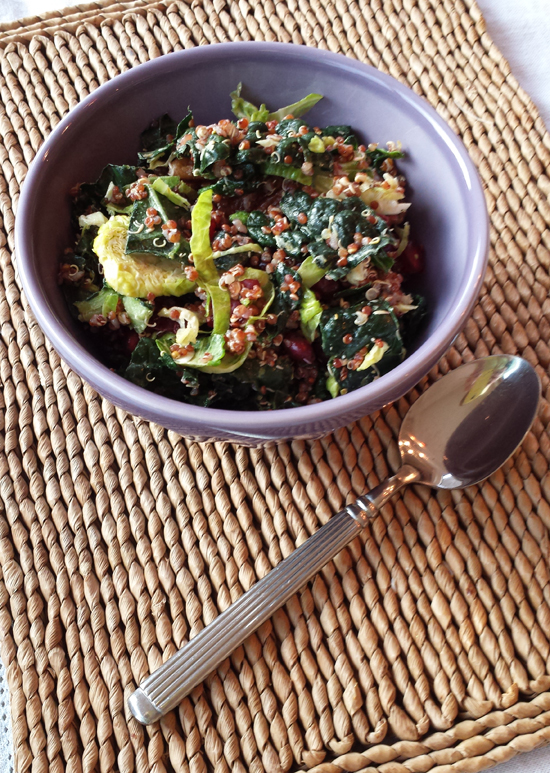
So here is my version. I added shredded Brussels sprouts and punched up the mustard flavor using both Dijon and whole grain mustard.
Quinoa, Kale, Pomegranate seeds! It's a superfood extravaganza.
Author: StreamingGourmet/Amy
Recipe type: Appetizer
Cuisine: American
Serves: 8-10
Ingredients
1 cup red quinoa
Sea salt to taste
4 Tbsp. extra virgin olive oil
Zest and juice of 1 lemon
1 Tbsp champagne vinegar
¼ cup Maille Dijon mustard
1 Tbsp Maille Old Style whole grain Dijon mustard
Salt and pepper to taste
1 10 oz bag of chopped Lacinato kale
About ¾ of a 10 oz bag of Trader Joe's shredded Brussels Sprouts
¼ cup dried cranberries
¼ cup roasted, salted pecans
¼ cup fresh pomegranate seeds
Instructions
Bring 2 cups of water or vegetable stock to boil. Add quinoa and simmer on low for about 15 minutes or until all of the liquid is absorbed. Remove from heat and transfer to a bowl for cooling.
In a really large bowl (the largest bowl you have), zest the lemon and squeeze out the lemon juice. Add the oil, vinegar and both mustards. Whisk vigorously until completely emulsified and smooth.
Add the quinoa to the bowl (when it's cool) and toss to coat.
Now add the kale, Brussels sprouts, cranberries, pecans, and pomegranate seeds and toss to coat completely. Allow this mixture to sit for several hours (in the fridge would be ideal) to soften the kale leaves and Brussels sprouts.
Enjoy. Can be stored in a sealed contained and enjoyed the following day as well.
As summer draws to a close, it’s time to pause one last time and acknowledge the plum. All summer long, they have been a staple in my weekly CSA box and I have been thinking I must make an upside-down cake.
This one is particularly easy. I made it before work this morning while also packing lunches and preparing breakfast for my two kids. Slice the fruit and mix the batter. That was about it.
The great news is the cake come out light and fluffy and the plums work their own magic so the end result is delicious. I’ve added twice the normal amount of vanilla in this recipe which made the flavor of the cake really pop.
Cajun Shrimp with CA Strawberry Salsa - Photo courtesy of CA Strawberry Commission
The California Strawberry Commission has been hosting events in both Northern and Southern California that feature strawberries in ways you’ve never imagined, like this recipe, created by Chef Rui Wang of Palihouse Courtyard Brasserie in West Hollywood, CA. Combining a smoky spice rub, with the a spicy-sweet strawberry salsa that packs a punch with jalapeño peppers, lime juice and even mint, this light, summer dish will keep your taste buds dancing.
Cajun Rock Shrimp with California Strawberry Salsa
California Strawberry Salad - Photo courtesy of the CA Strawberry Commission
Last week the California Strawberry Commission hosted an event for bloggers and food writers in San Francisco. Cheryl Sternman Rule was on hand discussing her amazing book, Ripe: A Fresh, Colorful Approach to Fruits and Vegetables. After the event, the CA Strawberry Commission shared recipes that I am privileged to share with you. One of my favorites is the California Strawberry Salad, a recipe developed by True Food Kitchen. True Food Kitchen is a restaurant with several locations in Southern California and Arizona. It was developed in partnership with Andrew Weil, MD and their goal is to make mouthwatering food that is also great for your health. I hope they have plans to move to the Bay Area!
A savory salad courtesy of True Food Kitchen and the California Strawberry Commission. Used by permission.
Author: True Food Kitchen and the California Strawberry Commission
Recipe type: Appetiser
Serves: 4
Ingredients
2 cups snap peas, cleaned
1 fennel bulb, diced
1 pint strawberries, washed and sliced
4 oz baby greens
3 Tbsp extra virgin olive oil, plus more for roasting
1 Tbsp agave nectar
1 Tbsp balsamic vinegar
1⁄2 cup goat cheese
1⁄2 cup toasted walnuts
Salt and pepper to taste
Instructions
Blanch the snap peas in salted boiling water for 30 seconds. Refresh in ice water immediately after cooking to lock in the bright green color and to keep from overcooking.
Lay out the fennel on a sheet pan. Season with olive oil, salt and pepper. Roast snap peas at 375 degrees for 10 minutes or until tender and caramelized. Remove from oven and allow to cool for 45 minutes.
Arrange strawberries, baby greens, blanched snap peas and roasted fennel in a large salad bowl. In a separate bowl, combine the agave nectar and balsamic vinegar with the olive oil to create the vinaigrette. Whisk until incorporated. Season to taste with salt and pepper.
Divide on four plates and drizzle vinaigrette over the salad. Top the salad with equal parts goat cheese and walnuts.
Strawberry Caprese Salad - photo courtesy of the California Strawberry Commission
Last week, the California Strawberry Commission hosted in an event in San Francisco highlighting strawberries and featuring Cheryl Sternman Rule, author of the new book, Ripe: A Fresh, Colorful Approach to Fruits and Vegetables. Ms. Sternman Rule is a Silicon-Valley based food writer who writes the amazing blog, 5 Second Rule. I am always inspired by her writing and her photography alike. If this blog is not on your radar screen, it should be. Add it to your list. Stat.
The California Strawberry commission generously shared some amazing recipes with me which I am excited to share with you, like this Strawberry Caprese Salad. What a great combination to mix the sweetness of strawberries with the tanginess of a balsamic reduction and the creaminess of Mozzarella. If it seems strange at first, don’t forget, tomatoes are fruit too!
I feel so lucky to live in California in the heart of Strawberry country. Did you know that California produces 88% of all of the strawberries in the US? We benefit from a year-round growing season. In Southern California, there is harvesting of strawberries in April, May and June as well as October, November and December. Northern California sees its peak growing season in late spring and early summer, but also continues to harvest into November.
To keep strawberries fresh once harvested, they are rushed to a cooling facility where the heat from the fields is drawn out quickly and then they are kept at 32˚F until they reach the market.
For more great strawberry recipes and recipes for everything else in your CSA box or in your bag from the Farmer’s Market, don’t forget to order:
A few weeks ago, a company called Full Circle reached out and offered me the opportunity to experience their CSA box delivery program free of charge for a brief period of time. They recently expanded into the Bay Area from Washington State and Idaho, and they wanted to give bloggers like me a chance to sample their new service. There was no requirement to review or purchase the product, but it is such a great service, I am happy to write about it here. In this week’s box, there were Santa Rosa Plums. I knew it was time to make Plum Clafoutis. More about that later. First, let me tell you about Full Circle Farms and invite you to enter a drawing to win one free farm box delivery from them! Details below.
Full Circle delivers a weekly box of local & organic fruits and veggies right to your doorstep. You can pick items from their artisan grocery list too – dairy, breads, pastas, grass-fed meats, coffee, jams and more. They started as an organic farm 15 years ago in North Bend, WA. Now, they’re CSA program has grown to serve thousands in the Northwest, Alaska and most recently, the Bay Area. They work with a bunch of the best organic and family farms on the West Coast. When I check my front step on Wednesdays, it feels like Christmas morning.
Santa Rosa Plums
If you’d like to have fresh, organic produce delivered to your doorstep too, enter “STREAMINGGOURMET’S 1 FREE FARM BOX FROM FULL CIRCLE GIVEAWAY” Entries could include: a TWEET, a FB share, a PIN, a Google+, or a BLOG POST. All entries must link back to this post. LEAVE A COMMENT at the bottom detailing your entries and you will be entered into the drawing. The DEADLINE is Sunday, August 12 at midnight PDT. To win, you must reside within one of Full Circle’s Delivery Areas.
If you are the winner, you will be contacted by email, and given a coupon code to enter during the registration process on the Full Circle website. We will also announce the winner on FB and Twitter. You will be under no obligation to purchase any items from Full Circle. (Credit card required at signup. Membership required through online registration, automatic renewal unless cancelled.) So starting sharing and comment below to enter! The more ways you share, the better your chances of winning.
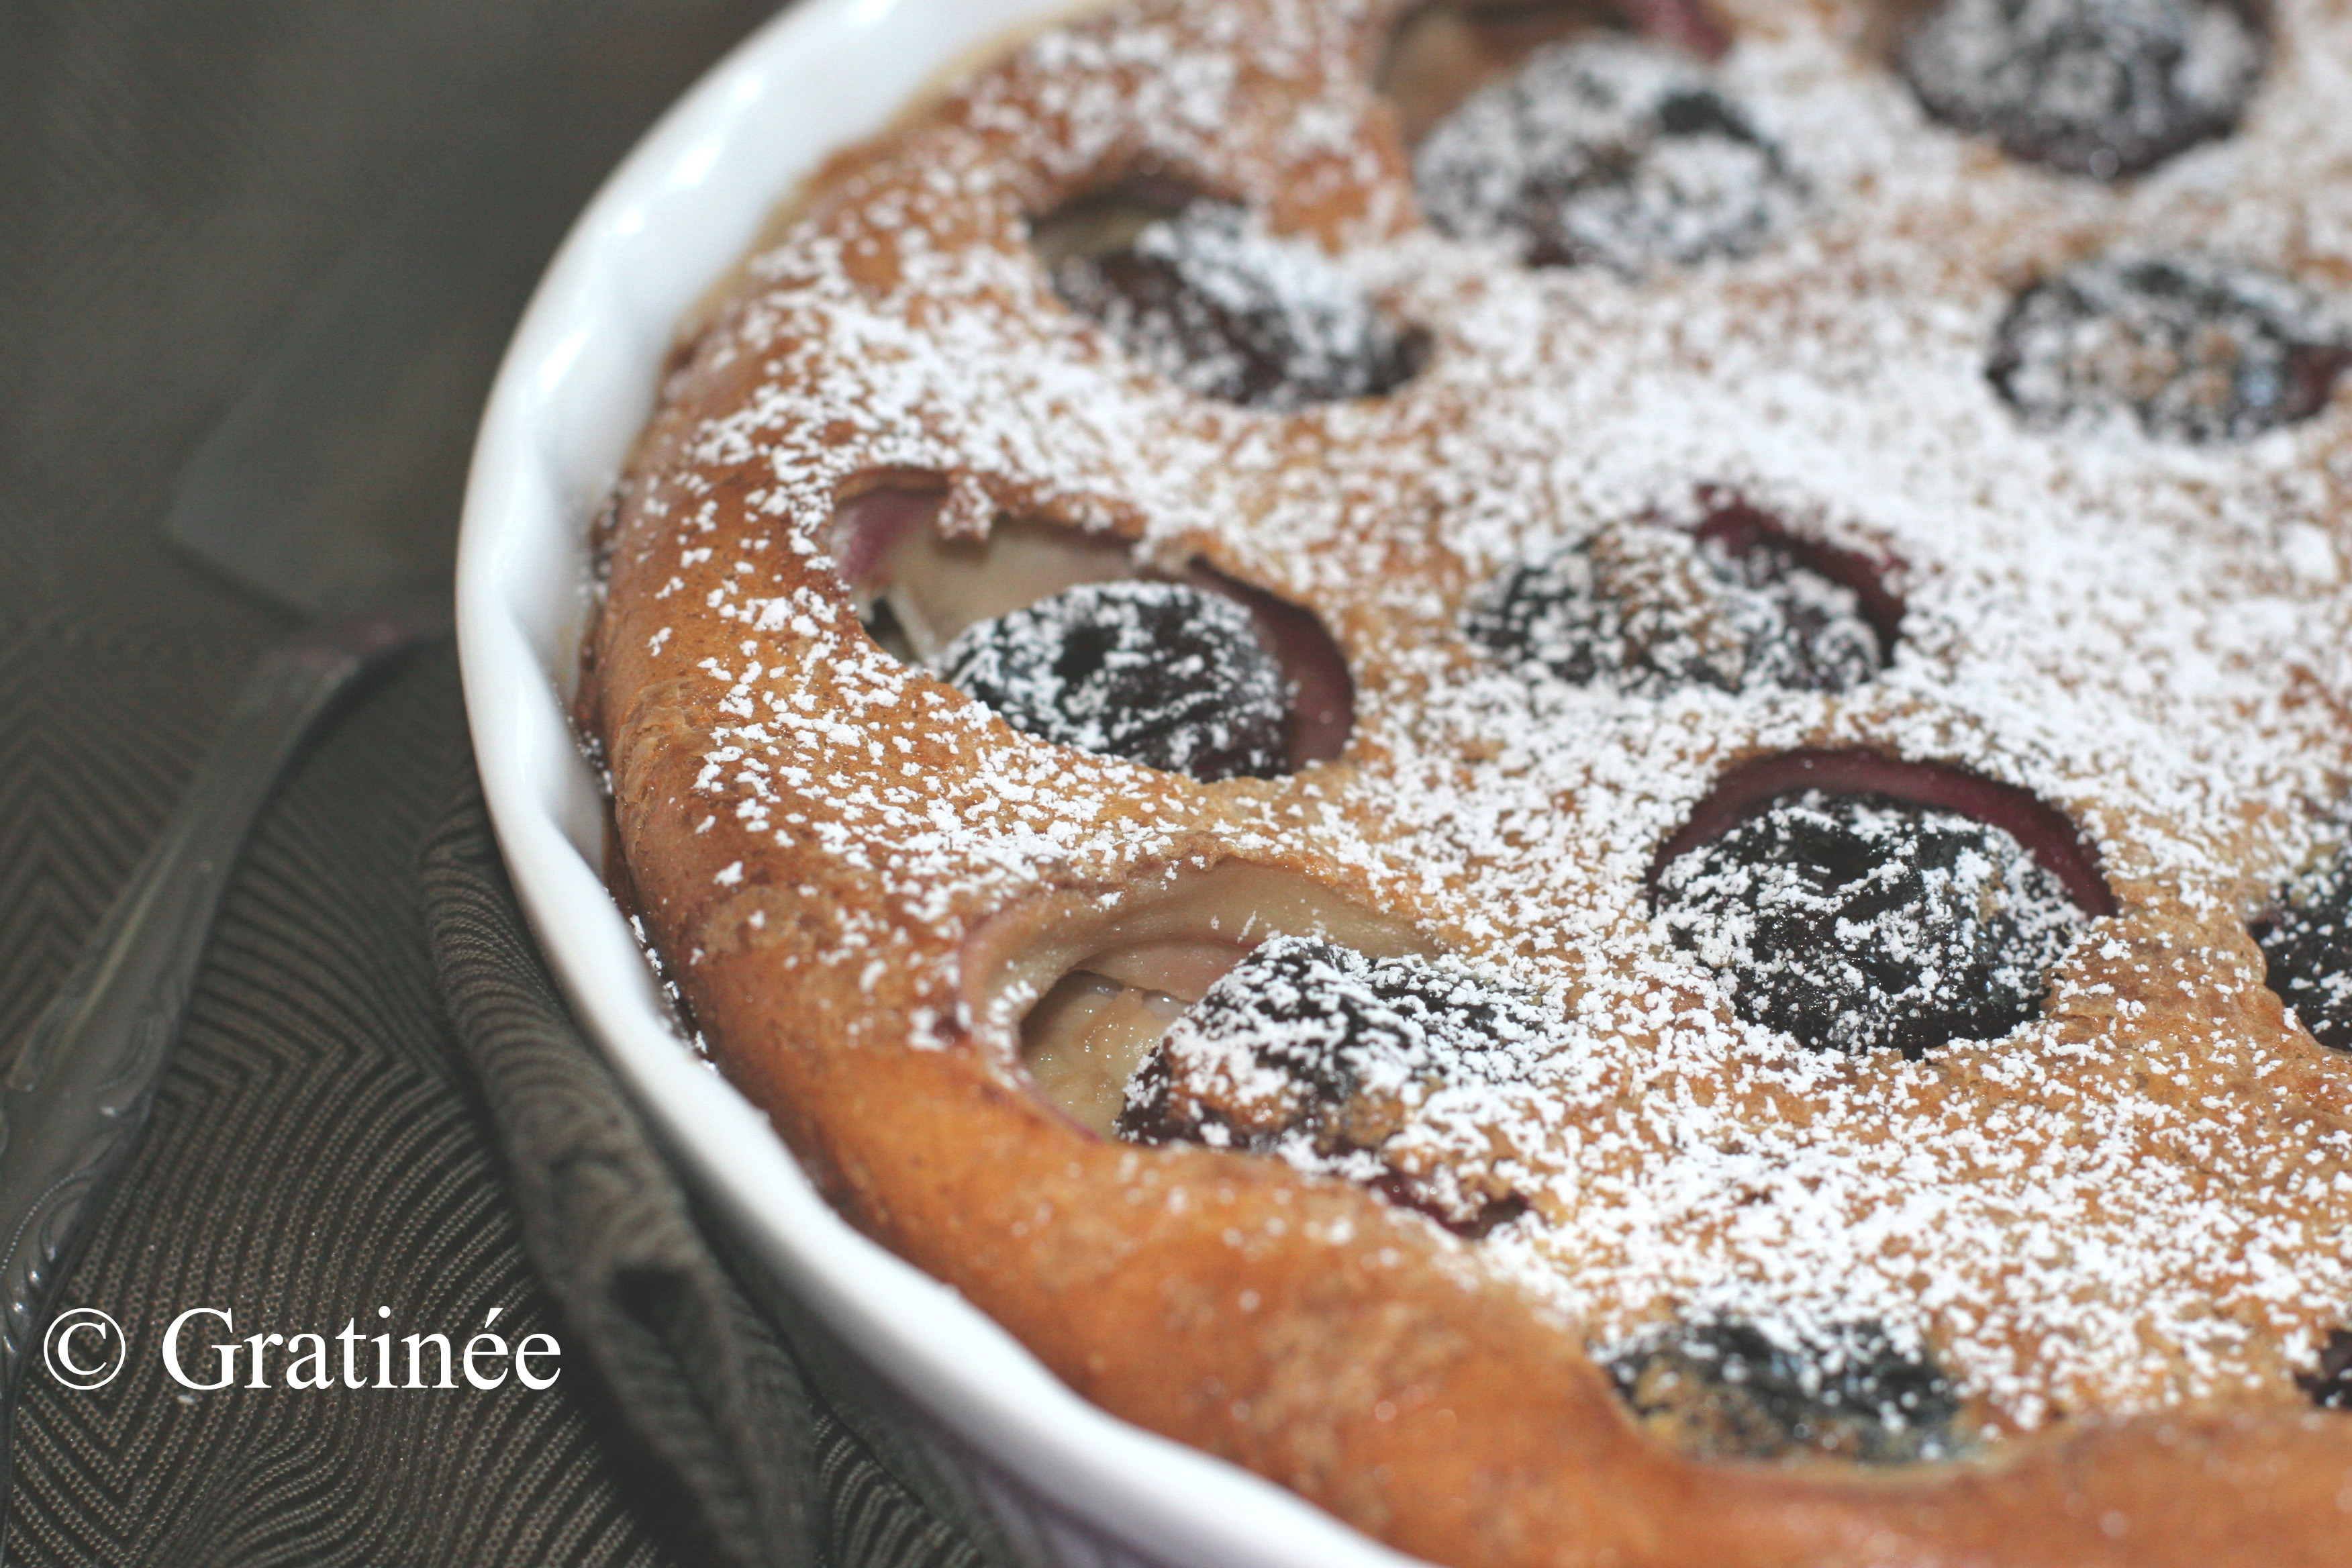
And when you get your box, if plums are still in season, you just might want to make this classic French dessert, Plum Clafoutis. It’s like a custardy cake. Or is it a cakey custard? I like mine particularly eggy, so this one is more like a cakey custard. For extra oomph, you could do what Julia Child would do and soak your plums in cognac first, or I like the idea of soaking them in Cointreau, a French liqueur with orange overtones. I didn’t have any Cointreau on hand, so I went without and it still tasted great. Make sure you eat the clafoutis soon after it leaves the oven. Because it has certain soufflée qualities, it’s just not the same the next day.
The classic French dessert, not too sweet and just right for a summer's CSA box full of plums.
Author: Amy Wilson
Recipe type: Dessert
Serves: 8
Ingredients
6-8 Santa Rosa plums (or any variety of plum or stone fruit)
1 Tbsp of sugar
1-2 Tbsp butter
5 large eggs + 1 egg yolk
¼ cup of sugar
1½ cups milk (I used 2%)
2 tsp vanilla extract
1 cup all-purpose flour, sifted
Powdered sugar
Instructions
Preheat the oven to 350˚F. Spray a 9x12 baking dish with non-stick cooking spray. Slice the plums in half and remove the pits. Place the plums in the pan with the skin side down. Sprinkle with the sugar and dot with a little butter on each one.
In a stand-up mixer, beat the eggs for about 2 minutes until they start to get stiff. Add the sugar and beat until sugar is nearly dissolved. Add the milk and vanilla and whisk to combine. Add the sifted flour and whisk to combine. Do not overmix.
Pour the batter over the plums. Bake in the oven for about an hour. The batter will puff up and then start to brown. When it is golden brown on top, it's done.
After the clafoutis has cooled a bit, dust it with the powdered sugar and serve. Clafoutis is best eaten right out of the oven! Serve with vanilla ice cream for a extra punch.
On a trip to Delaware in early June, I had the privilege of observing the process of harvesting and freezing peas with Delaware Department of Agriculture Secretary, Edwin Kee. We toured a pea farm near Milford and the PictSweet pea freezing and packing facility near Bridgeville. Mr. Kee explained that peas are a cool weather crop. They are planted in February/March and harvested in early June.
On this early June day, Delaware is abuzz at how amazing the pea yields are this year. Pictsweet tells us they are on track to harvest over five and half million pounds of peas in Delaware this spring. That’s right. 5.5 million pounds. They are pulling in peas at a rate of 3,500 lbs/acre. That’s the best pea yield in Delaware 10 years. The long, cool spring which featured a warmup in the middle hit it just right.
Pea Harvest Time in Delaware
What do you do when you’re pulling 3,500 lbs of peas off of every acre? You quickly transport them to the freezing plant for sorting, grading, washing, washing, more sorting, more washing, blanching, flash freezing and storing. Peas typically move from field to frozen in 4-6 hours. Can you believe it? 4-6 hours. I’ve always heard that frozen is more fresh than fresh. Now I know what that means.
The equipment involved in moving millions of pounds of peas in just a short harvest window would blow your mind.
Pea Harvester
1) First there is the harvester. This machine can also operate as a lima bean harvester. Each one of these harvesters will set a farmer back about $400,000 and there were 3-4 of them working this field this afternoon. It doesn’t just pull the pea shoots up off of the floor of the field, it sucks them up, rotates them in a drum, beats on them at just the right pressure to make the peas pop out of their shells and diverts the shoots away from the peas to dispose of them on the ground. It preserves the shelled peas which are then transfered to a large dump truck headed for the processing plant.
Tenderometer
2) The next piece of equipment the pea encounters is the tenderometer. That’s right a tenderometer. Once the peas arrive at the plant, the size and tenderness of the peas are measured to determine their maturity and their value. The price paid to the farmer is decided here. In the grading room, one by one, a few shelled peas are put into a Tenderometer for measuring. Invented at the University of Maryland after World War II, the device literally measures how tender the peas are. Tender peas that are the right size get frozen. Starchier, stiffer peas might go to canning where they will hold up well during the canning process. Once the price is determined, the entire truckload gets dumped onto a conveyor belt outside the plant and the processing begins.
Pea Processing Line - Photo courtesy of alibaba.com
3) Up next: The sorting and washing starts on the pea processing line. I was not permitted to photograph this part of the tour, but the Pea Processing Line pictured above is for sale at a farm equipment website called http://alibaba.com. It resembles what I saw.
This line starts right at the outside of the building where the drucks drive in and dump their loads and then the line snakes through the building and continues to get more and more refined. Peas are moving a mile a minute along these conveyor belts and the machinery is loud. Employees where hair nets and protective equipment for their ears. Mr Kee explained that when he was a young graduate student, 30 years ago, working on improving the tenerometer, he would stop by the plant and their would be 75 people working the line. Now it takes only about 25 people. The machinery has replaced the need for humans to do any of the manual sorting of the peas.
Optical Sorter
4) The next piece of hi-tech equipment on the line? The Optical Sorter. You won’t believe what this machine is capable of doing. Peas fly through this machine at incredibly high speeds. Peas that don’t deserve to make it into a PictSweet frozen bag of peas must be sorted out. In the early stages of the line, they are more crudely bumped out, sifted out or blown out, but once inside, the sorting must get more precise. This device takes an individual picture of every pea (there are billions going through in a day) and in the time it takes the pea to enter the scan area and get photographed, the machine is able to send a signal so that peas that are the wrong size or blemished in some way are blasted with a precise laserlike blast of air. That blast of air kicks that singular pea out while allowing the rest to pass through. Did you get that? Photo, signal, air blast, bad pea gone.
The rest zoom on their way through wash after wash, a quick steam bath at about 210˚F for 2-3 minutes, then more washing and finally flash freezing. At this plant the peas are put into large, 3ft. by 3ft. plastic lined cardboard boxes and stacked in a warehouse for storage. They aren’t put into the consumer size bags you see below at this plant. They wait until they are ready for distribution at retail grocery stores before packing them in the consumer sized bags.
The frozen pea storage warehouse reminded me of winery caves, because there were rows and rows of stored product that stretched into the distance. Each box is barcoded and the field of origin and date of processing are recorded.
PictSweet Peas
Vegetables make up about 6% of Delaware Agricultural revenue. The highest portion of revenue comes from the Poultry Industry which makes up 74%. Vegetables grown for processing (freezing and canning) earn Delaware farmers about $28,000,000/year and use about 30,000 acres of land. Before canning, freezing, and distribution technology existed at scale, farmers had no incentive to grow more produce than their families could consume. It’s only through these distribution channels and preserving technologies that farmers could produce excess and earn a profit. The last ten years have brought consolidation in the industry and there are now only 4 vegetable processing companies left in Delaware. PictSweet is one and it processes more than just peas. A national company, they are sourcing product from Tennessee, California and elsewhere, but in Delaware, in addition to peas, they are processing lima beans, corn and green beans.
To learn more about the Pea Production in Delaware, I invite you to read this article published by the University of Delaware: Pea Production for Processing on Delmarva.
Some of my favorite Pea Recipes. Click on the photo to be redirected to the recipe.
Tagliatelle with PeasCreamy Fettuccine with PeasFresh Peas with Basil and MintFingerling Potatoes with Peas and TarragonSpring Risotto with Peas, Ramps, and AsparagusNew Potato and Pea Frittat
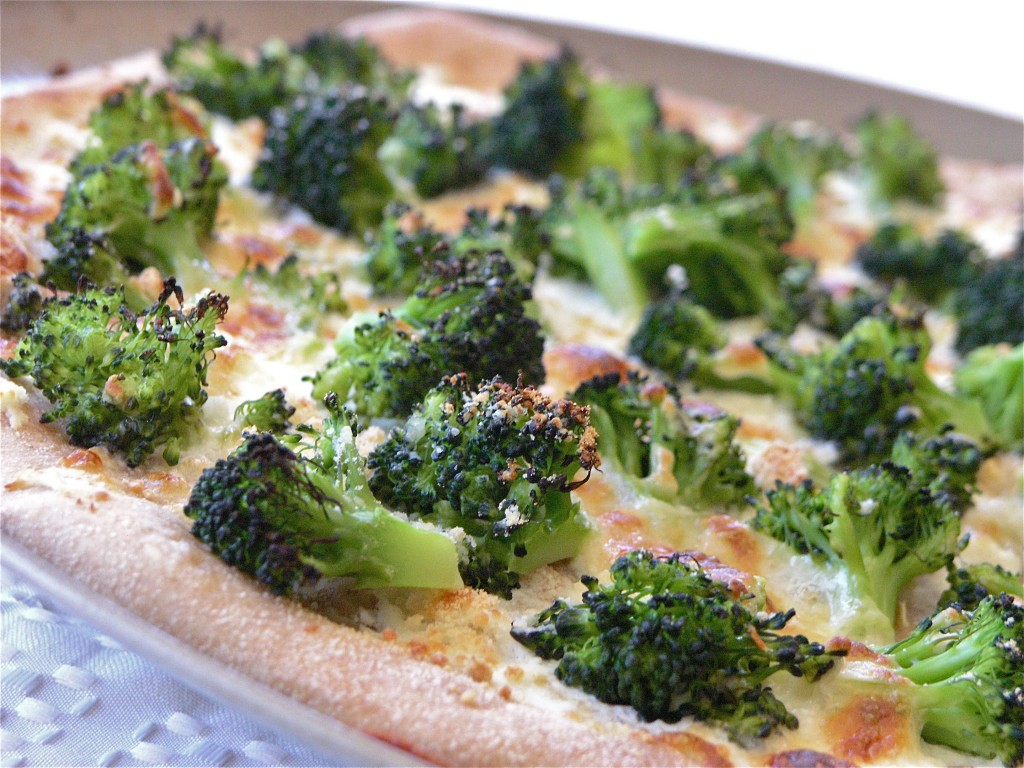
I must admit. I am a total broccoli addict. I eat broccoli every day. Roasted. Steamed. With cheese melted over it on a potato and this way: on a white pizza. This is pretty guilt free. As long as you don’t eat half the pizza, like I sometimes do. But because low-fat ricotta stands in for most of the cheese, the calorie count on this dish is not terrible.
I was first introduced to white pizza in college outside of Philadelphia. Renato’s in Swarthmore used to make an awesome pizza with ricotta, Mozzarella, and lots of garlic. I’m pretty sure there was broccoli on that one too. So basically, I wanted to recreate that pizza here.
I’ve been eating this broccoli pizza almost once a week for about a month now, so I figured it was time to do a post.
I use freeze-dried garlic in this recipe, because it’s so much faster to just sprinkle it over the pizza, than it is to chop fresh garlic. The flavor is great. I don’t miss the fresh garlic at all. I use Litehouse brand, but you can find this other brand at Amazon:
You can make the crust yourself, as I used to do a lot (I just realized I’ve never posted by pizza dough recipe, which is weird), but lately, I’ve just been buying whole wheat pizza dough at the grocery store. Mollie Stone’s now carries Il Fornaio pizza dough in the frozen section. It tastes just like my homemade version, so I’ve been hard pressed to go to all the trouble of making it from scratch. Just make sure that you let the dough sit out long enough to come to room temperature, because if you’re not careful, you can run into the problem of having the toppings cook before the dough is ready, and then it just sticks to the pizza pan like crazy.
To help with making sure the pizza doesn’t stick, I use a nonstick, perforated pizza pan like this one available at Amazon.com (just click on it). I also spray it with a little nonstick spray:
2 heads of broccoli, chopped into florets (about 3 cups)
1 Tablespoon freeze-dried garlic
¾ cup reduced fat ricotta cheese
½ cup shredded part-skim Mozzarella cheese
Salt to taste
Instructions
Preheat the oven to 500˚F
If you have purchased frozen pizza dough, make sure it thaws overnight. Then let it rest on the counter for at least 20 minutes before shaping it into a pizza.
While the pizza dough is resting on the counter, you can steam the broccoli. Put the florets in a medium saucepan with 2 cups of rapidly boiling water. Steam for 3-4 minutes. Watch carefully. When the broccoli is ready, it will be bright green still, and tendercrisp. It is better for it to be undercooked than overcooked. Remove from the heat and drain completely. Then rinse with cold water to stop the cooking process and drain again. Pour the broccoli out onto some paper towels. You don't want to transfer any water to the surface of the pizza.
When you are ready to shape the dough, put a couple of tablespoons of flour (semolina or wheat) onto a large cutting board. Coat the dough ball with the flour. Flatten the ball into a disc. Then with your fingertips, work your way around the edges, stretching it all out as you go. Put your fist in the middle of the growing circle and let the sides stretch down. Move your arm up and down to help it stretch out. Then work your fingers around the edge of the circle one more time.
Spray the pizza pan with a little nonstick cooking spray and spread the circle of dough onto the pan. With the back of a spoon, spread the ricotta evenly over the pizza. Then sprinkle with the dried garlic. Arrange the broccoli pieces over the surface evenly. Sprinkle with the Mozzarella. Season with salt.
Bake in the oven for 10-15 minutes. Watch carefully. If the cheese starts to brown too quickly (before the crust has had a chance to brown), back off the heat a little bit. When the cheese and the crust are just starting to brown, remove from the oven and let cool for 2 minutes. Then slice and serve immediately.
Cinqo de Mayo is just around the corner and we’re getting ready by enjoying California Avocados – back in season and perfect for bringing together your favorite Mexican flavors – lime, cilantro, and… avocado. Yum.
This shrimp tostada recipe, a light and healthy dish perfect for a weeknight or for a dinner party, was shared with us by the California Avocado Commission and was created for them by chefs Mary Sue Milliken and Susan Feniger, aka, the Too Hot Tamales of early Food Network fame. Known also for their fabulous Santa Monica restaurant Border Grill, the Too Hot Tamales have been partnering with the California Avocado Commission for some time now to bring fresh, flavorful, avocado forward dishes to all of us. Enjoy!
Bold flavors come together in this fresh take on the shrimp tostada
Author: Recipe created by chefs Mary Sue Milliken and Susan Feniger for the California Avocado Commission
Recipe type: Entrée Salad
Serves: 4
Ingredients
¾ cup beer
3 bay leaves
½ tsp. celery seeds
½ tsp. cayenne
½ tsp. salt
½ lb. domestic, wild-caught jumbo shrimp, peeled and cleaned
2 ripe, fresh California avocados, seeded, peeled and cut into ½-inch dice
1 Roma tomato, finely diced
¼ cup finely diced red onion
1 small carrot, peeled and finely diced
1 jalapeño, stem and seeds removed, finely diced
½ bunch cilantro, finely chopped
1½ limes, juiced
3 Tbsp. extra virgin olive oil
Salt, to taste
Ground black pepper, to taste
Canola oil, for frying
4 (6-inch) corn tortillas
4 romaine lettuce leaves, finely julienned
Instructions
Combine beer, bay leaves, celery seeds, cayenne and salt in a saucepan and bring to a boil. Add shrimp and cook 2 to 3 minutes, or until just turning pink and cooked through. Remove shrimp from liquid, cool to room temperature, and cut into ½-inch dice.
In a large bowl, combine cooked shrimp with avocado, tomato, onion, carrot, jalapeño, cilantro, lime juice, olive oil, salt and pepper. Stir gently, taste, and adjust seasonings as necessary. Chill thoroughly.
Meanwhile, pour oil to a depth of ½-inch in a small pan for frying. Fry the tortillas on both sides until crisp and drain on paper towels.
To serve, divide julienned lettuce evenly between each crispy corn tortilla. Top with avocado shrimp mixture and serve immediately.
Notes
I substitute ¼ cup shredded carrots (in the bag) for the diced carrots in this recipe and I leave out the celery seeds.
Blueberries are in season and therefore, they’re on sale at Trader Joe’s for just $6.99 for a 2 lb basket. Time for cobbler when that happens.
I wanted to see if I could toss a bunch of fresh blueberries into pie plate with as few other ingredients as possible and come out with a tasty cobbler half an hour later. The answer is yes. Yes I can.
I use less sugar and butter in this recipe than most recipes out there, because I know that these berries can stand on their own. And I don’t stew them first, because I want them to maintain their structure. You can see in the photograph that the berries are still berries. That’s just how I like it.
See if you like it too. Subtract some berries and add peaches if you’ve got those lying around too.
Blueberry Cobbler: Fast, Fresh and Easy Serves up to 9
Ingredients
2 1/2 cups Bisquick baking mix
2/3 cup reduced fat milk
4ish cups fresh blueberries
1/4 cup of sugar
2 Tbsp butter, cut into little pieces
Method
1. Preheat oven to 400˚F.
2. Put 3.5 – 4 cups of blueberries in a pie plate. Sprinkle 1/4 cup sugar (or a little more to taste) over the berries. Sprinkle the slices of butter around, evenly, on top of the berries.
3. If the oven is ready, put the pie plate with just the blueberry mixture into the over for 10 minutes to get the mixture heated through.
4. While berries are heating, mix together the Bisquick and the milk and stir until dough forms. Let sit for remaining time. (No kneading, no rolling – these will be like drop biscuits on top).
5. Remove berries from the oven at the end of 10 minutes. Increase the oven temperature to 425˚F. Drop the biscuit dough on top of the blueberries, trying to drop 8 dollups in a circle plus one in the middle. Bake uncovered for an additional 15 minutes or until biscuits are golden brown.
Serve immediately, if possible. Also sits well in the oven at low temperature. Cobbler is great with a scoop of vanilla ice cream too!