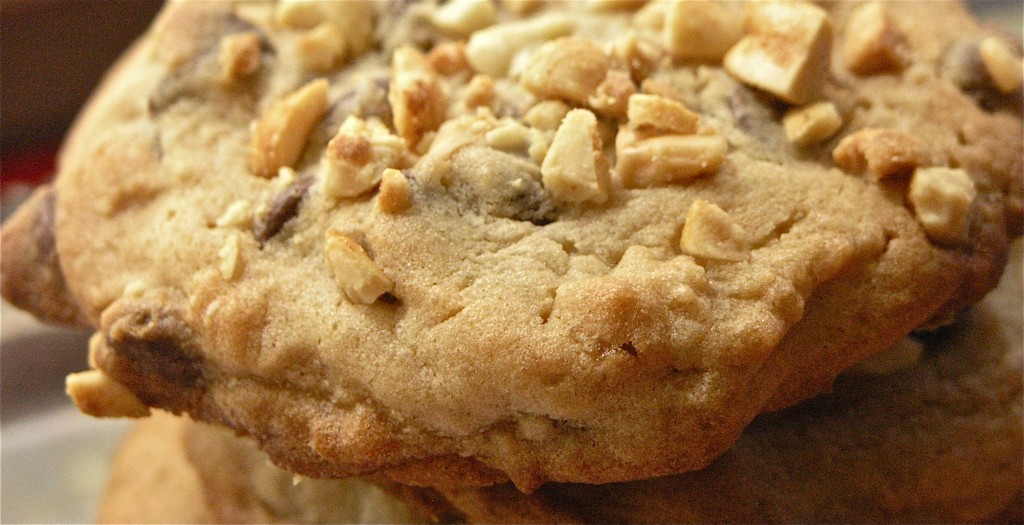
May 15 is National Chocolate Chip Day. What better way to celebrate than to enjoy classic drop chocolate chip cookies with a peanut butter twist.
Tips and tricks for getting great chocolate chip cookies
1) Make them large. When they are large, the edge can be crispy while the center is still soft. That’s how I like them.
2) Don’t forget the vanilla. It seems like an ingredient of little importance, but vanilla adds depth to chocolate chip cookies (peanut butter otherwise) and without it, they seem flat
3) Don’t open the oven door while they’re cooking, but check on them through the window. You don’t want the temperature in the oven to drop, but near the end, you’ve got to watch so that they don’t over-brown.
4) For these cookies: Creamy peanut butter or chunky peanut butter. It’s up to you!
5) Use big, disc-shaped chocolate chips, like the ones made by Ghiradelli:
Remember that 80’s commercial for Reese’s Peanut Butter cups?
In an electric mixer, cream the butter and sugars until fluffy. Add peanut butter and beat until fully incorporated.
Add the eggs, one at a time and beat until each is well blended.
In a separate bowl, combine the flour, baking soda and salt. Add the dry ingredients in 3 batches, mixing with a spoon until fully incorporated. Stir in the chocolate chips and vanilla.
Drop in large tablespoons onto a cookie sheet. I was able to fit about 8 cookies on each cookie sheet.
Spoon a little bit of the crushed nuts onto the top of each cookies and press gently with your fingers.
Bake for 10-12 minutes. Watch closely near the end. The edges should just be browning and the middle will appear a little soft.
Remove and let cool for a couple of minutes before transferring to a plate or cooling rack.
Notes
Makes 4 batches of 8 cookies. Takes 40 minutes if you cook the batches one after the other.
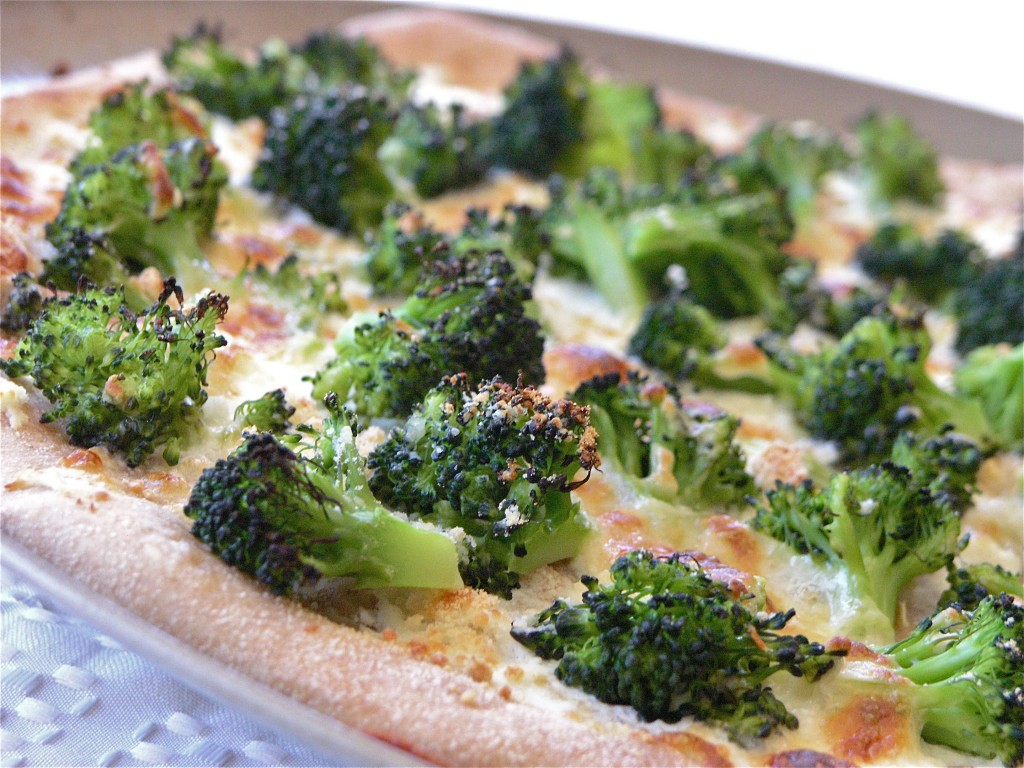
I must admit. I am a total broccoli addict. I eat broccoli every day. Roasted. Steamed. With cheese melted over it on a potato and this way: on a white pizza. This is pretty guilt free. As long as you don’t eat half the pizza, like I sometimes do. But because low-fat ricotta stands in for most of the cheese, the calorie count on this dish is not terrible.
I was first introduced to white pizza in college outside of Philadelphia. Renato’s in Swarthmore used to make an awesome pizza with ricotta, Mozzarella, and lots of garlic. I’m pretty sure there was broccoli on that one too. So basically, I wanted to recreate that pizza here.
I’ve been eating this broccoli pizza almost once a week for about a month now, so I figured it was time to do a post.
I use freeze-dried garlic in this recipe, because it’s so much faster to just sprinkle it over the pizza, than it is to chop fresh garlic. The flavor is great. I don’t miss the fresh garlic at all. I use Litehouse brand, but you can find this other brand at Amazon:
You can make the crust yourself, as I used to do a lot (I just realized I’ve never posted by pizza dough recipe, which is weird), but lately, I’ve just been buying whole wheat pizza dough at the grocery store. Mollie Stone’s now carries Il Fornaio pizza dough in the frozen section. It tastes just like my homemade version, so I’ve been hard pressed to go to all the trouble of making it from scratch. Just make sure that you let the dough sit out long enough to come to room temperature, because if you’re not careful, you can run into the problem of having the toppings cook before the dough is ready, and then it just sticks to the pizza pan like crazy.
To help with making sure the pizza doesn’t stick, I use a nonstick, perforated pizza pan like this one available at Amazon.com (just click on it). I also spray it with a little nonstick spray:
2 heads of broccoli, chopped into florets (about 3 cups)
1 Tablespoon freeze-dried garlic
¾ cup reduced fat ricotta cheese
½ cup shredded part-skim Mozzarella cheese
Salt to taste
Instructions
Preheat the oven to 500˚F
If you have purchased frozen pizza dough, make sure it thaws overnight. Then let it rest on the counter for at least 20 minutes before shaping it into a pizza.
While the pizza dough is resting on the counter, you can steam the broccoli. Put the florets in a medium saucepan with 2 cups of rapidly boiling water. Steam for 3-4 minutes. Watch carefully. When the broccoli is ready, it will be bright green still, and tendercrisp. It is better for it to be undercooked than overcooked. Remove from the heat and drain completely. Then rinse with cold water to stop the cooking process and drain again. Pour the broccoli out onto some paper towels. You don't want to transfer any water to the surface of the pizza.
When you are ready to shape the dough, put a couple of tablespoons of flour (semolina or wheat) onto a large cutting board. Coat the dough ball with the flour. Flatten the ball into a disc. Then with your fingertips, work your way around the edges, stretching it all out as you go. Put your fist in the middle of the growing circle and let the sides stretch down. Move your arm up and down to help it stretch out. Then work your fingers around the edge of the circle one more time.
Spray the pizza pan with a little nonstick cooking spray and spread the circle of dough onto the pan. With the back of a spoon, spread the ricotta evenly over the pizza. Then sprinkle with the dried garlic. Arrange the broccoli pieces over the surface evenly. Sprinkle with the Mozzarella. Season with salt.
Bake in the oven for 10-15 minutes. Watch carefully. If the cheese starts to brown too quickly (before the crust has had a chance to brown), back off the heat a little bit. When the cheese and the crust are just starting to brown, remove from the oven and let cool for 2 minutes. Then slice and serve immediately.
My friend Raquel is the master of the wild rice salad. She tosses it up in huge quantities for party buffets at her house and there’s never any left over. I’ve been meaning to do a version of my own and today was the day. The only difference between my version and hers, is that I’ve added an orange juice-based vinaigrette – just a wee-tiny bit, because this salad can even stand on its own without any vinaigrette, but I love orange and cranberry flavors together, so I thought it would only make this great salad greater.
Hey, it’s vegan and gluten-free. Can’t beat that.
Wild Rice, Cranberry and Toasted Almond Salad with a hint of Orange Serves 4 as a side
Ingredients
2 cups cooked wild rice (still warm)
3/4 cup dried cranberries
1/2 cup toasted almonds slivers
1. Cook rice according to package directions (it takes about 45 minutes). Meanwhile, toast the almonds in a frying pan with no oil over medium high heat for about 5 minutes or until just starting to brown.
2. While the rice is still warm, toss it with the dried cranberries and the almonds. This will allow the cranberries to swell and their flavor to meld.
3. While the rice mixture is cooling, whisk together the ingredients for the vinaigrette until an emulsion is formed. Once rice mixture has cooled to room temperature toss the vinaigrette with the rice and mix thoroughly. Refrigerate and serve chilled.
Blueberries are in season and therefore, they’re on sale at Trader Joe’s for just $6.99 for a 2 lb basket. Time for cobbler when that happens.
I wanted to see if I could toss a bunch of fresh blueberries into pie plate with as few other ingredients as possible and come out with a tasty cobbler half an hour later. The answer is yes. Yes I can.
I use less sugar and butter in this recipe than most recipes out there, because I know that these berries can stand on their own. And I don’t stew them first, because I want them to maintain their structure. You can see in the photograph that the berries are still berries. That’s just how I like it.
See if you like it too. Subtract some berries and add peaches if you’ve got those lying around too.
Blueberry Cobbler: Fast, Fresh and Easy Serves up to 9
Ingredients
2 1/2 cups Bisquick baking mix
2/3 cup reduced fat milk
4ish cups fresh blueberries
1/4 cup of sugar
2 Tbsp butter, cut into little pieces
Method
1. Preheat oven to 400˚F.
2. Put 3.5 – 4 cups of blueberries in a pie plate. Sprinkle 1/4 cup sugar (or a little more to taste) over the berries. Sprinkle the slices of butter around, evenly, on top of the berries.
3. If the oven is ready, put the pie plate with just the blueberry mixture into the over for 10 minutes to get the mixture heated through.
4. While berries are heating, mix together the Bisquick and the milk and stir until dough forms. Let sit for remaining time. (No kneading, no rolling – these will be like drop biscuits on top).
5. Remove berries from the oven at the end of 10 minutes. Increase the oven temperature to 425˚F. Drop the biscuit dough on top of the blueberries, trying to drop 8 dollups in a circle plus one in the middle. Bake uncovered for an additional 15 minutes or until biscuits are golden brown.
Serve immediately, if possible. Also sits well in the oven at low temperature. Cobbler is great with a scoop of vanilla ice cream too!
You know, chocolate is a funny thing. It comes in so many flavors and textures and each person knows just how they like it. Me? I like rich, dark chocolate. Sharffen Berger gets my kind of chocolate just right. So I was lucky when the company just happened to sponsor a Food Blogging conference I attended and the goodie bag we got was filled with lots of Sharffen Berger baking chocolate. Like the 70% cacao bittersweet chocolate, which is the basis for these fudgy brownies. This recipe comes directly from the source. Sharffen Berger publishes this and lots of other recipes on their site. These are definitely the fudgiest, most decadent brownies I’ve ever had. Enjoy!
Sharffen Berger 70% Cacao Bittersweet Chocolate
Sharffen Berger Fudgy Brownies Makes 9 two-inch square brownies Ingredients
6 tablespoons (3 ounces) unsalted butter, cut into cubes, plus more for the pan
8 ounces SCHARFFEN BERGER 70% bittersweet chocolate, coarsely chopped
3/4 cup plus 2 tablespoons granulated sugar
1/4 teaspoon salt
2 large eggs
1/3 cup all-purpose flour
Method
1. Position a rack in the lower third of the oven and preheat the oven to 325°F. Cut an 8 by 16-inch piece of parchment paper. Lightly butter an 8 by 8 by 2-inch pan and line it with the parchment, allowing it to extend evenly over the opposite sides. Butter the parchment including the paper on the sides of the pan.
2. Place the chocolate and butter in a large heatproof bowl set over a pot of gently simmering water and stir occasionally until melted and smooth. Remove from the heat.
3. With a large rubber spatula or wooden spoon, beat the sugar and salt into the chocolate mixture. Beat in the eggs one at a time. Add the flour and mix vigorously until the batter is very glossy and pulls away from the sides of the bowl.
4. Pour the batter into the prepared pan and tap the pan bottom on the countertop to level the batter. Bake for 30 to 35 minutes, or until a skewer in the center comes out moist but clean.
Let cool in the pan on a cooling rack for 10 minutes. Remove the brownies from the pan using the parchment “handles,” and cool completely on the rack before cutting into 2-inch squares.
Buy a bag of lentils at Safeway for $1.49, or spend $8 for a fancy box of French Le Puy Lentils at Whole Foods. Either way, you can create a myriad of healthy salads that will keep in the fridge for about a week and work as main dishes, sides or snacks. Put the lentil salad on top of a bed of lettuce or the add arugula for bite. Roll the lentils up in a whole wheat tortilla for a healthy bean wrap. Serve warm with fish, like Salmon or Mahi Mahi. The possibilities are endless.
To prepare the lentils, follow the directions on the side of the package. Do not pre-soak lentils. They cook pretty quickly. Typically, for a 16 oz bag of lentils, bring 8-10 cups of water to boil in a large pot. Add the lentils and simmer gently for 25-30 minutes. For salads, you want the lentils to maintain a little bite so that they don’t get too mushy. Start checking them at 25 minutes to get the texture just right. A 16-oz bag of lentils will yield about six cups of cooked lentils.
Heirloom Tomato-Basil Lentil Salad
Heirloom Tomato-Basil Lentil Salad
Serves 4 as a side
Ingredients
2 cups cooked lentils
1 large or 2 small heirloom tomatoes, diced into small cubes.
2 Tbsp minced shallots or scallions
1/4 cup minced fresh basil and additional leaves for garnish
2 Tbsp balsamic vinegar
6 Tbsp extra-virgin olive oil
1/4 teaspoon black pepper
1 Tbsp of Crumbled Feta (optional) – I left it out because I like to try to be vegan when I can
Method
1. For the vinaigrette, whisk together the olive oil and vinegar into an emulsion. Toss lentils, tomatoes, shallots, minced basil, and oil vinegar to combine. Season with pepper and garnish with basil leaf and feta if using. Serve chilled.
Tarragon-Mustard Vinaigrette Lentil Salad
Tarragon-Mustard Vinaigrette Lentil Salad
Serves 4 as a side
Ingredients
2 cups cooked lentils
1/2 red bell pepper, diced
2 Tbsp red-wine vinegar
1 Tbsp minced shallot or scallions
Salt and pepper to taste
6 Tbsp extra virgin olive oil
2 tsp Dijon mustard
1 Tbsp minced tarragon
Method
1. Whisk together the vinegar, shallots, salt, pepper, olive oil, mustard and tarragon. Toss with red bell pepper and lentils to combine. Garnish with tarragon leaves. Serve chilled.
Lemon Dill Lentil Salad
Fresh Lemon-Dill Lentil Salad
Serves 4 as a side
Ingredients
2 cups cooked lentils
1/2 red bell pepper, diced
1/4 cup fresh dill, minced
2 Tbsp fresh-squeezed lemon juice
1 Tbsp minced shallot or scallions
Salt and pepper to taste
6 Tbsp extra virgin olive oil
Method
1. Whisk together lemon juice, shallots, salt, pepper, and olive oil. Toss with lentils, red bell pepper and fresh dill to combine. Garnish with sprigs of dill.
I am totally into this focaccia. This recipe has been tested and tested. Use fresh rosemary. Don’t hold back on the oil and salt and eat it while it’s still warm.
Rosemary Focaccia
Ingredients
1/2 cup high quality extra-virgin olive oil
2-4 whole cloves garlic, cracked
2 sprigs of rosemary
1 (1/4-ounce) package rapid rise dry yeast
4 cups unbleached all-purpose flour plus additional for kneading
2 tsp table salt
2 tablespoons chopped fresh rosemary
1 teaspoon coarse sea salt
Method
For the garlic-rosemary infused olive oil:
1. Heat 1/2 cup of olive oil, the rosemary sprigs and garlic cloves in a small saucepan over medium-low heat. Heat until just starting to bubble, remove from heat and allow to sit and cool for at least 30 minutes or longer.
For the focaccia:
1. Stir together 1 2/3 cups lukewarm water and yeast in bowl of mixer. Add 4 cups flour, 1/4 cup of the rosemary-garlic infused oil, and the table salt and beat with the paddle attachment at medium speed until a dough forms. Replace paddle with dough hook and knead dough at high speed until soft, smooth, and sticky, 3 to 4 minutes.
2. Turn dough out onto a lightly floured surface. Knead in 1 – 2 more tablespoons of flour for about a minute then transfer to an oiled bowl and turn to coat it with the oil. Let rise, covered with plastic wrap, at warm room temperature, until doubled in bulk, 1 to 1 1/2 hours.
3. Press dough evenly into a generously oiled 15 x 10 inch baking pan. Let dough rise, covered with a kitchen towel, until doubled in bulk, about 1 hour.
4. Preheat oven to 500°F. Stir together rosemary and remaining 3 tablespoons oil. With a fork, make shallow pin pricks all over the dough, then brush with rosemary oil. Sprinkle sea salt over the focaccia. Bake at 500˚F for 5 minutes and then reduce to 475˚F for another 15 minutes or until golden brown.
5. Remove from oven and invert onto a rack and flip over. Eat immediately, if possible.
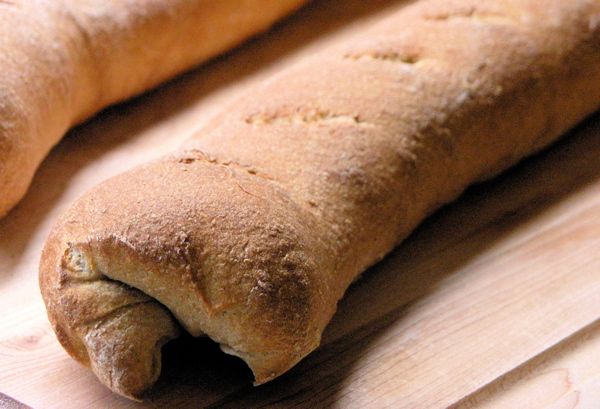
I originally wrote this blog post 10 years ago, but rediscovered it now that I’m staying home to do my part to prevent the spread of the corona virus. Since we might face a time when it’s hard to get provisions from the grocery store, I wanted to remind myself that I have the capability to make my own bread, from staples that are plentiful in my pantry.
Ten years ago, I didn’t want to just to eat good bread, I wanted to make it. I didn’t have the patience to do the whole, “wait for it overnight” thing. I wanted to make bread that I could enjoy later that same day.
I’m pretty new to bread making, but I’ve been on a rampage lately, making bread, and more consistently, pizza dough.
This bread came out just the way I wanted it to. Crunchy on the outside, great texture on the inside and the nutty/sweet flavor of whole wheat and honey. I didn’t have a pizza stone, so I literally just used a half-sheet pan and it worked fine. Jaden includes advice/tricks for what to do if you don’t have a pizza stone either.
Whole Wheat Baguette
Whole Wheat Sweet French Baquette Makes 2 loaves
Ingredients 2 cups whole wheat flour 1 3/4 cups all-purpose white flour 1 Tbsp honey 2 tsp instant dry yeast 2 tsp salt 1 1/2 – 2 cups warm water
Method
1. Set aside the bag of white flour to dust your surface with later. Place remaining white and whole wheat flour in the bowl of a stand-up mixer. With your spoon, swirl the yeast on one side of the bowl and then swirl the salt on the other side. Pour the warm water in a well in the middle of the flour. Using the mixer paddle, mix on low speed until the dough comes together in a mass, then switch to the dough hook. Mix on medium speed for 2 minutes. The dough should come together and clear the sides but some of it will continue to stick to the bottom. You may need to add additional water. If so, do so, one tablespoon at a time. After 2 minutes, let the dough rest for 5 minutes. After the dough has rested for 5 minutes, turn on the mixer again and knead with the dough hook for 3 minutes.
2. Take the dough out and place on a wooden cutting board dusted with the white flour. If the dough is still too sticky, you will incorporate a little more flour into while you knead it. If it doesn’t need additional flour, then just knead the dough by hand until it is very satiny, smooth, tight and formed into a nice, compact ball.
3. Place the dough in a large lightly oiled bowl (I use olive oil). Turn dough over to coat it on all sides. Cover with a damp, clean dish towel. and set in warm place for 1 1/2 hours. Dough should almost double in size during this rest time. About 1 hour into this stage, preheat the oven to 450F and place pizza stone (if you have one) into the oven to preheat it as well.
4. After the dough has risen for an hour and a half, punch it down and form it back into a ball. Cut the dough into half, placing one ball back in the bowl and covered with a towel. Pick up the dough you’re working with and stretch it out until it forms a big rectangle. On the wooden chopping block dusted with flour, fold over each end about an inch and then fold in the long sides until they touch each other. Press down on the middle seam, down the length of the dough get it all tucked in and then pinch then ends shut as well. You want to make sure there is a tight seal to allow the bread to rise and expand evenly while it is baking. Don’t overwork the dough during this stage. It just spent an hour and a half creating tiny bubbles inside and you don’t want to lose all of them at this point.
5. Turn the dough over so that the seam is on the bottom. Place it on a well-floured surface and cover it with a damp kitchen towel. Repeat the whole process with the other dough half. Let the loaves rest for 30 minutes. Then, take a sharp knife and cut several shallow, diagonal slashes on the surface of the loaf. The slashes allow steam to escape during baking so your bread doesn’t burst and crack and everything expands evenly.
6. When you are ready to transfer the dough loaves onto the pizza stone in the oven, get a 1/2 cup of water ready close by. Open the oven, put your bread in the oven and throw the water on the oven floor (literally toss the water out onto the bottom of the oven to create a big steam cloud). Immediately close the oven door to trap the steam inside. Bake for 20-25 minutes. Check temperature of the bread, like you would a steak. The internal temperature should be 190-210F. Remove and let cool slicing it.
I’m a huge fan of chicken Marsala and veal Marsala, but I’ve got a craving for a pork chop, so I figure “why not try pork Marsala?” At the store, a double thick pork chop catches my eye and once again I think, “Why not?” (read on to find out why not). I’ve never made Marsala sauce before, but I figure it’s a variation on the Fig Sauce I did in September, just with mushrooms and Marsala wine instead of figs and Balsamic vinegar. Let’s see how this one turns out. An ingredients list (of sorts) is at the end of this post.