I’ve been off McDonald’s for awhile, trying to erase the sins of the holiday season by following the plan put forth in Tim Ferris’ book, The 4-Hour Body. It’s all about rapid fat loss and it’s been working pretty well, so I’m not eager to mess with it, but the beauty of the program is that once each week, you are required, that’s right, required, to binge. One must do so carefully, but still.
So this Saturday, I’m planning to head over to a Bay Area McDonald’s and try a new, limited-time product they launched this week called Fish McBites. I’m a sucker for restaurant history, so I thought it was cool when I learned that this year, McDonald’s celebrates the 50th anniversary of the Filet-O-Fish sandwich. That makes it a perfect time to launch a new fish product, but in 2013, we must be careful about sustainability and McDonald’s is on it with this one. Fish McBites contain wild-caught Alaska Pollock that is responsibly sourced from Marine Stewardship Council (MSC) certified sustainable fisheries. That makes McDonald’s the first fast food chain in the U.S. to offer MSC certified sustainable fish on its menu all year long (the same MSC certified Pollock is in the File O’ Fish sandwich too).
Fish McBites are only available until the end of March. They timed the launch to coincide with Lent, a period of time in the Christian calendar when people often decide to give up things, like red meat.
And Fish McBite’s aren’t only available in grown-up portions. For the first time ever, the limited-time Fish McBites Happy Meal brings a fish entrée option to the iconic Happy Meal.
Fish McBites Happy Meals with 1 percent low-fat white milk, 100 percent apple juice or fat-free chocolate milk, meet new nutrition criteria in the Council of Better Business Bureaus’ Children’s Food and Beverage Advertising Initiative.
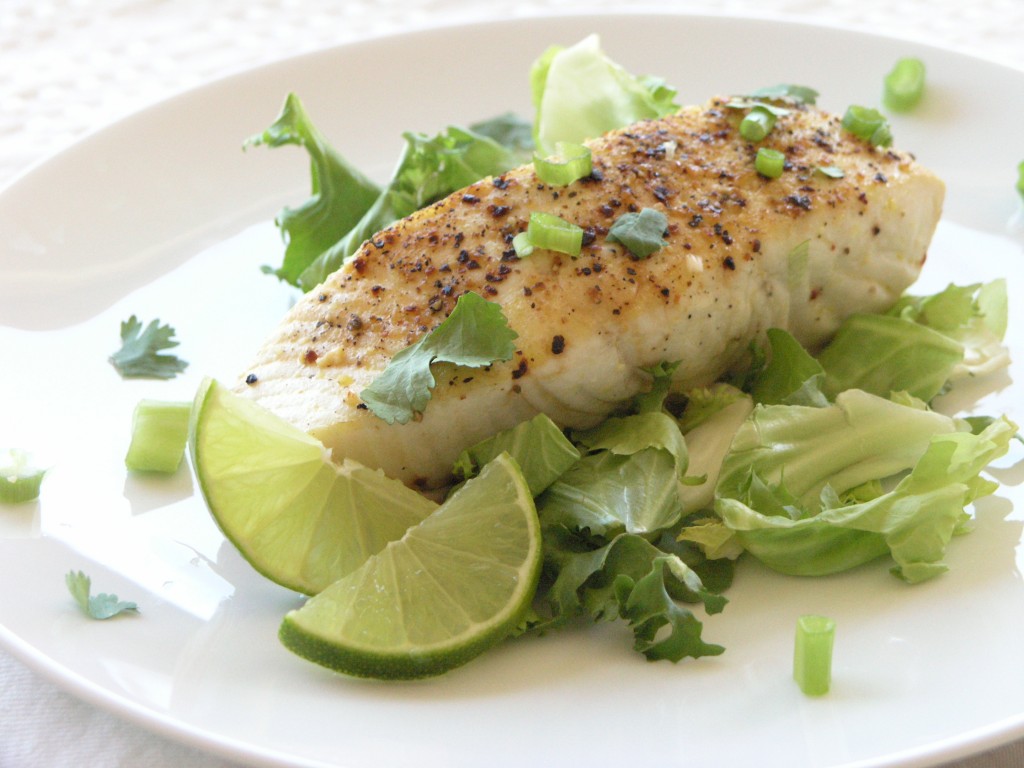
Cajun Shrimp with CA Strawberry Salsa - Photo courtesy of CA Strawberry Commission
The California Strawberry Commission has been hosting events in both Northern and Southern California that feature strawberries in ways you’ve never imagined, like this recipe, created by Chef Rui Wang of Palihouse Courtyard Brasserie in West Hollywood, CA. Combining a smoky spice rub, with the a spicy-sweet strawberry salsa that packs a punch with jalapeño peppers, lime juice and even mint, this light, summer dish will keep your taste buds dancing.
Cajun Rock Shrimp with California Strawberry Salsa
Food like this that keeps me feeling great. Full of flavor, protein, vitamins – this is the kind of food that keeps me “on track.”
The sauce is light. I’ve stuck with chicken stock, white wine and lime juice as its base. When I made it originally back in 2012, I also used an infused oil that was available at Mollie Stones. It was called Nona Luisa’s Blood Orange infused Olive Oil. With just a tad of it in the pan at the beginning, it gave the dish an extra zest. I’m not sure that it is still available.
To keep things light, grain-free, and low-carb in general, serve this over a bed of greens, or with a Cucumber and Avocado Ceviche piled on top. For today, lettuce with a little blood-orange olive oil vinaigrette did just fine.
2 green onions, chopped from the white part halfway up the green part
Another slug of Blood Orange Olive Oil
A bunch of fresh cilantro
Salt and Pepper to taste
Instructions
Heat the oil in a large frying pan over medium heat. Coat the filets with garlic pepper on the flesh side. When pan is heated, add filet flesh side down to pan to sear that side. Allow to cook for about 30 seconds. Then flip filets over with tongs.
Add white wine to pan and cover to steam. After about 2 minutes, much of the wine will have evaporated. Add the chicken stock gradually. Allow the filets to steam for another couple of minutes. Then add the lime juice. When bubbling and both filets are opaque all the way through, add the green onions to the pan and swirl in the sauce for a moment.
Remove filets to beds of lettuce. Add a tsp of the Blood Orange Olive, swirl the green onions in the sauce one more time and then pour equal parts over the fish.
Garnish with fresh cilantro and lime wedges. Sprinkle with salt and pepper to taste. Serve immediately.
Cinqo de Mayo is just around the corner and we’re getting ready by enjoying California Avocados – back in season and perfect for bringing together your favorite Mexican flavors – lime, cilantro, and… avocado. Yum.
This shrimp tostada recipe, a light and healthy dish perfect for a weeknight or for a dinner party, was shared with us by the California Avocado Commission and was created for them by chefs Mary Sue Milliken and Susan Feniger, aka, the Too Hot Tamales of early Food Network fame. Known also for their fabulous Santa Monica restaurant Border Grill, the Too Hot Tamales have been partnering with the California Avocado Commission for some time now to bring fresh, flavorful, avocado forward dishes to all of us. Enjoy!
Bold flavors come together in this fresh take on the shrimp tostada
Author: Recipe created by chefs Mary Sue Milliken and Susan Feniger for the California Avocado Commission
Recipe type: Entrée Salad
Serves: 4
Ingredients
¾ cup beer
3 bay leaves
½ tsp. celery seeds
½ tsp. cayenne
½ tsp. salt
½ lb. domestic, wild-caught jumbo shrimp, peeled and cleaned
2 ripe, fresh California avocados, seeded, peeled and cut into ½-inch dice
1 Roma tomato, finely diced
¼ cup finely diced red onion
1 small carrot, peeled and finely diced
1 jalapeño, stem and seeds removed, finely diced
½ bunch cilantro, finely chopped
1½ limes, juiced
3 Tbsp. extra virgin olive oil
Salt, to taste
Ground black pepper, to taste
Canola oil, for frying
4 (6-inch) corn tortillas
4 romaine lettuce leaves, finely julienned
Instructions
Combine beer, bay leaves, celery seeds, cayenne and salt in a saucepan and bring to a boil. Add shrimp and cook 2 to 3 minutes, or until just turning pink and cooked through. Remove shrimp from liquid, cool to room temperature, and cut into ½-inch dice.
In a large bowl, combine cooked shrimp with avocado, tomato, onion, carrot, jalapeño, cilantro, lime juice, olive oil, salt and pepper. Stir gently, taste, and adjust seasonings as necessary. Chill thoroughly.
Meanwhile, pour oil to a depth of ½-inch in a small pan for frying. Fry the tortillas on both sides until crisp and drain on paper towels.
To serve, divide julienned lettuce evenly between each crispy corn tortilla. Top with avocado shrimp mixture and serve immediately.
Notes
I substitute ¼ cup shredded carrots (in the bag) for the diced carrots in this recipe and I leave out the celery seeds.
Mary Bergens Shrimp California Avocado and Endive Salad
Summer marks the peak season of California avocados, when the fruit is readily available and at its most delicious. So what better time than now to learn more about two of the nearly 5,000 California avocado farmers who take pride in growing the delicious fruit and their favorite avocado recipes.
Ninety percent of the nation’s avocados are hand-grown by farmers in California, all of whom take special care in growing premium avocados. Many of the California avocado groves are multi-generational and family operated.
For example, California avocado grower Mary Bergen’s parents bought a ranch in Ojai, Calif. in 1957 – Rancho dos Rios. As a young child, she spent her time roaming the avocado groves and disappearing into the hills, which she says allowed her to gain an appreciation and love for the land. Mary took over the operations of the ranch in 2000 and with the help of other avocado growers, she has become knowledgeable and found a community. “I’m more connected with the community here than I ever was in the city,” says Mary. “It’s wonderful to grow something people love. It’s great to grow something outstanding.”
Here is her recipe for Shrimp, Endive and California Avocado Salad.
Mary Bergen’s Shrimp, Endive and California Avocado Salad
Recipe created by California avocado grower Mary Bergen for the California Avocado Commission.
2 cups water
1 cup dry white wine
2 tsp. coarse salt
1 dried bay leaf
1 lb. medium shrimp, peeled
2 Tbsp. fresh lemon juice
1 Tbsp. white wine vinegar
1/4 cup extra virgin olive oil
6 Tbsp. crème fraîche
2 Tbsp. finely chopped shallot
2 Tbsp. minced fresh chives
2 small Belgian endives
1 ripe, fresh California avocado, peeled, seeded and diced
1 small head butter lettuce
Instructions
1. Bring water, wine, half the salt and the bay leaf to a boil in a medium saucepan. Reduce heat and simmer for 5 minutes. Add half the shrimp and cook until opaque, about 1 minute. Transfer the shrimp to a plate with a slotted spoon. Cook the remaining shrimp, transfer to the plate and let cool. Cut into 1/4-inch pieces.
2. Whisk together lemon juice, vinegar and remaining salt in a medium bowl. Pour in olive oil in a slow, steady stream, whisking until emulsified. Whisk in crème fraîche. Fold in shallots, chives and shrimp. Cover with plastic wrap and refrigerate for at least 30 minutes.
3. Separate endive leaves and thinly slice crosswise. Fold endive and avocado into shrimp mixture. Make a bed of lettuce on each salad plate and add a generous spoonful of the shrimp mixture to each plate and serve.
Nutrition Information Per Serving: Calories 480; Total Fat 30 g (Sat 4.5 g, Trans 0 g, Poly 3 g, Mono 15 g); Cholesterol 225 mg; Sodium 1520 mg; Total Carbohydrates 17 g; Dietary Fiber 12 g; Protein 29 g
A few weeks after the amazing California Avocado Commission dinner at One Market, I flew to the south of Spain for a family wedding. We stayed at a small inn about 45 minutes west of Malaga called Hotel Rural La Paloma. Owned and operated by an Italian couple, Philippo and Elena took amazing care of us.
The menu at the inn’s restaurant was a great mix of Spanish and Italian-influenced dishes. They were incredibly accommodating as well. My husband is a vegan, and they were happy to prepare separate, off-the-menu dishes for him. While I am moving towards a vegan diet, I took the opportunity to taste a few dishes on the menu that contained dairy and seafood. One of my favorites was “Aguacate relleno de pulpa de cangrejo gratinado,” or “Puréed avocado stuffed with crab au gratin.” We’ll call it Avocado-Crab Gratinée.
I couldn’t wait to come home and try to prepare the dish myself. Elena was nice enough to share the recipe with me and both avocados and dungeness crabs happen to be in season right now. This dish is so easy to prepare, you could easily whip it up for weeknight treat for two.
Author: Amy Wilson adapted from Hotel Rural La Paloma
Recipe type: Appetiser
Serves: 2
Ingredients
1 ripe California Grown Avocado
Salt and pepper to taste
3 Tbsp heavy whipping cream
2 oz lump crabmeat
2 Tbsp grated Parmesan cheese
Instructions
Preheat the broiler. Cut the avocado in half. Discard the pit, but reserve the skins. Empty the flesh into a microwave-safe bowl. Mash it with a fork it and add salt and pepper, combining well. Add the heavy cream and the crabmeat and mix well with a fork. If the mixture is too thick, add additional heavy cream.
Warm the mixture in the microwave for 1 minute. Add the grated Parmesan cheese to the mixture and stir it in completely. Spoon the mixture either back into the two empty avocado halves or into one or two small oven-safe dishes. Sprinkle additional Parmesan cheese on top.
Bake under the broiler for a couple of minutes until the cheese has browned slightly. Serve immediately.
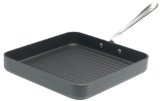
In late 2009, All-Clad launched a new line of cookware that is available only at Williams-Sonoma (online and in-store). As part of the launch, All-Clad contacted food bloggers and asked them to test and review one pan of their choosing. I chose to test the 3-quart sauté pan.
I’ll be honest. I normally don’t splurge on All-Clad. Before receiving the complimentary sauté pan in the mail, I owned just one All-Clad pan; it is one I would not want to go without, mind you, but still. It is the All-Clad LTD 11-Inch Square Nonstick Grille Pan, available at Amazon.com. It enables me to grill indoors and simplifies the cleanup immeasurably. I love it.
But this is my first time cooking with a stainless steel-interior All-Clad pan. The d5 technology improves upon All-Clad’s previous pans, because they’ve welded together not 3, but 5 layers of metal to create an incredibly stable, evenly-heating pan. Representatives from All-Clad assured me that this pan heats so evenly and holds heat so efficiently that I would not need to turn up my gas burner to high. In fact, they warned against it. I wanted to put this notion to the test by cooking something that requires high, even, sustained heat, so I decided to sear scallops.
All-Clad d5 Sauté Pan
Searing Scallops to Perfection
The trick to getting the perfect seared scallop is to start with a well-heated pan and ensure that your scallops are completely dry. Remember when you learned in grade school that the boiling point of water is 100˚C? Well, that means that water cannot reach a temperature higher than that. Steam can, but water can’t. So if the scallops are full of water, they’re going to be stuck at a measly 100˚C, which is not hot enough to produce a nice, caramelized sear. So pat those babies dry. And, if possible, buy scallops that haven’t been sitting in a brine getting water-logged in the first place. That means you’ll need to ask the man behind the fish counter for “dry scallops.”
Now that you’ve patted the scallops dry, season them with a bit of sea salt and freshly ground pepper on both sides and heat the pan. I decided to heat the d5 pan over medium-high heat (instead of high heat), because the All-Clad representatives were so convincing that the new technology warranted it. After the pan itself was good and hot, I added grapeseed oil, (because of its neutral flavor and high smoke point) and let it pre-heat as well. Sure enough, the pan performed perfectly. I knew that the temperature was right as soon as I added the scallops and I heard just the right kind of sizzle. The scallops got a nice sear going right away and the pan did not drop its heat when the three were added. Also, all three seared at the same rate.
Brown for about two minutes on first side
There was enough oil in the pan to just coat the bottom entirely and I added only three scallops so that they wouldn’t get too crowded. If you crowd scallops in the pan, they will steam each other which prevents them from getting a good, crispy sear.
After about 2 minutes, I flipped the scallops and saw the sear I was hoping to see. I let them cook for only another minute or two. It’s important not to overcook scallops and they cook very quickly. They should still be ever-so-slightly-translucent in the middle when you take them off of the heat. If you overcook them, they will become rubbery. So after about 90 seconds, I removed them from the heat and transfered them to a paper-towel-lined plate.
Be careful not to overcook scallops
Since I wanted to serve the scallops over pasta with a garlic, white wine sauce, I set to work preparing the sauce in the same pan. (The pasta had already cooked and was draining in the colander). Here’s how I pulled together the sauce in just a few minutes:
Garlic and White Wine Sauce Serves 1-2
Ingredients
1 Tbsp butter
2 cloves garlic, peeled and finely chopped
1/3 cup dry white wine
Salt and pepper to taste
1 Tbsp fresh lemon juice + a few scrapes of lemon zest
1 Tbsp fresh parsley, chopped
Method
1. Reduce heat in the pan. You don’t want to burn the garlic. Add the tablespoon of butter and let it melt. Add the garlic and sauté until fragrant, about one minute. Add the wine and simmer until thickened, about 3-4 minutes. Add salt and pepper, the lemon juice and zest and toss. Add about 2 cups of cooked pasta. Toss to coat. Remove from heat. Toss in most of the parsley then pour onto a plate. Place scallops on top. Garnish with additional parsley. Enjoy immediately.
Scallops seared to perfection
So, in conclusion, I do recommend splurging on a d5 pan. Pick one you know you’ll use again and again for recipes that require a little finesse. If you want your pan to be just the right, even temperature while sautéing meat or vegetables or whipping up fragile creamy sauces, I do think it’s worth spending a little more for a pan that will last a lifetime. I was surprised and delighted to learn that these pans are dishwasher safe. And, the new, larger handles even stay cool while you’re cooking. What’s not to love?
Disclaimer: While I did not receive money to write this review, All-Clad did provide me with a complementary pan and asked that I participate in an informational web conference, where I had an opportunity to share my feedback and ask questions. I was not required to write this post.
Want to know more about how to get the temperature of your pan just right? Watch this instructional video from Rouxbe.com. I was totally mesmerized when I watched it.
For more of the highest quality instructional videos are around, visit Rouxbe.com. Rouxbe offers over 200 step-by-step video recipes and about 250 cooking tip videos with their free basic membership. There are also a few free sample cooking school lessons to try out the cooking school content but the rest of the cooking school requires a Premium Membership. Try it free for 14 days.
Okay, I’m officially back on a health kick, which is why I’ve been blogging a little less frequently lately. I actually go to the gym now! But, I’m determined to eat delicious, healthy dishes and am eager to share them all with you, so here we go. Today’s installment is a seared halibut with mashed potatoes and kale chips. Now, I didn’t totally skimp on the ingredients here. I use real butter and olive oil and even whole milk in the mashed potatoes – one could substitute skim milk, cooking spray and so on, but my strategy is to eat flavorful foods but be careful with the portions and to choose foods that have tons of vitamins and minerals and aren’t high in bad fat. We’ll see if it works.
The sauce below breaks some rules because I needed to use ingredients that were on hand. The good news is that it turned out great anyway. Normally, I would have used heavy cream and wine and so on, but I didn’t have any of either, so I used chicken stock and whole milk instead and to my delight, the sauce thickened up nicely and was flavorful too. Again this sauce could easily be tweaked. You could take out the mustard and put in sour cream and paprikah instead or you could keep the mustard and also add capers or olives. I just love mustard and leeks, so that’s how I did it.
Pan Seared Halibut with Leek-Dijon Sauce Serves 4
Ingredients
4 Halibut fillets about 1/2 lb each
Salt and pepper
Olive oil
2 Tbsp Dijon mustard
1 Tbsp olive oil
1/2 cup chicken stock or white wine
1/2 cup whole milk
1 Tbsp butter
1 leek, trimmed and finely chopped
1 tsp grated lemon zest
1 Tbsp freshly squeezed lemon juice
Method
1. Season halibut fillets with salt and pepper and set aside. In a medium bowl, whisk together mustard, olive oil, chicken stock, and milk. Set aside.
2. Heat about 2 tbsp of olive oil in a large sautée pan over medium-high heat. Add fillets to the pan and sautée on one side for about 3 minutes. Flip carefully and sautée for another 3-5 minutes. If the fillets are very thick, they may take a little longer, but be careful not to overcook them. They should flake with a fork and be just opaque (maybe even a little teeny bit translucent in the very middle depending on your taste). Remove to a warmed plate.
3. Add butter to the same pan. Add leeks and sautée gently until softened, about 2 minutes. Add the milk and mustard mixture. Simmer over medium heat until thickened, about 5 minutes. Grate lemon zest over the sauce and squeeze about a Tbsp of lemon juice into the sauce. Stir to mix. Spoon sauce over fish (and mashed potatoes) and serve immediately.
Creamy Leek Mashed Potatoes Serves 4
Ingredients
4 Yukon Gold Potatoes
Salt and pepper
1 leek trimmed and chopped finely
1 Tbsp butter
1/2 cup whole milk or more
Method
1. Peel potatoes and cut into one-inch pieces. Boil for about 15 minutes or until fork tender. In the meantime, melt butter over medium heat in a medium sautée pan. Add leeks and sautée until softened and slightly browned, about 4-5 minutes. Spoon into large bowl. Drain potatoes into same bowl. Add milk and mash either with hand masher or electric hand mixer. Season with salt and pepper.
Kale Chips Serves 4
Ingredients
4 large leaves of Dino Kale (curly leaf kale can work too)
1 Tbsp of extra virgin olive oil
Sea salt to taste
Method
1. Preheat oven to 400˚F or use your convection setting and preheat it to 375˚F.
2. Wash and dry kale leaves. I left the stems on mine, but it really is better to remove them, because they remain tough and stringy while the rest of the pieces of kale becomes paper thin and crispy. Remove a stem by folding the kale in half and cutting away the stem.
3. Brush kale leaves with olive oil and season with fresh ground sea salt. Lay them side by side on a cookie sheet and bake for about 5 minutes. Flip them over and bake for another 5-7 minutes or until leaves are slightly browned, paper thin and crispy. Serve immediately as garnish over the fish.
I’m seeing the world through pumpkin-tinted glasses these days, so when my eyes settled on the Buffalo Bill Pumpkin Ale display at the market the other day, I just knew I had to cook something with it. You see, it’s day 14 of 31 Days of Pumpkin and time for something completely different.
A beer batter video came across my desk while working on my other project, StreamingGourmet: Where You are the Food TV Star (join today!) and I knew just what to do. I’ve always wanted to master deep frying with batter and today, I think I have. In the past, I’ve struggled with keeping the coating on the food and having it crisp up just right. Well I’m not exactly sure what went right today, whether it was the consistency of the batter, the high temperature of the oil, or the fact the oil was the right depth, but I got perfectly fried fish every time and it was a cinch. I ate the fried calamari too quickly to photograph it. Sorry.
Day 9 of 31 days of pumpkin and I am psyched. I chowed down on this dish after photographing it and it was delicious. It’s been a long time since I’ve made risotto. It’s a labor of love kind of recipe that demands one’s full attention, so I made this while the kids were at school today. And then, in a quiet house with the hazy, long shadows of an early afternoon in fall, I savored every last bite. Then a pair of Blue Angels screamed overhead breaking one reverie and ushering in a new one.
For this recipe, I use the smaller Bay Scallops, rather than the larger Sea Scallops. Either could be appropriate here, but the Bay Scallops were $9.99/lb as opposed to the $19.99/lb Sea Scallops, so I decided to go for the lower stakes. I wasn’t disappointed. Yesterday, I read a blog post by Debi Shawcross on How to Perfectly Pan Sear Scallops and I took her advice to heart. Definitely check out her post. The key takeaway for me was to try to get as much of the water out of the scallops as possible because water is the enemy of browning.