So today I thought I might make another lentil salad, but I accidentally overcooked the red lentils. Chango presto, it’s lentil burger time. My hubby had just requested a bean burger not made with soy, so voila. Here’s my opportunity.
I wanted to make something with real flavor punch that would sing several notes, not just one. So instead of using Curry Powder or even a store-bought Garam Masala, I introduced Indian flavors by incorporating turmeric and fenugreek. Indian isn’t the only note playing here. With cumin and coriander, there’s a little Southwest happening and with the Cayenne pepper, the burger hits the tongue HOT. The fresh cilantro cools and sweetens. Try it today! Super healthy. Totally vegan. No flavor compromise.
Fenugreek, Cumin, Cayenne and Cilantro come together for a spicy, Indian inspired vegan burger.
Author: Amy Wilson
Serves: 4
Ingredients
½ cup dry lentils
1½ cups water
1 small red onion
8-10 mini carrots, chopped in a mini food processor
½ cup raw almonds chopped in a mini food processor
2 cloves chopped garlic
1 Tbsp ground cumin
2 tsp ground coriander
1 tsp Cayenne pepper
½ tsp turmeric
1 tsp ground fenugreek
½ cup fresh cilantro, chopped finely
2 tsp salt
1-2 Tbsp olive oil
4 buns
Instructions
To prepare the lentils, bring water to a boil in a medium saucepan. Add lentils, reduce heat and cover partially. Simmer for about 15 minutes, which will overcook the lentils. Remove from heat and set aside uncovered.
In a separate saute pan, heat a Tbsp of olive oil over medium heat. Add chopped onion and saute until onions are softened, about 5 minutes. Add shredded carrots and garlic and continue cooking, stirring frequently.
Add chopped almonds, cumin, coriander, cayenne, turmeric, and fenugreek and continue to saute for a minute or two more while these flavors meld. Then remove from heat.
In a medium large mixing bowl, combine the lentils, onion mixture, cilantro, and salt. Stir to combine well. Shape into 4 patties.
In a large skillet over medium flame, heat the olive oil. Add patties and sautee until golden brown on one side, about 3 minutes. Flip and repeat. Serve immediately. These can be stored and cooked later.
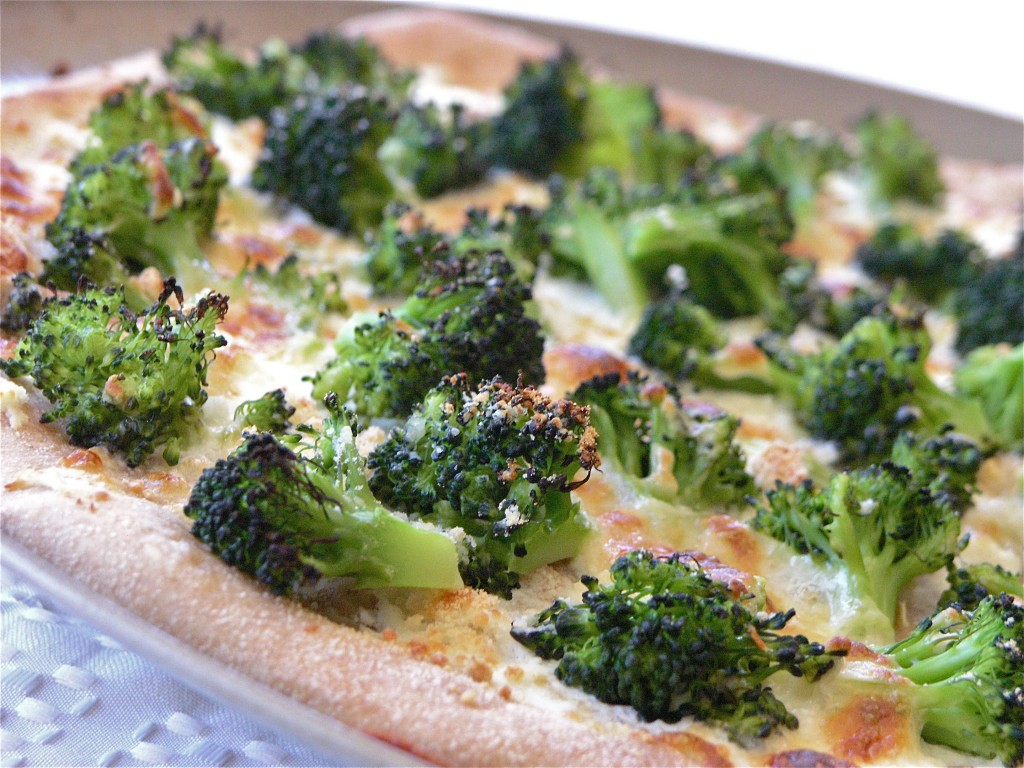
I must admit. I am a total broccoli addict. I eat broccoli every day. Roasted. Steamed. With cheese melted over it on a potato and this way: on a white pizza. This is pretty guilt free. As long as you don’t eat half the pizza, like I sometimes do. But because low-fat ricotta stands in for most of the cheese, the calorie count on this dish is not terrible.
I was first introduced to white pizza in college outside of Philadelphia. Renato’s in Swarthmore used to make an awesome pizza with ricotta, Mozzarella, and lots of garlic. I’m pretty sure there was broccoli on that one too. So basically, I wanted to recreate that pizza here.
I’ve been eating this broccoli pizza almost once a week for about a month now, so I figured it was time to do a post.
I use freeze-dried garlic in this recipe, because it’s so much faster to just sprinkle it over the pizza, than it is to chop fresh garlic. The flavor is great. I don’t miss the fresh garlic at all. I use Litehouse brand, but you can find this other brand at Amazon:
You can make the crust yourself, as I used to do a lot (I just realized I’ve never posted by pizza dough recipe, which is weird), but lately, I’ve just been buying whole wheat pizza dough at the grocery store. Mollie Stone’s now carries Il Fornaio pizza dough in the frozen section. It tastes just like my homemade version, so I’ve been hard pressed to go to all the trouble of making it from scratch. Just make sure that you let the dough sit out long enough to come to room temperature, because if you’re not careful, you can run into the problem of having the toppings cook before the dough is ready, and then it just sticks to the pizza pan like crazy.
To help with making sure the pizza doesn’t stick, I use a nonstick, perforated pizza pan like this one available at Amazon.com (just click on it). I also spray it with a little nonstick spray:
2 heads of broccoli, chopped into florets (about 3 cups)
1 Tablespoon freeze-dried garlic
¾ cup reduced fat ricotta cheese
½ cup shredded part-skim Mozzarella cheese
Salt to taste
Instructions
Preheat the oven to 500˚F
If you have purchased frozen pizza dough, make sure it thaws overnight. Then let it rest on the counter for at least 20 minutes before shaping it into a pizza.
While the pizza dough is resting on the counter, you can steam the broccoli. Put the florets in a medium saucepan with 2 cups of rapidly boiling water. Steam for 3-4 minutes. Watch carefully. When the broccoli is ready, it will be bright green still, and tendercrisp. It is better for it to be undercooked than overcooked. Remove from the heat and drain completely. Then rinse with cold water to stop the cooking process and drain again. Pour the broccoli out onto some paper towels. You don't want to transfer any water to the surface of the pizza.
When you are ready to shape the dough, put a couple of tablespoons of flour (semolina or wheat) onto a large cutting board. Coat the dough ball with the flour. Flatten the ball into a disc. Then with your fingertips, work your way around the edges, stretching it all out as you go. Put your fist in the middle of the growing circle and let the sides stretch down. Move your arm up and down to help it stretch out. Then work your fingers around the edge of the circle one more time.
Spray the pizza pan with a little nonstick cooking spray and spread the circle of dough onto the pan. With the back of a spoon, spread the ricotta evenly over the pizza. Then sprinkle with the dried garlic. Arrange the broccoli pieces over the surface evenly. Sprinkle with the Mozzarella. Season with salt.
Bake in the oven for 10-15 minutes. Watch carefully. If the cheese starts to brown too quickly (before the crust has had a chance to brown), back off the heat a little bit. When the cheese and the crust are just starting to brown, remove from the oven and let cool for 2 minutes. Then slice and serve immediately.
With Cinqo de Mayo around the corner, what better way to celebrate the flavors of Mexico than to try out new recipes featuring the avocado, now back in season, here in California.
This year, Americans will consume 81 million pounds of avocados on Cinco de Mayo alone! That’s more than 160 million avocados in one day. Get in on the fun by trying this recipe, created for the California Avocado Commission by celebrity chefs, Mary Sue Milliken and Susan Feniger, known as the “Too Hot Tamales,” and co-chef/owners of the popular Border Grill restaurants in Santa Monica, Calif., Downtown Los Angeles and Las Vegas. This dynamic duo were Food Network pioneers when their show “Too Hot Tamales” premiered in 1995. They’ve gone on to compete on Bravo’s “Top Chef Masters,” and have now partnered with the California Avocado Commission to create innovative, fresh recipes featuring California avocados.
I love how this recipe is new and different and yet reminiscent of food I love. It reminds me of falafel of course, but there is also something very sushi maki about it too – like, if you were to take a california roll and fry it. Hey wait a minute. I think I’m onto something.
The recipe uses quinoa (pronounced “KEEN wah”), the high-protein, ancient Andean grain everyone is eating these days. It also calls for Cotija (pronounced “ko-TEE-hah”) cheese, a Mexican cheese with a grainy texture used as an accent by adding a tangy saltiness to dishes when grated on top. If your local grocer doesn’t sell Cotija cheese, order it on Amazon or substitute grated Parmesan.
Author: Recipe created by chefs Mary Sue Milliken and Susan Feniger for the California Avocado Commission
Recipe type: Appetizer
Serves: 8
Ingredients
⅔ cup white or black quinoa, rinsed and well drained
1⅓ cups water
¼ cup all-purpose flour
¼ cup grated cotija cheese
¾ tsp salt
4 green onions, white and light green parts only, finely chopped
½ bunch Italian parsley
1 egg
1 egg yolk
¾ cup canola or grape seed oil for frying
1 ripe, fresh California avocado, seeded, peeled and cut in ½-3/4 inch dice
Salt to taste
Ground black pepper, to taste
1 cup Aji Amarillo Aioli (see make-ahead recipe below)
Instructions
Place a small, dry saucepan over high heat. Add quinoa and toast for about 5 minutes, shaking and stirring constantly to prevent scorching. Transfer to a large saucepan and add water. Bring to a boil, reduce to a simmer and cook, covered, until water is absorbed, about 10 minutes. Set aside to cool.
In a large bowl, combine cooked quinoa, flour, cheese and salt. Add onions, parsley, egg and yolk. Stir thoroughly with a spoon until the mixture has the consistency of soft dough. Chill for 30 minutes.
Heat oil in a large skillet over medium heat.
In a small mixing bowl, season avocado with salt and pepper to taste and toss gently to coat.
Using hands, create round fritters about the size of a walnut shell with a piece of avocado in the center of each fritter.
Working in batches, gently slide fritters into the hot oil. Fry until golden brown, about 3 to 4 minutes, turning as necessary. Drain on paper towels and serve warm, topped with Aji Amarillo Aioli.
Notes
If cotija cheese is not available, parmesan cheese can be substituted
Yields about 24 fritters
My friend Raquel is the master of the wild rice salad. She tosses it up in huge quantities for party buffets at her house and there’s never any left over. I’ve been meaning to do a version of my own and today was the day. The only difference between my version and hers, is that I’ve added an orange juice-based vinaigrette – just a wee-tiny bit, because this salad can even stand on its own without any vinaigrette, but I love orange and cranberry flavors together, so I thought it would only make this great salad greater.
Hey, it’s vegan and gluten-free. Can’t beat that.
Wild Rice, Cranberry and Toasted Almond Salad with a hint of Orange Serves 4 as a side
Ingredients
2 cups cooked wild rice (still warm)
3/4 cup dried cranberries
1/2 cup toasted almonds slivers
1. Cook rice according to package directions (it takes about 45 minutes). Meanwhile, toast the almonds in a frying pan with no oil over medium high heat for about 5 minutes or until just starting to brown.
2. While the rice is still warm, toss it with the dried cranberries and the almonds. This will allow the cranberries to swell and their flavor to meld.
3. While the rice mixture is cooling, whisk together the ingredients for the vinaigrette until an emulsion is formed. Once rice mixture has cooled to room temperature toss the vinaigrette with the rice and mix thoroughly. Refrigerate and serve chilled.
Buy a bag of lentils at Safeway for $1.49, or spend $8 for a fancy box of French Le Puy Lentils at Whole Foods. Either way, you can create a myriad of healthy salads that will keep in the fridge for about a week and work as main dishes, sides or snacks. Put the lentil salad on top of a bed of lettuce or the add arugula for bite. Roll the lentils up in a whole wheat tortilla for a healthy bean wrap. Serve warm with fish, like Salmon or Mahi Mahi. The possibilities are endless.
To prepare the lentils, follow the directions on the side of the package. Do not pre-soak lentils. They cook pretty quickly. Typically, for a 16 oz bag of lentils, bring 8-10 cups of water to boil in a large pot. Add the lentils and simmer gently for 25-30 minutes. For salads, you want the lentils to maintain a little bite so that they don’t get too mushy. Start checking them at 25 minutes to get the texture just right. A 16-oz bag of lentils will yield about six cups of cooked lentils.
Heirloom Tomato-Basil Lentil Salad
Heirloom Tomato-Basil Lentil Salad
Serves 4 as a side
Ingredients
2 cups cooked lentils
1 large or 2 small heirloom tomatoes, diced into small cubes.
2 Tbsp minced shallots or scallions
1/4 cup minced fresh basil and additional leaves for garnish
2 Tbsp balsamic vinegar
6 Tbsp extra-virgin olive oil
1/4 teaspoon black pepper
1 Tbsp of Crumbled Feta (optional) – I left it out because I like to try to be vegan when I can
Method
1. For the vinaigrette, whisk together the olive oil and vinegar into an emulsion. Toss lentils, tomatoes, shallots, minced basil, and oil vinegar to combine. Season with pepper and garnish with basil leaf and feta if using. Serve chilled.
Tarragon-Mustard Vinaigrette Lentil Salad
Tarragon-Mustard Vinaigrette Lentil Salad
Serves 4 as a side
Ingredients
2 cups cooked lentils
1/2 red bell pepper, diced
2 Tbsp red-wine vinegar
1 Tbsp minced shallot or scallions
Salt and pepper to taste
6 Tbsp extra virgin olive oil
2 tsp Dijon mustard
1 Tbsp minced tarragon
Method
1. Whisk together the vinegar, shallots, salt, pepper, olive oil, mustard and tarragon. Toss with red bell pepper and lentils to combine. Garnish with tarragon leaves. Serve chilled.
Lemon Dill Lentil Salad
Fresh Lemon-Dill Lentil Salad
Serves 4 as a side
Ingredients
2 cups cooked lentils
1/2 red bell pepper, diced
1/4 cup fresh dill, minced
2 Tbsp fresh-squeezed lemon juice
1 Tbsp minced shallot or scallions
Salt and pepper to taste
6 Tbsp extra virgin olive oil
Method
1. Whisk together lemon juice, shallots, salt, pepper, and olive oil. Toss with lentils, red bell pepper and fresh dill to combine. Garnish with sprigs of dill.
You say Garbanzo Bean, I say Chickpea, but in India, it is “Chana.”
Chana Masala is one of the most popular Indian dishes. Since it’s vegan and spicy, it falls into the category of “dishes my husband likes.” I hope you enjoy it too.
Chana Masala Serves 4-6
Ingredients
1 1/2 tablespoons vegetable oil
1 whole cardamom pod
1 whole cinnamon stick
1 whole Bay Leaf
A few whole cloves
1 tsp whole cumin seeds
2 medium onions, diced
2 cloves garlic, minced
2 teaspoons grated fresh ginger
1 teaspoon ground turmeric
1 15-ounce can of diced tomatoes
chopped green chilis
1 teaspoon garam masala
1/4 tsp chili powder
1/2 tsp ground coriander
1/4 tsp turmeric
1/2 tsp cumin powder
2 (15-ounce) cans chickpeas, rinsed and drained
Salt to taste
Squeezes of lemon juice
Fresh cilantro to garnish
Method
1. Heat oil in a large skillet. Add whole spices (cadamom pod, cinnamon stick, Bay Leaf, whole cloves, cumin seeds) to the pan and sautée for 2 minutes over medium-high heat. Add onion and sautée until softened and browned, about 8 minutes. Add garlic, ginger and turmeric. Stir to combine. Sautée for a minute or two.
2. Add the canned tomatoes and green chilis. Simmer until thickened slightly, about 3 minutes. While tomatoes are simmering, mix together the garam masala powder, chili powder, ground coriander, turmeric, and cumin powder. Add this mixture to the simmering tomatoes and stir to combine.
3. Add the chickpeas. If the dish is getting dry, add up to 2/3 cup of water. Simmer uncovered for 5-10 minutes or until chickpeas are soft, but not mushy. Season with salt.
4. Fish out the Bay Leaf and cinnamon stick. Serve over rice. Squeeze lemon on top and garnish with lots of fresh cilantro.
Here is a version of Chana Masala demonstrated by ShowMeTheCurry. Their version involves using tea bags to enhance flavor and color. Cool!
Over the past six days, I’ve shared each course of a five-course dinner I cooked for my husband’s recent birthday party. Looking at the array of photos below, would it occur to you that this is a collection of vegan, gluten-free recipes? Think of it. No cheese. No pasta. No fish or fowl. If you had asked me on my husband’s birthday last year whether I could (or would even want to) make a dinner like this, I would have answered, “no,” flatly. Now, I can barely imagine eating any other way. Well, almost barely.
Yes, we are happily joining the national craze of eating in a sustainable, healthful way. In fact, just yesterday, I planted a whole pallet of seeds which means we’re joining the garden-at-home craze too. Count on a whole host of blog entries about this new adventure. When I was on the outside looking in at this fad, I thought it was a bit of overblown malarky, and, well, just a fad. Now that I’m joining in, I can feel myself transforming into an evangelist. I guess 38 per cent of Americans (the number of people who had a vegetable garden last year) can’t be wrong. Well, sometimes they can, but not this time.
Seeds germinating after just 24 hours
I absolutely must thank Viviane Bauquet Farre for her inspiration and help on this birthday dinner project. If you haven’t seen her blog yet, you are really missing out. You can find her at food and style and please, go “Like” her facebook fan page. Viviane creates the most original and beautiful recipes. She also produces some of the highest quality cooking instructional videos on the web. See them all on StreamingGourmet.com. It took me months to figure out that her recipes are vegetarian, so they will appeal to you whether you are a vegetarian, a vegan, an omnivore or someone determined to subsist on truffles and scotch. Seriously. Thanks again, Viviane!
It’s day five of my blogging event: “How to host an elegant, flavorful, vegan, gluten-free dinner party” in which I feature recipes created by the wonderful Viviane Bauquet Farre of food and style. My husband and several of his friends have transitioned to a vegetarian diet and several of them are also avoiding dairy and gluten, so when I decided to celebrate G’s birthday with a dinner party, I knew I needed to turn to my friend Viviane who features such refined recipes which also happen to be meat free. Today’s installment is the fourth of that five-course meal – the main course, in fact. For dessert, you’ll just have to check back tomorrow.
For this course, I got to experiment with fresh vegetables from the farmer’s market I’ve been dying to use, like English peas and fava beans. If you’re going to choose between the two, English peas are way easier to prepare. You just have to pop the peas out of the pod and they’re ready to go. Fava beans, on the other hand, require several steps. The beans within the pods are coated with a little jacket that needs to be removed as well. For this recipe, I actually prepared both and it took all day. Luckily, I was able to stream three episodes of This American Life while I shucked, blanched and peeled.
Fresh Peas
I prepared the fava beans by following the first part of a recipe by LocalLemons. First I had to remove the beans from their pods. Rinse them. Blanch them for 30 seconds and then pull off the outer layer from each bean. The inner bean is bright green and more fragile. After 3 hours of work, I forgot to photograph the bright green inner beans, but you can see what they look like over at the LocalLemons post. Here’s what they look like during step one and two.
Fava Beans removed from the podFava Beans after blanching
This dish is truly scrumptious. It is lighter than risotto because there is no butter and no Parmesan cheese, but the saffron, wine and garlic more than make up for flavor. I would make this dish again in a minute and look forward to varying the vegetables depending on what’s in season.
For the vegetables
1/4 cup extra virgin olive oil
2 large shallots – skinned, quartered and finely sliced
1 teaspoon saffron threads – gently pounded in a mortar to a coarse powder
1 1/2 cups dry white wine
2 garlic cloves – skinned and finely chopped
2 medium, young carrots – peeled and cut in 1/8″ x 1″ sticks
4 oz shelled fresh English peas
8 oz asparagus – stalk ends snapped off and spears cut on the diagonal in 1″ pieces
1/2 teaspoon sea salt
freshly ground black pepper to taste
A handful of fresh baby arugula
For the quinoa-millet pilaf
1 Tbsp extra virgin olive oil
1-2 shallots, diced finely
1 clove of garlic, peeled and bashed
½ cup millet
½ cup quinoa (rinsed well)
2 ½ cups vegetable stock
Sea salt to taste (about 1/2 tsp)
About a cup of shelled fava beans
Method
1. To get the quinoa-millet pilaf started, put the quinoa in a fine-mesh strainer and place a bowl underneath. Rinse with cold water while rubbing the quinoa between your fingers. The water will become cloudy. Drain, and repeat this process with fresh water two more times. Strain excess water and set aside. Heat the olive oil in a saucepan over medium heat. Add the shallots and sauté for about 4 minutes, or until soft. Add the garlic and sautée for another minute. Now we are going to toast the grains so that they have a rich, nutty flavor. Add the millet, and sauté for 5 minutes, stirring frequently. Now add the quinoa and sauté for 2 to 3 minutes more. Again, stirring frequently to coat the grains with the olive oil, shallots and garlic. Add the vegetable stock and salt and bring to a boil. Reduce heat, simmer, covered for about 30 minutes, or until the water is absorbed. Fluff before serving
2. Now that the quinoa-millet is cooking, it’s time to do the vegetables. Heat the olive oil in a wide, heavy-bottomed skillet over medium-high heat. Add the shallots and sauté for 1 to 2 minutes until they have softened. Add the wine, saffron, and garlic. Bring to a full boil and then reduce heat to between medium and medium-low. Cover the pan and simmer for 5 minutes. Add the carrots, toss well, cover the pan and simmer for 10 minutes. During my dinner party, I actually paused the dish here while we were eating and the carrots steeped in the saffron-wine-garlic sauce (with no heat) for about 20 minutes. This had the delightful effect of infusing them with intense saffron flavor. You could try it that way.
3. Add the peas and asparagus, toss well, cover the pan and continue to simmer for 5 minutes until the asparagus are tender but still a bit crunchy. Uncover the pan. Raise heat to high, add the salt, black pepper to taste and the arugula. Toss until the arugula has wilted, about 30 seconds to 1 minute. Immediately remove from heat.
4. To serve, spoon the pilaf into shallow bowls. Top with the braised vegetables. Drizzle with the pan juices. Garnish with a drizzle of olive oil. Serve immediately.
Optional fava bean addition:
Sautée the fava beans over medium high heat in a separate sautée pan, with some olive oil and pepper for about 3 minutes. Serve as a garnish on top.
It’s day four of my blogging event: “How to host an elegant, flavorful, vegan, gluten-free dinner party” in which I feature recipes created by the wonderful Viviane Bauquet Farre of food and style. My husband and several of his friends have transitioned to a vegetarian diet and several of them are also avoiding dairy and gluten, so when I decided to celebrate G’s birthday with a dinner party, I knew I needed to turn to my friend Viviane who features such refined recipes which also happen to be meat free. Today’s installment is the third of that five-course meal. For the next course, you’ll just have to check back tomorrow.
So far in this dinner, we’ve enjoyed cucumber and avocado ceviche, and slurped down an artichoke soup with truffles on top. Now we’re ready for a scrumptious early Spring salad, so Viviane’s Roasted Asparagus with Grapefruit is just the thing. Here’s what I learned by making this recipe: It is soooo easy to make and it is easy to prepare ahead of time, when it was time for this course, I could truly relax. All I had to do was plate everything and drizzle it with oil.
Roasted Asparagus
The other revelation I had while making this recipe is just how easy it is to roast asparagus. Brush the spears with a little olive oil, pop them into an oven preheated to 500˚F and 7-10 minutes later you’ve got roasted asparagus. No careful chopping, no peeling, no long wait. It’s like fast food. Well, sort of.
Brush with olive oil, then roast
Watch Viviane’s video for more tips on roasting asparagus and to watch her demonstrate how to prepare grapefruit slices with no pith or membrane in sight. Again, now that I’ve done it once, I want to do it this way all the time. My kids love eating citrus in our house now because I prepare for them this way now.
1 large Texas Rio Star grapefruit
1 1/4 lbs asparagus spears – washed and stem snapped
2 tablespoons extra virgin olive oil
1/4 teaspoon sea salt or to taste
2 tablespoons pine nuts
4 teaspoons lemon infused oil as garnish
A bit of lemon zest for garnish
freshly ground black pepper to taste
1 large jellyroll pan
Method
1. Peel the grapefruit down to the flesh, Quarter lengthwise and remove the thin membrane around each slice, being careful not to break them. Transfer to a bowl and set aside.
2. If your pine nuts are raw, preheat the oven to 425˚F. Place the pinenuts on a baking sheet and roast for about 2 minutes, but watch carefully through the window to make sure they don’t burn. Set aside.
3. Increase oven temperature to 500°F. Move rack to the top of the oven. Spread the asparagus on a jellyroll pan. Brush with the olive oil and sprinkle with the salt. Bake for 7 to 10 minutes (depending on their size) until the tips begin to brown. Remove from pan and let cool for 10 minutes.
4. Place a bundle of asparagus in the center of each plate. Top with 3-4 grapefruit slices and sprinkle with the pine nuts. Drizzle with the lemon oil and finish with a bit of fresh lemon zest and freshly ground black pepper to taste. Serve immediately.
It’s day three of my blogging event: “How to host an elegant, flavorful, vegan, gluten-free dinner party” for which I feature recipes created by the lovely and talented Viviane Bauquet Farre of food and style. Today’s installment is the second of the five-course meal. Check back Monday for course number three.
Velouté in French means, “velvety,” and this soup is made velvety, not by creating a butter and flour roux, as are most French velouté sauces, but rather by puréeing the soup (including the artichokes and potatoes) in a blender and then pressing the it through a fine sieve. Whenever I strain a sauce or soup through a sieve, I am reminded of Thomas Keller because he has said that ‘nothing moves from one pot to another in the French Laundry kitchen without first passing through a sieve.’ Now that I have gotten into this habit as well, I highly recommend it.
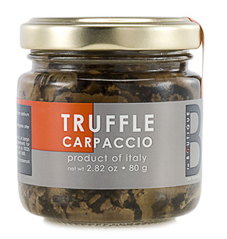
The other special trick for this soup is the black truffle carpaccio as the garnish. Viviane featured these in her original post, and I was compelled to order some myself. They are available at Gourmet Attitude in New York City. They FedEx them to you in a chilled box. They were a wonderful addition to this soup and I can’t wait to try them in other dishes as well. These are the first truffles to take up residence in my kitchen, so I am very excited about that.
This would be another great occasion to own a stick blender. Every time I make a soup like this, I think it’s time to buy one, but I’ll be honest. I haven’t yet pulled the trigger.
Parlsey and Thyme Bundle
Artichoke Velouté with Black Truffle Carpaccio
From a recipe by Viviane Bauquet Farre, by permission serves 6 (makes 8 cups)
3 tablespoons extra virgin olive oil
1 medium Vidalia or Spanish onion – skinned, quartered and thinly sliced
1/2 cup dry white wine
2 garlic cloves – skinned and finely chopped
8 oz Yukon gold potato (1 large) – peeled and cut in 1/2” cubes
2 8oz boxes of frozen artichoke hearts
2 1/2 cups vegetable stock
2 1/2 cups spring/filtered water
1 1/4 teaspoons sea salt or to taste
freshly ground black pepper to taste
8 Italian parsley sprigs & 6 thyme sprigs – tied in a bundle with kitchen string
1/2 – 2.82 oz jar Black Truffle Carpaccio or truffle oil as garnish
1/4 cup finely chopped chives as garnish
Method
1. Heat a large heavy-bottomed soup pot at medium-high heat. Add the olive oil and onion, stir well and sauté for 5 to 6 minutes, until just golden, stirring from time to time. Add the garlic and wine. Stir well and continue to sauté for 2 to 3 minutes, until the wine has reduced to a syrupy sauce and has almost all evaporated. Add the potato cubes, frozen artichokes, stock, water, salt, pepper to taste and herb bundle. Bring to a boil, then reduce heat to medium-low, cover the pot and slow-simmer for 40 minutes until the artichokes are very tender. Remove the herb bundle and discard.
2. Purée the soup with a stick blender, food processor, or blender until very smooth. Strain in a sieve and return to the soup pot and gently re-heat at medium heat. Taste and season with salt and pepper if needed.
3. Ladle the soup into soup bowls, put a spoonful of black truffle carpaccio (or a spoonful of truffle oil), garnish with a swirl of extra virgin olive oil and a sprinkling of fresh chives and serve immediately.
Amy’s tip: Viviane recommends straining this soup through a medium sieve. I own a fine sieve but not a medium one. It was time-consuming to strain it through the fine sieve as she warned ,but I was glad I did it anyway. I used a wooden spoon to press it through and just tried to stay patient.