After having dinner with a bunch of friends last weekend, where the conversation centered around health and sustainable eating, my husband decided it was time to make the move towards vegetarianism that had been on his mind for some time. So, while at the public library the next day, I checked out a stack of beautiful vegetarian-leaning cookbooks. One of them was Ivy Manning’s The Adaptable Feast: Satisfying Meals for the Vegetarians, Vegans, and Omnivores at Your Table. Casting about for a recipe that would use ingredients I had on hand, including potatoes and cheese (always on hand in our household), I found an inspired variation on a tried-and-true favorite: the twice-baked potato.
Since this version calls for potatoes and cabbage, the author, Ivy Manning describes it as the perfect vegetarian option for a St. Patrick’s Day feast. Recently, in her own recipe blog, Ivy’s Feast, she wrote about another twice-baked potato variation that would also be appropriate for St. Patrick’s Day: Twice Baked Irish Potatoes with Kale and Stout Onions. Yum. And she even made a cooking video to boot. See it here:
Okay, I’m officially back on a health kick, which is why I’ve been blogging a little less frequently lately. I actually go to the gym now! But, I’m determined to eat delicious, healthy dishes and am eager to share them all with you, so here we go. Today’s installment is a seared halibut with mashed potatoes and kale chips. Now, I didn’t totally skimp on the ingredients here. I use real butter and olive oil and even whole milk in the mashed potatoes – one could substitute skim milk, cooking spray and so on, but my strategy is to eat flavorful foods but be careful with the portions and to choose foods that have tons of vitamins and minerals and aren’t high in bad fat. We’ll see if it works.
The sauce below breaks some rules because I needed to use ingredients that were on hand. The good news is that it turned out great anyway. Normally, I would have used heavy cream and wine and so on, but I didn’t have any of either, so I used chicken stock and whole milk instead and to my delight, the sauce thickened up nicely and was flavorful too. Again this sauce could easily be tweaked. You could take out the mustard and put in sour cream and paprikah instead or you could keep the mustard and also add capers or olives. I just love mustard and leeks, so that’s how I did it.
Pan Seared Halibut with Leek-Dijon Sauce Serves 4
Ingredients
4 Halibut fillets about 1/2 lb each
Salt and pepper
Olive oil
2 Tbsp Dijon mustard
1 Tbsp olive oil
1/2 cup chicken stock or white wine
1/2 cup whole milk
1 Tbsp butter
1 leek, trimmed and finely chopped
1 tsp grated lemon zest
1 Tbsp freshly squeezed lemon juice
Method
1. Season halibut fillets with salt and pepper and set aside. In a medium bowl, whisk together mustard, olive oil, chicken stock, and milk. Set aside.
2. Heat about 2 tbsp of olive oil in a large sautée pan over medium-high heat. Add fillets to the pan and sautée on one side for about 3 minutes. Flip carefully and sautée for another 3-5 minutes. If the fillets are very thick, they may take a little longer, but be careful not to overcook them. They should flake with a fork and be just opaque (maybe even a little teeny bit translucent in the very middle depending on your taste). Remove to a warmed plate.
3. Add butter to the same pan. Add leeks and sautée gently until softened, about 2 minutes. Add the milk and mustard mixture. Simmer over medium heat until thickened, about 5 minutes. Grate lemon zest over the sauce and squeeze about a Tbsp of lemon juice into the sauce. Stir to mix. Spoon sauce over fish (and mashed potatoes) and serve immediately.
Creamy Leek Mashed Potatoes Serves 4
Ingredients
4 Yukon Gold Potatoes
Salt and pepper
1 leek trimmed and chopped finely
1 Tbsp butter
1/2 cup whole milk or more
Method
1. Peel potatoes and cut into one-inch pieces. Boil for about 15 minutes or until fork tender. In the meantime, melt butter over medium heat in a medium sautée pan. Add leeks and sautée until softened and slightly browned, about 4-5 minutes. Spoon into large bowl. Drain potatoes into same bowl. Add milk and mash either with hand masher or electric hand mixer. Season with salt and pepper.
Kale Chips Serves 4
Ingredients
4 large leaves of Dino Kale (curly leaf kale can work too)
1 Tbsp of extra virgin olive oil
Sea salt to taste
Method
1. Preheat oven to 400˚F or use your convection setting and preheat it to 375˚F.
2. Wash and dry kale leaves. I left the stems on mine, but it really is better to remove them, because they remain tough and stringy while the rest of the pieces of kale becomes paper thin and crispy. Remove a stem by folding the kale in half and cutting away the stem.
3. Brush kale leaves with olive oil and season with fresh ground sea salt. Lay them side by side on a cookie sheet and bake for about 5 minutes. Flip them over and bake for another 5-7 minutes or until leaves are slightly browned, paper thin and crispy. Serve immediately as garnish over the fish.
The Dungeness Crab season is in full swing here in the Bay Area and while my appreciation for Dungeness Crab is limited by my upbringing on the Eastern Shore of MD (Chesapeake country, blue crabs), I can’t resist this pale imitation once a year, so when I saw the price had dropped to $5.99/lb at Mollie Stone’s, I jumped. I paid $9.50 for a single crab which yielded about 1 cup of crabmeat.
Last year, I made a crab-picking video which has been playing continuously ever since on my livestream channel. You can check it out here: Livestream.com/StreamingGourmet It’s embarrassing for me to watch and I can’t stand the sound of my own voice, so although I host StreamingGourmet (the blog and video site) I don’t make very many videos. I felt compelled to demonstrate how easy it can be to yank big chunks of crab meat out of the back fin of a crab, though, since it can be a little intimidating. I like to confess that I picked dungeness crab on my very first date with my (now) husband, so if he can fall in love with me with crab juice dripping down my chin and crab meat wedged in my fingernails, then we’ll probably be fine when we’re 65.
Dungeness Crab
Dungeness Crab Mac-n-Cheese Serves 3-4
Ingedients
1/2 lb penne
Olive oil
1 cup heavy cream
1 cup shredded sharp cheddar cheese
1 cup shredded Gruyére cheese
1 tsp salt
freshly ground pepper
freshly grated nutmeg
1 Tbsp butter
1/4 cup chopped onion
1 large clove of garlic, minced
1 cup crab meat
1/2 cup white wine
1/2 cup Panko bread crumbs
1/4 cup grated Parmesan cheese
a few dabs of butter
Method
1. Prepare penne according to al dente package directions. When drained, toss with a bit of olive oil to keep it from sticking together while you prepare the other elements of the dish. Set aside.
2. Preheat oven to 350˚F.
It’s best if you work on steps 3 and 4 simultaneously. Read them through to see what I mean.
3. In a medium saucepan, slowly bring the cream to a boil. Allow it to thicken and reduce by half, watching carefully not to scald the cream or let it boil over. Turn off the heat and let it cool for about a minute. Then add the cheddar and Gruyére cheeses in small batches, incorporating each batch before adding the next. Try not to over stir the mixture as this could make it stringy. Halfway through adding the cheese, you can pop the heat back on low, but be careful to keep the heat as low as possible while still promoting the melting process. Heat that is too high will cause the cheese fats to separate from the proteins. If that happens, there’s no going back. After the last batch of shredded cheese is incorporated, add salt, pepper and nutmeg to the sauce. Turn off heat and let sit, stirring occasionally.
4. While the milk is simmering and reducing, (before you are melting the cheese into it) prepare the other part of the sauce: In a medium saucepan, melt the butter over medium heat. Add the garlic and onion and sautée until onions are softened, but not browned, about 4 minutes. Add wine and simmer to reduce wine by half, about 15 minutes. Add crab meat and continue to simmer until wine has reduced by half again. Remove from heat.
5. Stir the wine & crab meat mixture into the cheese sauce until fully combined. Spray a casserole dish with nonstick cooking spray. (You could also prepare this dish in individual serving-sized gratin dishes). Add pasta to the casserole dish and then pour the wine/cheese sauce over the pasta and toss to combine. Top with bread crumbs. Dab with butter and sprinkle Parmesan cheese across the top.
6. Bake for 20-25 minutes, or until bubbly. If the top is not browned by the end of the baking process, stick it under the broiler for a few minutes. Let cool for 5 minutes and then enjoy immediately.
Day 2 of 14 Days of StreamingApple and I’ve found another amazing recipe in this out-of-print cookbook I’ve got that was published by the Culinary Institute of America in 1999. It’s called Cooking Secrets of the CIA and used copies are available on Amazon. You may remember that during 31 Days of Pumpkin, I cooked a Pumpkin Mascarpone Cheesecake from this book. Well a quick scan for apples yielded this whimsical recipe.
Day 29 of 31 days of pumpkin and you’re still here? You’re crazy.
Just kidding.
I’ve been doing a lot of fattening up of recipes lately and this one is no exception. In fact, I actually adapted this one from a lighter recipe in Cooking Light Five Star Recipes: The Best of 10 Years. The book was published in 1997 and is out of print, but it’s available on Amazon:
The difference between the recipe in the book and the one I’ve published here is that Cooking Light leave out the extra 1/4 cup of Gruyere that I added and they use 1/4 cup of fat free sour cream instead of 1/4 cup of heavy whipping cream. If I had had sour cream on hand, I would have used it, but to be honest, I had a lot of heavy whipping cream on hand because of the all the garnishes I’ve had to do this week, so I just substituted it in. Their recipe also didn’t call for nutmeg, which I added in because it’s a flavor I love to mix with Gruyere and with pumpkin, so it was a natural addition.
The last difference is that the Cooking Light recipe does not call for baking the mixture in the oven with a little bit more cheese on top. That’s all me.
This is a great side dish, and perhaps a fun addition to a Thanksgiving lineup. It could use a bit more flavor, however. Next time, I might add chives to the ensemble or other fresh herbs. The pumpkin flavor was subtle. You can substitute two cups of canned pumpkin if you don’t have the fresh pumpkin all peeled, deseeded and chopped on hand. I actually did have it on hand because of this crazy pumpkin month I’ve been having.
4 cups peeled, cubed baking potato (about 1 1/2 lbs)
3 cups peeled, cubed pumpkin flesh
1/4 cup shredded Sharp cheddar cheese
1/4 cup shredded Gruyere cheese, divided
1/4 cup heavy whipping cream, at room temperature
1/2 tsp salt (or more)
1/4 tsp ground pepper
Pinch ground nutmeg
Method
1. Place potato and raw, fresh pumpkin chunks in a large saucepan; add water to cover and bring to a boil. Cover and cook for 20-30 minutes or until tender; drain.
2. Preheat oven to 375˚F. Combine potato, pumpkin, cheddar cheese, half of the Gruyere cheese, whipping cream and seasonings in a large mixing bowl. Beat at medium speed with an electric mixer until smooth. (You could even pass it through a sieve to make it really smooth). Transfer mixture to an oven proof dish like a Gratin dish and sprinkle remaining Gruyere on top. Bake in oven for 15-20 minutes or until top is golden brown. Let stand for 5-10 minutes before serving.
Day 18 of 31 days of pumpkin and I’ve decided to bring one of my favorite potato recipes into the world of pumpkin. The dish? Gratin Dauphinois or Potatoes Gratin. Thinly sliced potatoes baked in cream and Gruyére cheese. Surely pumpkin can adapt, but not on its own and so I’ve paired it with Garnet yams. One of my inspirations cooking this dish with pumpkins and yams comes from the fact that I always add a little nutmeg to dishes with melted Gruyére, like macaroni and cheese. It’s not a far jump from nutmeg to pumpkin, so I thought, maybe pumpkin and yams will stand up to the creamy cheesy sauce that is a gratin. I was right. This dish is great for confronting October’s chill.
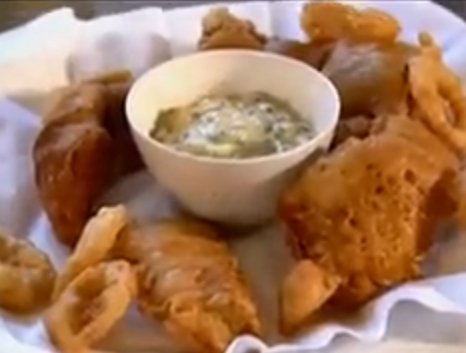
I’m seeing the world through pumpkin-tinted glasses these days, so when my eyes settled on the Buffalo Bill Pumpkin Ale display at the market the other day, I just knew I had to cook something with it. You see, it’s day 14 of 31 Days of Pumpkin and time for something completely different.
A beer batter video came across my desk while working on my other project, StreamingGourmet: Where You are the Food TV Star (join today!) and I knew just what to do. I’ve always wanted to master deep frying with batter and today, I think I have. In the past, I’ve struggled with keeping the coating on the food and having it crisp up just right. Well I’m not exactly sure what went right today, whether it was the consistency of the batter, the high temperature of the oil, or the fact the oil was the right depth, but I got perfectly fried fish every time and it was a cinch. I ate the fried calamari too quickly to photograph it. Sorry.
Day 9 of 31 days of pumpkin and I am psyched. I chowed down on this dish after photographing it and it was delicious. It’s been a long time since I’ve made risotto. It’s a labor of love kind of recipe that demands one’s full attention, so I made this while the kids were at school today. And then, in a quiet house with the hazy, long shadows of an early afternoon in fall, I savored every last bite. Then a pair of Blue Angels screamed overhead breaking one reverie and ushering in a new one.
For this recipe, I use the smaller Bay Scallops, rather than the larger Sea Scallops. Either could be appropriate here, but the Bay Scallops were $9.99/lb as opposed to the $19.99/lb Sea Scallops, so I decided to go for the lower stakes. I wasn’t disappointed. Yesterday, I read a blog post by Debi Shawcross on How to Perfectly Pan Sear Scallops and I took her advice to heart. Definitely check out her post. The key takeaway for me was to try to get as much of the water out of the scallops as possible because water is the enemy of browning.
When I saw these gorgeous beans (still in the shell) at the market, I just had to buy them. I had no idea what they were or what I was going to do with them, but they were too beautiful to pass by. Turns out, their flavor is just as pleasing: nutty, rich, creamy. They’re like eating a bowl of health.
“What are they?” you ask? At the store, they were labeled “Raspberry Beans,” but my subsequent research has shown that they are more commonly called “Cranberry Beans.” They are related to the Italian ‘borlotti’ bean. The best explanation of the origin and history of the Cranberry Bean can be found over at The Culinary Addict. He explains how the Cranberry Bean was first cultivated by the Aztecs and the Incas thousands of years ago. It’s believed to have been crossed with the white bean to create today’s larger, kidney-shaped Cranberry Bean. It was brought to Italy in the 1500’s and has thrived there ever since. Check out The Culinary Addict’s photos of the beans still in their shell.
Cranberry Beans Just Shelled
Unfortunately, the beautiful marbled color does fade with cooking, but the flavor more than makes up for the lost colors. I decided to cook mine in a garlicky, low-fat broth. This would be great served with lamb shanks or osso bucco, but I’ll be honest. I ate mine without any accompaniment.
1. Bring 6 cups of salted water to boil. Add beans and simmer for 20 minutes. Remove from heat, drain, and rinse with cold water to stop the cooking. Set aside.
2. Heat olive oil in heavy-bottom medium sauce pan. Add leeks and sautée gently until starting to soften, about 2 minutes. Add garlic and sautée for 1 minute. Add cooked beans and stir to coat. Add broth, butter and salt and bring to a gentle simmer. Add bay leaf and let cook uncovered for 20 minutes, stirring as needed. Add additional chicken stock to keep beans moist, if necessary.
3. While beans are cooking, mix grated lemon zest, chives and minced garlic in a small bowl. Add this mixture to the beans near the very end of the cooking time. Remove bay leaf, add fresh ground pepper to taste and enjoy.
My four-year old is a very picky eater. If he could have macaroni and cheese at every meal, he would. So I’ve taken to hiding healthy foods in the mac-n-cheese to ensure he’s getting enough nutrition. This version worked pretty well. If I were making it for myself, I would have used stronger cheeses like (you guessed it) Gruyére, and I would have added other punchy flavors like garlic or nutmeg. But I wanted this dish to go down without a fuss, so cheddar ruled the day.
I didn’t conceal from him the fact that I was concealing healthy foods in his macaroni and cheese. In fact, I enlisted his help during the broccoli and cauliflower grinding process. He loves to push the button. We used my new Cuisinart mini chopper. It’s a snap to pull out, use, and clean up.
Available at Amazon - Click here
My son
Broccoli Chopped in the Mini Prep
Macaroni & Cheese with Broccoli and Cauliflower Serves 4
Ingredients
1 1/2 cups broccoli florets
1 1/2 cups cauliflower florets
1 tsp olive oil
1/2 lb elbow macaroni
3 Tbsp butter
2 Tbsp flour
1 1/4 cup whole milk (or heavy cream to make it really decadent)
2 cups shredded sharp cheddar cheese (we had fun shredding ours in a vintage Mouli)
1 tsp salt
1/2 cup bread crumbs
1 Tbsp melted butter
Broccoli & Cauliflower sautéeing
Method
1. Preheat oven to 350˚F. Put broccoli florets into food processor and grind into teeny weeny pieces. Remove to a bowl. Repeat with cauliflower.
2. Heat olive oil in a skillet over medium heat. Add broccoli and cauliflower and toss. Basically, we’re browning these vegetables just a little bit to enhance the nutty sweet flavors they bring to the dish. After a few minutes, turn off the heat and leave for later.
3. Bring salted water to boil in a large pot and boil the macaroni. Since you’re going to be baking this dish, you can shave off a minute from the boiling time recommended on the package.
4. In the meantime, for the roux, heat the milk in a saucepan to almost boiling. Remove from heat for later. Melt butter in a heavy-bottom saucepan. Add flour and whisk continuously. Sautée flour for 3 minutes. Don’t let it brown or it will get bitter. Add the warm milk in a steady stream and whisk continuously. Simmer gently (no boiling!) until thickened, about 2 minutes. Add shredded cheese in small batches, incorporating each batch completely. Season with salt. Add broccoli and cauliflower and stir until well combined. At this stage, you have a kind of broccoli-cheddar cream soup. You could use this sauce for lots of different things. I put it over a baked potato and it was awesome.
5. Mix bread crumbs and melted butter in a small bowl.
6. To assemble, pour macaroni into a baking dish that has been sprayed with non-stick cooking spray. I used this small Le Creuset dish. Stir in the sauce, coating all of the macaroni completley. Top with the buttered bread crumbs. Bake uncovered for 25 minutes or until bubbly. If topping is not already browned, you can put it under the broiler for a minute at the end.
Le Creuset. Available at Amazon
Want to see a bunch more macaroni and cheese ideas? Check out this video collection at StreamingGourmet.com:
Looking for more broccoli recipes? Check out ComfyCook’s collection of Broccoli recipes collected from BSI participants around the blogosphere.