Categories
Fish & Shellfish

Cilantro-Lime Halibut

Cilantro Lime Halibut

Food like this that keeps me feeling great. Full of flavor, protein, vitamins – this is the kind of food that keeps me “on track.”

The sauce is light. I’ve stuck with chicken stock, white wine and lime juice as its base. When I made it originally back in 2012, I also used an infused oil that was available at Mollie Stones. It was called Nona Luisa’s Blood Orange infused Olive Oil. With just a tad of it in the pan at the beginning, it gave the dish an extra zest. I’m not sure that it is still available.

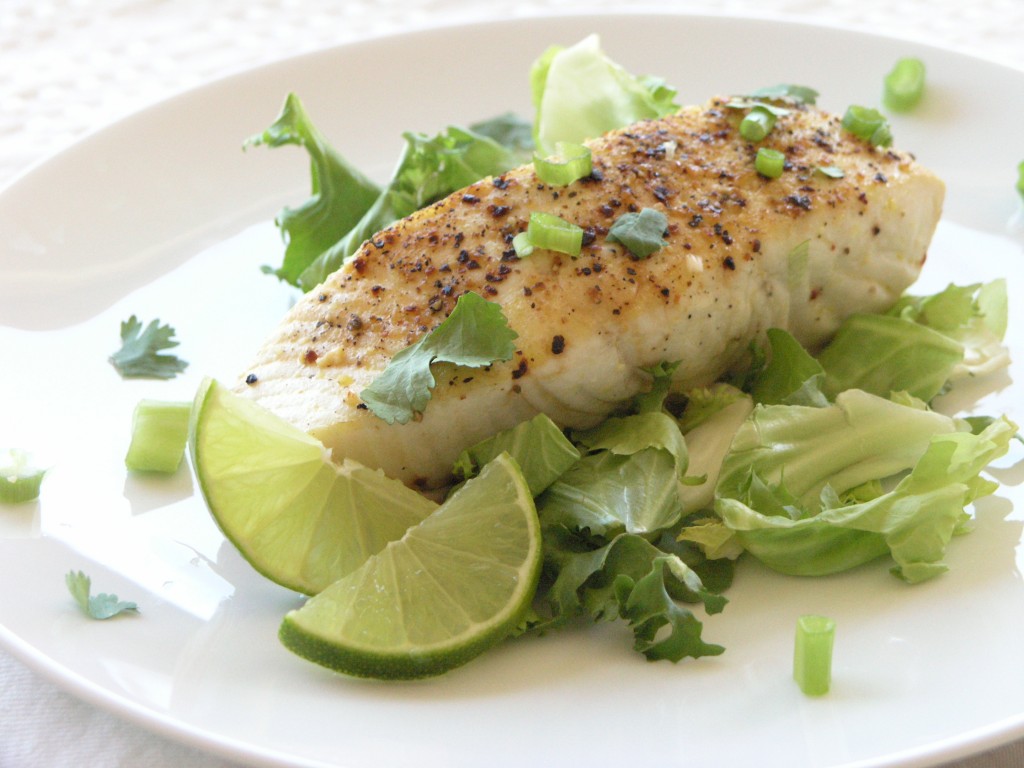
To keep things light, grain-free, and low-carb in general, serve this over a bed of greens, or with a Cucumber and Avocado Ceviche piled on top. For today, lettuce with a little blood-orange olive oil vinaigrette did just fine.

Cilantro-Lime Halibut
 
Prep time
Cook time
Total time
 
Cilantro and lime are the perfect pairing for halibut.
Author:
Recipe type: Main
Serves: 2
Ingredients
  • 2 (1/2 lb) Northern Halibut Filets
  • 2 tsp Mollie Stone's Blood Orange Olive Oil (or regular olive oil)
  • Dusting of garlic-pepper
  • ¼ cup white wine
  • ¼ cup chicken stock
  • Juice of one lime
  • 2 green onions, chopped from the white part halfway up the green part
  • Another slug of Blood Orange Olive Oil
  • A bunch of fresh cilantro
  • Salt and Pepper to taste
Instructions
  1. Heat the oil in a large frying pan over medium heat. Coat the filets with garlic pepper on the flesh side. When pan is heated, add filet flesh side down to pan to sear that side. Allow to cook for about 30 seconds. Then flip filets over with tongs.
  2. Add white wine to pan and cover to steam. After about 2 minutes, much of the wine will have evaporated. Add the chicken stock gradually. Allow the filets to steam for another couple of minutes. Then add the lime juice. When bubbling and both filets are opaque all the way through, add the green onions to the pan and swirl in the sauce for a moment.
  3. Remove filets to beds of lettuce. Add a tsp of the Blood Orange Olive, swirl the green onions in the sauce one more time and then pour equal parts over the fish.
  4. Garnish with fresh cilantro and lime wedges. Sprinkle with salt and pepper to taste. Serve immediately.


Categories
Dessert Uncategorized

Cherry Cobbler

Cherry Cobbler
Cherry Cobbler

May 17 is National Cherry Cobbler Day! I decided to make an easy cherry cobbler with more than a hint of cinnamon. I prefer the real “biscuity” kind of topping on cobbler, rather than a streusel, or sugar crusted type topping. Using the Stonewall Kitchen Cherry Pie Filling saves one from having to pit the cherries and cook them just right. My easy cobbler recipe takes about 10 minutes to prep and 20 minutes to cook. Done and done!

icon
icon

Cherry Cobbler
 
Prep time
Cook time
Total time
 
Easy cherry cobbler with a hint of cinnamon
Author:
Recipe type: Dessert
Serves: 6
Ingredients
  • 4 Tbsp butter, cut into small pieces
  • 2 Tbsp sugar
  • 1 cup all-purpose flour
  • 1 tsp baking powder
  • ½ tsp baking soda
  • ½ tsp cinnamon
  • ½ tsp salt
  • 1 cup whole milk
  • 29 oz Jar of Cherry Pie Filling
Instructions
  1. Preheat oven to 425˚F.
  2. Add pie filling to a 9 x 12 casserole dish. While preparing the batter, put the dish in the oven for about 10 minutes so that the fruit has a chance to warm up.
  3. Meanwhile, in a standup mixer, cream together the butter and the sugar until fluffy.
  4. In a separate bowl, mix together the dry ingredients. Add the dry ingredients to the butter-sugar mixture and mix in the mixer until a crumbly dough starts to form. Don't over mix.
  5. Add the milk and stir with a spoon until mixture is a smooth batter. Again be careful not to overmix it.
  6. Remove casserole dish from the oven and spread batter over the top, trying to reach all of the corners.
  7. Bake at 425˚F for 15-20 minutes or until biscuit topping is golden brown. The cinnamon in the mixture will make it appear more brown than a normal biscuit.
  8. Serve with vanilla ice cream or just on its own. Best when served warm.

Categories
Dessert

Peanut Butter Chocolate Chip Cookies

Peanut Butter Chocolate Chip Cookies

May 15 is National Chocolate Chip Day. What better way to celebrate than to enjoy classic drop chocolate chip cookies with a peanut butter twist.

Tips and tricks for getting great chocolate chip cookies
1) Make them large. When they are large, the edge can be crispy while the center is still soft. That’s how I like them.
2) Don’t forget the vanilla. It seems like an ingredient of little importance, but vanilla adds depth to chocolate chip cookies (peanut butter otherwise) and without it, they seem flat
3) Don’t open the oven door while they’re cooking, but check on them through the window. You don’t want the temperature in the oven to drop, but near the end, you’ve got to watch so that they don’t over-brown.
4) For these cookies: Creamy peanut butter or chunky peanut butter. It’s up to you!
5) Use big, disc-shaped chocolate chips, like the ones made by Ghiradelli:


Remember that 80’s commercial for Reese’s Peanut Butter cups?


4.5 from 2 reviews
Peanut Butter Chocolate Chip Cookies
 
Prep time
Cook time
Total time
 
Hey, you got your chocolate in my peanut butter!
Author:
Recipe type: Dessert
Serves: 24
Ingredients
  • ½ pound (2 sticks) butter, softened
  • ¾ cup white sugar
  • ¾ cup dark brown sugar
  • ¾ cup creamy peanut butter
  • 2 large eggs
  • 2 cups all-purpose flour
  • ½ tsp baking soda
  • ½ tsp salt
  • 3 cups semi-sweet chocolate chips
  • 2 tsp vanilla extract
  • ½ cup roasted, salted peanuts crushed
Instructions
  1. Preheat the oven to 375˚F
  2. In an electric mixer, cream the butter and sugars until fluffy. Add peanut butter and beat until fully incorporated.
  3. Add the eggs, one at a time and beat until each is well blended.
  4. In a separate bowl, combine the flour, baking soda and salt. Add the dry ingredients in 3 batches, mixing with a spoon until fully incorporated. Stir in the chocolate chips and vanilla.
  5. Drop in large tablespoons onto a cookie sheet. I was able to fit about 8 cookies on each cookie sheet.
  6. Spoon a little bit of the crushed nuts onto the top of each cookies and press gently with your fingers.
  7. Bake for 10-12 minutes. Watch closely near the end. The edges should just be browning and the middle will appear a little soft.
  8. Remove and let cool for a couple of minutes before transferring to a plate or cooling rack.
Notes
Makes 4 batches of 8 cookies. Takes 40 minutes if you cook the batches one after the other.


Peanut Butter Chocolate Chip Cookies

Categories
Beef Pork Uncategorized

Sun-Dried Tomato Pesto Italian Meatloaf

Sun-Dried Tomato Pesto Meatloaf

When Mooney Farms contacted me asking if I would be interested in trying out some of their Sun Dried Tomato products, I said, “Yes. Yes!” Shortly after, a goodie box arrived chock full of tantalizing jars and packets. I’m inspired. Stay tuned for more recipes, but today I made Meatloaf with their Sun Dried Tomato Pesto.

Family owned in Chico, CA, Mooney Farms produces high quality sun-dried tomatoes and uses premium 100% pure olive oil. I can definitely vouch for the rich flavor.

Today, I made a recipe that was attached to the top of the jar of the Sun-Dried Tomato Pesto. Man, was it delicious. I don’t normally make meatloaf. My husband doesn’t really eat meat and my kids woud be scared of it in this form. Since they’re not interested, if I’m not careful, I’m going to sit here and eat all 3 lbs of it myself this afternoon. Seriously. It’s that good. If your family likes meatloaf, this is going to be a winner. There is melted Mozzarella on top, no less!

If your market doesn’t carry their products, you can purchase them directly from the Mooney Farms Wesbite.

Sun-Dried Tomato Pesto Italian Meatloaf
 
Prep time
Cook time
Total time
 
Bella Sun Luci Sun Dried Tomato Pesto kicks up Italian Meatloaf a notch
Author:
Recipe type: Main
Serves: 6
Ingredients
  • 2½ lbs lean ground beef
  • 1 lb pork sausage (I used Sweet Italian Sausage)
  • 2½ cloves garlic minced
  • 2 large carrots, chopped finely
  • 1 tsp basil
  • 1 tsp oregano
  • ¼ tsp salt
  • pepper, to taste
  • 2½ cups bread crumbs
  • 3 eggs
  • ½ cup tomato ketchup
  • ½ cup red wine
  • 4 oz Bella Sun Luci Sun Dried Tomato Pesto
  • ¾ lb Mozzarella cheese
Instructions
  1. Combine all ingredients, except cheese, in a large bowl. Then place meatloaf in a pan. Bake for 70 minutes at 375˚F. Remove from oven and top with Mozzarella cheese. Return to oven for 5-10 minutes or unti cheese is melted. Garnish with additional pesto, if desired.


Sun Dried Tomato Pesto Meatloaf

Categories
Appetizers Salads Uncategorized

Classic Caesar Salad – Mad Men Style

Caesar Salad with Shaved Parmesan

Whenever I watch Mad Men, I wish I could be transported back in time to the New York City restaurants featured on the show. Of course, many of them are still open and thriving, and NY Eater has indexed them beautifully, here. But alas, I live in San Fracisco, and my time machine is in the shop, so I am reduced to trying to recreate the recipes of the day here at home.

I worked at a restaurant in the early eighties that made Caesar Salad table-side. It’s definitely food as theater when the waiter cracks the egg over the salad and mixes it in or lifts his arm high in the air to drizzle in the olive oil. Entertain your family at home with a similar preparation. It was in Season 1, episode 2 (The Ladies’ Room) that Betty and Don Draper dine with Roger Sterling at the restaurant Toots Shor, where a Caesar Salad is prepared table-side. Also in Season 3, Episode 4 (The Arrangements), Pete Campbell, Don Draper, and a potential client, Horace “Hoho” Cook dine at Keen’s where Caesar Salads are prepared table side even today.

Betty and Don Draper at Dinner

Nowadays, people are a little spooked by the raw egg mixed into the dressing, but I’m someone who has eaten raw cookie dough my whole life and never -knock on wood – suffered from salmonella poisoning. This Caesar Salad recipe also calls for a coddled egg (boiled in rapidly boiling water for 40 seconds) which may comfort those who are nervous. The US Department of Agriculture measures the risk encountering a contaminated at 1 in 30,000. Coddling doesn’t quite bring the temperature of the egg to the 160˚F required to kill the bacteria, but it makes for a creamier dressing.

And what about anchovies? They weren’t a part of the orginial Caesar Cardini salad recipe, so I haven’t included them here, but if you want to add them in, just chop a few of them finely to mix into the dressing and then garnish with a few more on top.

For more about the food of Mad Men, check out The Unofficial Mad Men Cookbook, available at Amazon.com:

Watch Mad Men on AMC, Sundays at 10/9c.

Caesar Salad
Serves 2-4

Ingredients

Dressing:
1 clove garlic crushed
1 egg yolk that has been coddled (boil in rapidly boing water for 40 seconds)
2 tsp Dijon mustard
1 lemon, juiced
1 tsp Worcestershire Sauce
1 pinch of salt
1/3 cup extra-virgin olive oil
Freshly shaved Parmesan cheese, plus extra for garnish
Freshly ground black pepper

2 heads romaine lettuce
Great croutons (if you have to make them yourself, toast cubed bread in olive oil and minced garlic until golden brown).

Method

1. In a large wooden bowl, spread the crushed garlic around. Crack a coddled egg into the bowl. Add mustard, lemon juice, Worcestershire Sauce and salt. Beat with a fork. Pour the oil in a steady slow stream while continuing to beat the mixture. Tear the lettuce into the bowl and toss. Grind fresh pepper on top. Add the croutons and freshly shaved Parmesan. Toss and transfer to plates. Then shave additional Parmesan on top.

Caesar Salad
Caesar Salad

Categories
Dessert Uncategorized

Black Cherry Chocolate Parfait

Black Cherry Chocolate Parfait

It’s National Chocolate Parfait Day, so I was inspired to run to the grocery store and whip up a parfait. My goal was to make some delicious and fast. So I opted for instant pudding today, but when I have more time, I’ll go for the home-made version. I did make my own whipped cream, because although most people don’t realize it, making real whipped cream is just about as fast as pulling the canned stuff out of the fridge.

I do have this great tool that enables me to whip with little effort and no noise. It’s a rotary egg beater and they have them on Amazon:

I used the rotary egg beater to whip up the instant pudding and during the 2 minutes that was chilling in the refrigerator I used it to whip up the whipped cream. Done and done.

Now for the layering. I love the flavors of chocolate and cherry together, so I used this lovely Black Cherry jam as one of the layers. It’s difficult to see in the photograph, but it’s lodged between the chocolate pudding and the whipped cream. It’s also available on Amazon if you can’t find it in your local grocery store:

5.0 from 1 reviews
Black Cherry Chocolate Parfait
 
Prep time
Cook time
Total time
 
Chocolate pudding, cherry jam and real whipped cream come together for a National Chocolate Parfait Day treat.
Author:
Recipe type: Dessert
Serves: 6
Ingredients
  • 1 package Jell-O instant chocolate pudding
  • 2 cups milk (I use 2%)
  • 1 cup heavy whipping cream
  • 1 Tbsp confectioner's sugar
  • 1 tsp vanilla
  • 6 Tbsp Black Cherry Jam
Instructions
  1. Using a rotary egg beater (or a whisk), beat the instant pudding mix and milk together for 2 minutes. Let chill and set in the refrigerator for 5 minutes.
  2. While the pudding is setting, use a rotary egg beater to beat together the cream, sugar and vanilla. It takes about 3-4 minutes to get nice peaks to form.
  3. Spoon pudding into the bottom of a champagne flute or other tall, narrow glass. Wipe rim with a paper towel to remove chocolate smudges. Spoon in a tablespoon of the jam into each flute, then top with whipped cream and garnish with a chocolate chip or a cherry or anything you like!
  4. Either eat immediately or chill for later.

Categories
Dessert Uncategorized

Oatmeal Chocolate Peanut Butter No Bake Cookies

Chocolate Peanut Butter No Bake Cookies

Today is National Oatmeal Cookie Day, so I thought it would be perfect to celebrate with these fudgy, chocolate, peanut butter oatmeal cookies that can be made with ingredients typically found in your pantry and cooked (from start to finish) in about 10 minutes. This video below, from the Food Network doesn’t demonstrate the proper technique for making these cookies at all. It’s funny to watch if you know how they’re really made. Read on for the proper technique!

I first learned this recipe in my 7th grade home economics class at Wicomico Junior High School in Maryland in 1983. I remember distinctly our teacher stressing two important factors in the preparation of these cookies. First, you must boil the mixture for exactly one minute. If you boil it for under a minute, the cookies won’t harden. If you boil it for longer than a minute, they will come out dry.

Well, to boil something for exactly one minute requires that you know exactly when to start counting. You need to know what “boiling” looks like. Is it when the bubbles to start to appear around the edge the pan? No. In this case, boiling means that there are bubbles all the way across the surface. Start your stopwatch then.

Once it’s boiled for one minute, then you add the oats, peanut butter and vanilla. It’s important to work quickly, because as it cools, it starts to harden into fudge and you want to have all of your spoonfuls onto the wax paper before it gets too hard.

4.6 from 18 reviews
Oatmeal Chocolate Peanut Butter No Bake Cookies
 
Prep time
Cook time
Total time
 
No bake cookies!
Author:
Recipe type: Dessert
Serves: 12
Ingredients
  • 2 cups granulated white sugar
  • 5 tablespoons unsweetened cocoa
  • 1 stick butter
  • ½ cup milk (you can use evaporated milk)
  • ½ cup creamy peanut butter
  • 1 teaspoon vanilla
  • 3 cups Old Fashioned Quaker Oats
Instructions
  1. In a medium saucepan stir add the sugar, cocoa, butter and milk. Over medium-high heat, bring it to a boil, stirring to help the butter melt. Boiling means that there are bubbles all the way across the top of the liquid. Start your stopwatch now and boil it for exactly 1 minute. Remove from heat and quickly add the peanut butter, vanilla and oatmeal and stir to combine.
  2. Working quickly, drop spoonfuls of the mixture onto a sheet of waxed paper. They will cool and harden within a few minutes. Voila. You're done!
Notes
You need wax paper!


Categories
Pizza and Pasta Produce Uncategorized Vegetarian

My Favorite Broccoli White Pizza With Whole Wheat Crust

Broccoli White Pizza

I must admit. I am a total broccoli addict. I eat broccoli every day. Roasted. Steamed. With cheese melted over it on a potato and this way: on a white pizza. This is pretty guilt free. As long as you don’t eat half the pizza, like I sometimes do. But because low-fat ricotta stands in for most of the cheese, the calorie count on this dish is not terrible.

I was first introduced to white pizza in college outside of Philadelphia. Renato’s in Swarthmore used to make an awesome pizza with ricotta, Mozzarella, and lots of garlic. I’m pretty sure there was broccoli on that one too. So basically, I wanted to recreate that pizza here.

I’ve been eating this broccoli pizza almost once a week for about a month now, so I figured it was time to do a post.

I use freeze-dried garlic in this recipe, because it’s so much faster to just sprinkle it over the pizza, than it is to chop fresh garlic. The flavor is great. I don’t miss the fresh garlic at all. I use Litehouse brand, but you can find this other brand at Amazon:

You can make the crust yourself, as I used to do a lot (I just realized I’ve never posted by pizza dough recipe, which is weird), but lately, I’ve just been buying whole wheat pizza dough at the grocery store. Mollie Stone’s now carries Il Fornaio pizza dough in the frozen section. It tastes just like my homemade version, so I’ve been hard pressed to go to all the trouble of making it from scratch. Just make sure that you let the dough sit out long enough to come to room temperature, because if you’re not careful, you can run into the problem of having the toppings cook before the dough is ready, and then it just sticks to the pizza pan like crazy.

To help with making sure the pizza doesn’t stick, I use a nonstick, perforated pizza pan like this one available at Amazon.com (just click on it). I also spray it with a little nonstick spray:

Broccoli Pizza Slice


Broccoli White Pizza With Whole Wheat Crust
 
Prep time
Cook time
Total time
 
White pizza with lots of broccoli and garlic
Author:
Recipe type: Entree
Serves: 4
Ingredients
  • 1 package of pizza dough (I use whole wheat)
  • Semolina or whole wheat flour to handle the dough
  • 2 heads of broccoli, chopped into florets (about 3 cups)
  • 1 Tablespoon freeze-dried garlic
  • ¾ cup reduced fat ricotta cheese
  • ½ cup shredded part-skim Mozzarella cheese
  • Salt to taste
Instructions
  1. Preheat the oven to 500˚F
  2. If you have purchased frozen pizza dough, make sure it thaws overnight. Then let it rest on the counter for at least 20 minutes before shaping it into a pizza.
  3. While the pizza dough is resting on the counter, you can steam the broccoli. Put the florets in a medium saucepan with 2 cups of rapidly boiling water. Steam for 3-4 minutes. Watch carefully. When the broccoli is ready, it will be bright green still, and tendercrisp. It is better for it to be undercooked than overcooked. Remove from the heat and drain completely. Then rinse with cold water to stop the cooking process and drain again. Pour the broccoli out onto some paper towels. You don't want to transfer any water to the surface of the pizza.
  4. When you are ready to shape the dough, put a couple of tablespoons of flour (semolina or wheat) onto a large cutting board. Coat the dough ball with the flour. Flatten the ball into a disc. Then with your fingertips, work your way around the edges, stretching it all out as you go. Put your fist in the middle of the growing circle and let the sides stretch down. Move your arm up and down to help it stretch out. Then work your fingers around the edge of the circle one more time.
  5. Spray the pizza pan with a little nonstick cooking spray and spread the circle of dough onto the pan. With the back of a spoon, spread the ricotta evenly over the pizza. Then sprinkle with the dried garlic. Arrange the broccoli pieces over the surface evenly. Sprinkle with the Mozzarella. Season with salt.
  6. Bake in the oven for 10-15 minutes. Watch carefully. If the cheese starts to brown too quickly (before the crust has had a chance to brown), back off the heat a little bit. When the cheese and the crust are just starting to brown, remove from the oven and let cool for 2 minutes. Then slice and serve immediately.


Categories
Fish & Shellfish Produce Salads Uncategorized

The Best Cinqo De Mayo Avocado Shrimp Tostadas

California Avocado Shrimp Tostadas

Cinqo de Mayo is just around the corner and we’re getting ready by enjoying California Avocados – back in season and perfect for bringing together your favorite Mexican flavors – lime, cilantro, and… avocado. Yum.

This shrimp tostada recipe, a light and healthy dish perfect for a weeknight or for a dinner party, was shared with us by the California Avocado Commission and was created for them by chefs Mary Sue Milliken and Susan Feniger, aka, the Too Hot Tamales of early Food Network fame. Known also for their fabulous Santa Monica restaurant Border Grill, the Too Hot Tamales have been partnering with the California Avocado Commission for some time now to bring fresh, flavorful, avocado forward dishes to all of us. Enjoy!

avocado commission
Avocado Trio

The Best Cinqo De Mayo Avocado Shrimp Tostadas
 
Prep time
Cook time
Total time
 
Bold flavors come together in this fresh take on the shrimp tostada
Author:
Recipe type: Entrée Salad
Serves: 4
Ingredients
  • ¾ cup beer
  • 3 bay leaves
  • ½ tsp. celery seeds
  • ½ tsp. cayenne
  • ½ tsp. salt
  • ½ lb. domestic, wild-caught jumbo shrimp, peeled and cleaned
  • 2 ripe, fresh California avocados, seeded, peeled and cut into ½-inch dice
  • 1 Roma tomato, finely diced
  • ¼ cup finely diced red onion
  • 1 small carrot, peeled and finely diced
  • 1 jalapeño, stem and seeds removed, finely diced
  • ½ bunch cilantro, finely chopped
  • 1½ limes, juiced
  • 3 Tbsp. extra virgin olive oil
  • Salt, to taste
  • Ground black pepper, to taste
  • Canola oil, for frying
  • 4 (6-inch) corn tortillas
  • 4 romaine lettuce leaves, finely julienned
Instructions
  1. Combine beer, bay leaves, celery seeds, cayenne and salt in a saucepan and bring to a boil. Add shrimp and cook 2 to 3 minutes, or until just turning pink and cooked through. Remove shrimp from liquid, cool to room temperature, and cut into ½-inch dice.
  2. In a large bowl, combine cooked shrimp with avocado, tomato, onion, carrot, jalapeño, cilantro, lime juice, olive oil, salt and pepper. Stir gently, taste, and adjust seasonings as necessary. Chill thoroughly.
  3. Meanwhile, pour oil to a depth of ½-inch in a small pan for frying. Fry the tortillas on both sides until crisp and drain on paper towels.
  4. To serve, divide julienned lettuce evenly between each crispy corn tortilla. Top with avocado shrimp mixture and serve immediately.
Notes
I substitute ¼ cup shredded carrots (in the bag) for the diced carrots in this recipe and I leave out the celery seeds.

Categories
Appetizers Rice and other Grains Uncategorized Vegetarian

Crunchy California Avocado Fritters

Crunchy California Avocado Fritters

With Cinqo de Mayo around the corner, what better way to celebrate the flavors of Mexico than to try out new recipes featuring the avocado, now back in season, here in California.

This year, Americans will consume 81 million pounds of avocados on Cinco de Mayo alone! That’s more than 160 million avocados in one day. Get in on the fun by trying this recipe, created for the California Avocado Commission by celebrity chefs, Mary Sue Milliken and Susan Feniger, known as the “Too Hot Tamales,” and co-chef/owners of the popular Border Grill restaurants in Santa Monica, Calif., Downtown Los Angeles and Las Vegas. This dynamic duo were Food Network pioneers when their show “Too Hot Tamales” premiered in 1995. They’ve gone on to compete on Bravo’s “Top Chef Masters,” and have now partnered with the California Avocado Commission to create innovative, fresh recipes featuring California avocados.

I love how this recipe is new and different and yet reminiscent of food I love. It reminds me of falafel of course, but there is also something very sushi maki about it too – like, if you were to take a california roll and fry it. Hey wait a minute. I think I’m onto something.

The recipe uses quinoa (pronounced “KEEN wah”), the high-protein, ancient Andean grain everyone is eating these days. It also calls for Cotija (pronounced “ko-TEE-hah”) cheese, a Mexican cheese with a grainy texture used as an accent by adding a tangy saltiness to dishes when grated on top. If your local grocer doesn’t sell Cotija cheese, order it on Amazon or substitute grated Parmesan.

Crunchy California Avocado Fritters
 
Prep time
Cook time
Total time
 
Author:
Recipe type: Appetizer
Serves: 8
Ingredients
  • ⅔ cup white or black quinoa, rinsed and well drained
  • 1⅓ cups water
  • ¼ cup all-purpose flour
  • ¼ cup grated cotija cheese
  • ¾ tsp salt
  • 4 green onions, white and light green parts only, finely chopped
  • ½ bunch Italian parsley
  • 1 egg
  • 1 egg yolk
  • ¾ cup canola or grape seed oil for frying
  • 1 ripe, fresh California avocado, seeded, peeled and cut in ½-3/4 inch dice
  • Salt to taste
  • Ground black pepper, to taste
  • 1 cup Aji Amarillo Aioli (see make-ahead recipe below)
Instructions
  1. Place a small, dry saucepan over high heat. Add quinoa and toast for about 5 minutes, shaking and stirring constantly to prevent scorching. Transfer to a large saucepan and add water. Bring to a boil, reduce to a simmer and cook, covered, until water is absorbed, about 10 minutes. Set aside to cool.
  2. In a large bowl, combine cooked quinoa, flour, cheese and salt. Add onions, parsley, egg and yolk. Stir thoroughly with a spoon until the mixture has the consistency of soft dough. Chill for 30 minutes.
  3. Heat oil in a large skillet over medium heat.
  4. In a small mixing bowl, season avocado with salt and pepper to taste and toss gently to coat.
  5. Using hands, create round fritters about the size of a walnut shell with a piece of avocado in the center of each fritter.
  6. Working in batches, gently slide fritters into the hot oil. Fry until golden brown, about 3 to 4 minutes, turning as necessary. Drain on paper towels and serve warm, topped with Aji Amarillo Aioli.
Notes
If cotija cheese is not available, parmesan cheese can be substituted Yields about 24 fritters

Aji Amarillo Aioli

Ingredients

1 cup mayonnaise
1 lime, juiced
1/2 tsp salt
2 Tbsp aji amarillo chile paste
1 Tbsp finely chopped Italian parsley

Instructions

1.    Combine ingredients in small bowl. Taste and adjust seasoning as necessary. Refrigerate until ready to use.

Not sure where to get Aji Amarillo Chile Paste? It is available on Amazon:


Blog Widget by LinkWithin