I am currently in the process of retooling for my next blog marathon, which will commence next Monday. Last month’s 31 Days of Pumpkin was a great success, so I am inspired to push on with more daily recipe postings around a theme. Tune in Monday to find out what the secret ingredient will be. If you don’t want to miss a single post, make sure to become a fan of StreamingGourmet on facebook or follow me on Twitter.
In the meantime, I want to bring your attention to my other project – StreamingGourmet, the videohosting site devoted to all things culinary. For Thanksgiving, we’ve assembled collections of the best videos from across the web in each of the important categories: Turkey, Stuffing, Sides, Apple (pie+) and Pumpkin (pie+). To embed these collections on your website, click on “embed this” in the lower left hand corner of the collection.
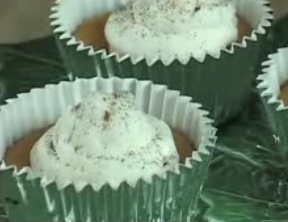
Day 24 of 31 days of pumpkin and we come to a fun, easy video recipe provided by the Karo Company, the corn syrup makers. The clever trick here is baking the cheesecakes in muffin tins lined with paper and lined with gingersnap cookies. Mini-crusts for mini cheesecakes. Genius.
I feel guilty using corn syrup since I read Michael Pollan’s books, but I wasn’t sure how to substitute my way out of it here. If you have an idea, please share it in the comments section. In the end, I figured one recipe a year can’t be all that bad. Right?
Day 16 of 31 days of pumpkin and we arrive at the roasted pumpkin seed. I love how seasonal these are. I mean, on what other day of the year do you roast your own pumpkin seeds but on about October 29? This year, I’ve decided to coat my pumpkin seeds with savory spices, but believe me, pumpkin seeds are divine when roasted with just a little bit of olive oil and a LOT of salt.
Getting the seeds out of the pumpkin wasn’t as hard as I thought it was going to be. If you paw through them while you rinse them, the remaining pieces of pulp come right off.
Day 3 of 31 days of pumpkin brings us to a savory recipe.
The secret to this pumpkin soup isn’t the sage (that’s in the title after all). It’s the fact that the onions are caramelized first. Caramelizing onions takes a bit of time (about 30 minutes, in fact), but it’s well worth it to bring out the sweet, nutty flavor hidden inside. The trick to caramelizing onions is to keep the temperature very low while they are sautéeing. Caramel is created when sugar undergoes controlled pyrolysis – the chemical decomposition that happens when organic stuff gets hot. If it gets too hot, then it gets charred. Char creates the familiar grill marks on a perfectly grilled steak. We’re not charring the onions, we’re trying to decompose the sugars in such a controlled way that they turn into caramel and that takes controlled temperature for a long time.
My four-year old is a very picky eater. If he could have macaroni and cheese at every meal, he would. So I’ve taken to hiding healthy foods in the mac-n-cheese to ensure he’s getting enough nutrition. This version worked pretty well. If I were making it for myself, I would have used stronger cheeses like (you guessed it) Gruyére, and I would have added other punchy flavors like garlic or nutmeg. But I wanted this dish to go down without a fuss, so cheddar ruled the day.
I didn’t conceal from him the fact that I was concealing healthy foods in his macaroni and cheese. In fact, I enlisted his help during the broccoli and cauliflower grinding process. He loves to push the button. We used my new Cuisinart mini chopper. It’s a snap to pull out, use, and clean up.
Available at Amazon - Click here
My son
Broccoli Chopped in the Mini Prep
Macaroni & Cheese with Broccoli and Cauliflower Serves 4
Ingredients
1 1/2 cups broccoli florets
1 1/2 cups cauliflower florets
1 tsp olive oil
1/2 lb elbow macaroni
3 Tbsp butter
2 Tbsp flour
1 1/4 cup whole milk (or heavy cream to make it really decadent)
2 cups shredded sharp cheddar cheese (we had fun shredding ours in a vintage Mouli)
1 tsp salt
1/2 cup bread crumbs
1 Tbsp melted butter
Broccoli & Cauliflower sautéeing
Method
1. Preheat oven to 350˚F. Put broccoli florets into food processor and grind into teeny weeny pieces. Remove to a bowl. Repeat with cauliflower.
2. Heat olive oil in a skillet over medium heat. Add broccoli and cauliflower and toss. Basically, we’re browning these vegetables just a little bit to enhance the nutty sweet flavors they bring to the dish. After a few minutes, turn off the heat and leave for later.
3. Bring salted water to boil in a large pot and boil the macaroni. Since you’re going to be baking this dish, you can shave off a minute from the boiling time recommended on the package.
4. In the meantime, for the roux, heat the milk in a saucepan to almost boiling. Remove from heat for later. Melt butter in a heavy-bottom saucepan. Add flour and whisk continuously. Sautée flour for 3 minutes. Don’t let it brown or it will get bitter. Add the warm milk in a steady stream and whisk continuously. Simmer gently (no boiling!) until thickened, about 2 minutes. Add shredded cheese in small batches, incorporating each batch completely. Season with salt. Add broccoli and cauliflower and stir until well combined. At this stage, you have a kind of broccoli-cheddar cream soup. You could use this sauce for lots of different things. I put it over a baked potato and it was awesome.
5. Mix bread crumbs and melted butter in a small bowl.
6. To assemble, pour macaroni into a baking dish that has been sprayed with non-stick cooking spray. I used this small Le Creuset dish. Stir in the sauce, coating all of the macaroni completley. Top with the buttered bread crumbs. Bake uncovered for 25 minutes or until bubbly. If topping is not already browned, you can put it under the broiler for a minute at the end.
Le Creuset. Available at Amazon
Want to see a bunch more macaroni and cheese ideas? Check out this video collection at StreamingGourmet.com:
Looking for more broccoli recipes? Check out ComfyCook’s collection of Broccoli recipes collected from BSI participants around the blogosphere.
I discovered this video a few days after posting my version of Creamed Spinach. There are some similarities. We both use fresh nutmeg. We both add cheese. He adds Parmesan. I add Gruyère. I made a roux first. He thickened his cream by cooking it down. The revelation I want to try next time? Chopping the raw spinach before adding it to the cream. What are your secrets?
While making sweet potato chips the other day (see that post here), I decided to use one of the other attachments from my new mandoline and make french fries as well. Once again, I was surprised and delighted by how easy and quick it was to turn one giant yam into a pile of matchstick fries.
After hestitating for a long time (“Mandolines are too expensive,” I thought. “They’re too dangerous.”) I purchased my Swissmar Borner V Slicer Plus for only about $40 and I learned that it works great and has many built-in safety features. Click on the photo to learn more.
Mandoline Magic
As usual, I was in a rush, so I didn’t salt these for the recommended 30 minutes. I just salted them and threw them into olive oil that I had pre-heated to nearly smoking. It only took about 5 minutes before they looked done.
Frying in Olive Oil
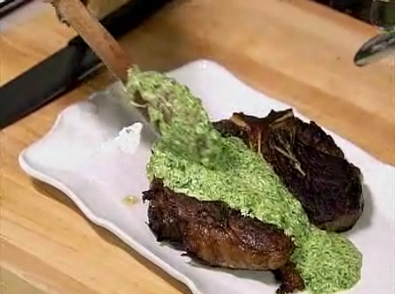
With tongs, I transferred them to a paper-towel lined plate and dabbed them to remove the excess oil. I salted them again and enjoyed them with leftover roast beef from the night before. Scroll down to watch the recipe video I used for the roast beef.
Although they tasted great, the sweet potato fries weren’t super crispy, so I did a little research. There’s a thread on CHOW that recommends soaking them in water first, then dredging them in cornstarch and then frying. I’m definitely going to try that next time because several people who tried this method concurred that it was a big success. You can read that thread here.
Remove them from oil to a paper towel
Even without the extra cornstarch step, these fries were super yummy. The texture reminded me a bit of the French fries at In & Out Burger, not super crispy, but still good. And since they’re sweet potatoes, they’re packed with extra nutrients, right?
Sweet Potato French Fries
Now for the roast beef video. In this video, they coat the beef with grainy mustard before roasting it. Yum.
Want to embed videos quickly on your food blog? In just a few minutes, I created this playlist at StreamingGourmet and then used the Grab Widget Code tool to create this player. Embed it on your site or create your own playlist to embed.You can also embed individual videos.