It’s day 11 of 31 days of pumpkin and I’ve decided to try something new. I’ve never added pumpkin to gingerbread, but it seems like a natural combination, so I’ve decided to go for it. The tagline of this blog is after all, “We risk disaster so you don’t have to.” Combining pumpkin and ginger isn’t even that big of a risk, but you never really know how something is going to turn out until you taste it. This risk yielded success. A moist, light, fluffy cake with a spicy bite to it, I would say this gingerbread is traditional with a twist.
Of course, writing this post feels a little bit like the time I was 8 years old and I told my family I had invented a new drink: half apple juice, half grape juice. Then, while watching tv that night, we all saw a commercial for Welch’s new Apple-Grape drink. While working on this post, a quick Google search for “Pumpkin Bread” has yielded a pretty long list of recipes. Duh.
Day 10 of 31 days of pumpkin brings us to a mousse recipe. I must admit, I’m new at making mousse and this is an adapted recipe, but I am delighted, because it was so easy to make. Before I started, I was a little intimidated by using gelatin, but there was nothing to it. This is one of those recipes that requires no baking and sometimes that comes as a great relief. With pumpkin pie (I haven’t posted one yet; it’ll come), it’s always nerve wracking to wait while it bakes in the oven. Things can go wrong. It can crack. It can dry out. Not so with mousse. Once you’re done. Your done. When I put it in the refrigerator to chill, I knew I was home free.
This recipe has rum flavoring in it, which is really an optional addition. I didn’t have any dark rum in the house, so I used 1 Tbsp of rum extract mixed with 3 Tbsp of water, but you could substitute 1/4 cup of dark rum or leave it out altogether.
I had such fun making the gingersnap crust. Crust is another thing that has the potential to intimidate me, but mushing buttery crumbs into a pie plate was a cinch. I used my handy Cuisinart Mini-Prep to crush the cookies. You could purchase one here and make my day.
Day 4 of 31 days of pumpkin and we arrive at a Bundt cake. I’m psyched because I actually bought this bundt cake pan today at Mollie Stones in Sausalito. It’s nonstick, so I really wasn’t worried when it came time to invert the cake onto a plate. And then I had so much fun sifting the powdered sugar on top. Can you tell I’ve been waiting a long time to make a Bundt cake?
Day 2 of 31 days of pumpkin and we come to a custardy pumpkin crème brulée with a hint of cardamom. I love making desserts that come in individual servings. Maybe that’s because I hate sharing. This way, everyone gets his own ramekin and no one has to fight over who gets the bigger piece.
Since starting this project, I’ve learned something about sugar: there’s more than one kind. Of course, I always knew there was brown sugar, and dark brown sugar, but I haven’t really gone beyond that sort of basic knowledge of sugar. This week, I discovered demerera sugar and I use it in this recipe.
October is my favorite month. Halloween is my favorite holiday and today is the one year anniversary of my recipe blog, StreamingGourmet – The Blog and my culinary videosharing website StreamingGourmet. To celebrate, I’m kicking off a month of daily pumpkin recipe posts. Follow StreamingGourmet on facebook (look to your right) and you won’t miss a single recipe.
Today’s recipe is for a fluffy pumpkin cookie with semi-sweet chocolate chips. Since the recipe contains both baking powder and baking soda, the cookie dough dough puffs up to make a soft, cakey cookie. The interplay between pumpkin pie flavors and the chocolate chips is surprisingly yummy. I think you’ll be seeing a lot of chocolate/pumpkin pairings this month.
A fluffy, cakey cookie perfect for a Halloween party.
Author: StreamingGourmet/Amy
Recipe type: Dessert
Cuisine: American
Serves: 36
Ingredients
½ cup unsalted butter, softened
¾ brown sugar
¾ granulated sugar
1 cup canned pumpkin
1 egg, beaten
2 teaspoons vanilla extract
2½ cups flour
1 tsp cinnamon
½ tsp ginger
¼ tsp ground cloves
pinch freshly ground nutmeg
pinch mace
1 tsp baking powder
1 tsp baking soda
½ tsp salt
1 cup semi-sweet chocolate chips
Instructions
Preheat oven to 350˚F.
In a large bowl, cream together the butter and sugar. Add pumpkin and beat well. Then add eggs and beat well. Finally add vanilla and beat well.
Mix together dry ingredients in a separate bowl. Add dry ingredients to pumpkin mixture, about ⅓ at a time and mix well after each addition. Fold in the chocolate chips with a spoon or spatula.
Spoon batter onto cookie sheets that have been sprayed with non-stick cooking spray or lightly buttered. Bake for 15 minutes or until lightly golden brown. Let sit for one minute after removing from oven. Then cool on wire racks.
Grilled Peaches with Toasted Almonds and Vanilla Ice Cream
I know, it’s late in the season to do a post about peaches, but I swear, local peaches are still on sale here at Paradise Market, so I didn’t hesitate when the dinner party menu I was using from the Williams-Sonoma Dinner Parties book included this Grilled Peaches dish for dessert. Once again, I adapted the recipe and made it my own.
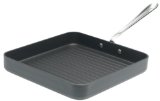
The method I used for each step of this recipe differed greatly from the one outlined in the Dinner Parties book, because I’m lazy and I like to keep the cleanup as simple as possible. Therefore, instead of using the oven and a cookie sheet to toast the almonds, I just toasted them in a sautée pan and rather than using my gas grill outside to grill the peaches, once again, I whipped out my All-clad non-stick grill pan. During the party, I had just grilled the Halibut, so I actually had to wash the pan between the main course and the dessert course before I could fire it back up, but because it’s a non-stick pan, washing it was a breeze and it was ready for another round of action in no time.
I have to say, the guests at the party went unexpectedly wild about this dessert. None of us were prepared for the peaches to cook all the way through in such a short amount of time, so we all took our first bite a bit tenatively. The peaches only grill for about 6-7 minutes, but they come out soft, warm and sweet – all they way through. Guests also commented enthusiastically about the contrast among textures with the crunch of the almonds, the creamy chill of the ice cream and the warm, soft texture of the peaches. A splash of Balsamic Vinegar lent tang and flavor. One guest, Steve, likes to make a Balsamic reduction for grilled fruit, because then it’s an amazingly sweet addition. See the links to other blogs at the bottom of this post to find out more about how to do that. For me, the Balsamic vinegar was a last minute thought, and I was just glad to have splashed it in.
Brush the peach halves with olive oil for grilling
Heat a 10-inch skillet over medium-high heat. Add almonds and toast, watching carefully so they don't burn. If the pan has truly had time to heat up, it takes about 2 minutes on the first side and then 1 minute after flipping them. Set almonds aside.
Brush both sides of each peach half lightly with extra virgin olive oil. Place peach halves in the pan, round side down and grill for about 3 minutes. Check one to see if grill marks have appeared. Turn them over and grill on the other side until grill marks appear, about 4 more minutes.
If peaches are large, place one half on each plate. For medium sized peaches, you could plate with two halves. Sprinkle with almonds and add a scoop of vanilla ice cream.
I really have no business posting anything about cupcakes given what’s out there about cupcakes these days, but I had fun baking and icing these with my son today, so there.
We used a boxed vanilla cake mix and added a couple of teaspoons of vanilla for good measure. Then we made a traditional butter icing with 1 box of confectioner’s sugar, 1 stick of butter, 1/4 cup of milk and a couple of teaspoons of vanilla. We added 5 drops of red food coloring and 1 drop of blue to get this version of pink icing. Iain was excited to add sprinkles we had leftover from Christmas. Red, green, and pink: my favorite color combination.
For cupcake inspirations with a lot more heft than mine, check out:
Sprinkles Cupcakes – The original cupcake bakery. Located in Beverly Hills, it is credited with igniting the craze. The site has truly inspired gift ideas.
Dainty Cakes LA Blog – An online cupcake delivery company. They sell homemade style gourmet cupcakes, cakes, cookies, pound cakes, and other desserts. The photos are to-die-for!
Cupcakes Take the Cake – Most likely, the #1 blog about cupcakes, Rachel Kramer Bussel, Nichelle Stephens and Stacie Joy keep you coated in sprinkles with the latest in cupcake trends, news, recipes and more. They have a link list with virtually every cupcake bakery in the world. Incredible.
Cupcake Project – When Stef volunteered to make cupcakes for her friends’ wedding, she didn’t know she would become one of the leading baking bloggers out there, but she did. She’s fearless. She’ll make a cupcake out of almost anything.
Or check out this video from the Culinary Institute of America demonstrating how to make a Cupcake Bouquet.
I got it into my head the other day that I just had to make marbled cupcakes. I don’t know why. I scoured the internet for techniques but in the end, I just invented my own. I needed to use what I had on hand in the pantry and I didn’t have any buttermilk or orange peel or almond extract or baker’s chocolate or lots of other things that the recipes were calling for. So I improvised. I made two batters: one was a version of Mark Bittman’s (again?!) Golden Layer Cake batter from How to Cook Everything and the other was a pre-packaged brownie mix batter to which I added an extra egg. The extra egg in the brownie batter made it light enough to co-exist with cake batter in a cupcake. I spooned the golden batter into the cups first then added a large dollop of chocolate brownie batter. Then I simply swirled a knife through with a circular and upwards motion. Once baked and cooled, I iced them with a basic butter cream frosting and added some sprinkles. I don’t have any cake decorating tools, so my icing job looks pretty amateur (at best), but I’m learning.
1. Cream the butter until smooth. Add sugar gradually and continue to cream for 3-4 minutes. Add the eggs, one at a time, incorporating each one completely before adding the next. Then beat in the vanilla extract.
2. In a separate bowl, combine flour, baking powder and salt. Alternate adding the flour mixture and the milk into the butter mixture, incorporating each completely before adding the next.
Chocolate Brownie Batter
1. Follow the instructions on the packaged brownie mix, but add one extra egg.
Assembling the Cupcakes
1. Preheat the oven to 350˚F. Spray two cupcake pans with cooking spray and insert paper cupcake liners.
2. Spoon in enough vanilla batter to fill about halfway up each cupcake liner. Then spoon in a heaping tablespoon of the chocolate batter. Take a knife and swirl it through the batter with an upward motion at the end. Don’t stir too much or the batters won’t remain delineated.
3. Bake in the oven for 25-30 minutes. An inserted toothpick should come out clean. Cool on rack. When completely cool, ice with a simple buttercream frosting.
Buttercream Frosting
1 stick butter, softened
1 lb package of confectioners sugar
1/4 cup milk (more or less)
2 tsp vanilla extract
1. Cream the butter. Alternate adding sugar and milk, beating everything to a smooth, creamy texture. Beat in vanilla. Adjust thickness by adding milk or sugar, but remember that putting it back in the refrigerator will also thicken it up.
Okay. My 4-year-old is home for the summer, so how do we spend our time? Why, baking, of course. Today, he begged me to break out the train cake mold I haven’t used since his 2nd birthday. My complaint about cake molds like this one (and Williams-Sonoma has a new cakelette mold on offer every season. Currently, they are selling a caterpillar cakelette mold) is that the little cakes are difficult to ice and come out pretty dry. So today, when confronted with this cake mold again, I immediately thought, “Brownies!” They are the perfect solution because icing them is not a necessity and it’s easier to keep brownies moist (or downright fudgy if you like them the way I do). In fact, this particular mold is the perfect size for fudgy brownies, because the individual train cars are small enough to be single-serving, yet large enough to leave the very center just a little bit under-cooked (when cooked for 25 minutes at 350˚F).
I’ll be honest. I used a brownie mix as the basis for today’s adventure, with a few minor additions to make the brownies come out the way I like them. I used Marie Callender’s Chocolate Fudge Brownie Mix.
Marie Callender's Brownie Mix
I followed the directions on the package, but substituted melted butter for the vegetable oil (the same measurement) and folded in 3/4 cup of Nestlée Toll House Semi-Sweet morsels.
There was not enough batter to fill every train car, but it didn’t matter.
Just Out of the Oven
I was pleasantly surprised by the chocolaty quality of the finished product. I usually use Ghirardelli chocolate and go to a lot of fuss, but these were just as good and a lot simpler. My son had a lot of fun helping. Williams-Sonoma doesn’t sell this pan anymore, but Amazon does:
I confess. I was at Costco the other day. That’s where I found a 32oz clamshell of California blueberries for $6. I adore blueberries, so I bought them without a second thought. (Actually, I did check to make sure that they were grown nearby, which they were). I had recently also purchased pre-made pie crusts thinking I might make a chicken pot pie, but when I got home and saw them in the refrigerator, it was only a matter of minutes before I was putting them together with the blueberries in pie formation.
I’ll admit, I’m intimidated by making my own crust. I do do it, but on this busy day, the thought of being able to basically dump 2 lbs of blueberries into a pre-made crust and have a pie an hour later was totally satisfying.
I consulted my well-used copy of Mark Bittman’s How to Cook Everything to find a recipe. I was relieved to have the fresh lemon on hand that it calls for. I’ve also become a big fan of grating my own nutmeg with a microplane grater, by the way. So sure enough, my idea of making a pie really fast was going to become a reality with little stress or strain.
It’s funny. Now that I’ve watched so many of Bittman’s videos, I can hear his voice in my head when I read the instructions in his cookbook. It’s such a relaxed and reassuring voice, like, “Anyone can cook, and most everyone should.” (which is the first sentence of the Introduction to the 1998 edition of How to Cook Everything).
Blueberries
Ingredients
5 cups blueberries, picked over, briefly rinsed, and lightly dried
1/2 to 1 cup sugar, depending on your taste and the sweetness of the berries, plus a little for the top of the pie
2 tablespoons cornstarch or 3 tablespoons instant tapioca
Pinch salt
1/4 teaspoon ground cinnamon
Pinch ground allspice or nutmeg
1 tablespoon freshly squeezed lemon juice
1 teaspoon minced lemon zest (optional)
1 recipe Pie Shell for a Two Crust pie (I used Pillsbury pre-made shells)
2 tablespoons unsalted butter, cut into bits
Milk as needed
Method
1. Gently toss the blueberries with the sugar, thickener, salt, and spices. Stir in the lemon juice and optional zest and pile into the rolled-out shell, making the pile a little higher in the center than at the sides. Dot with butter. Cover with the top crust. Decorate the edges with a fork or your fingers, using any of the methods illustrated on page 686 (of How to Cook Everything). Refrigerate while you preheat the oven to 450˚F.
2. Place the pie on a baking sheet and brush the top lightly with milk; sprinkle with sugar. Use a sharp paring knife to cut two or three 2-inch long vent holes in the top crust; this will allow steam to escape. Place in the oven and bake for 10 minutes. Reduce the heat to 350˚F and bake another 40 to 50 minutes, or until the pie is golden brown. Do not underbake. Cool on a rack before serving warm or at room temperature.