Categories
Pizza and Pasta Produce Uncategorized Vegetarian

My Favorite Broccoli White Pizza With Whole Wheat Crust

Broccoli White Pizza

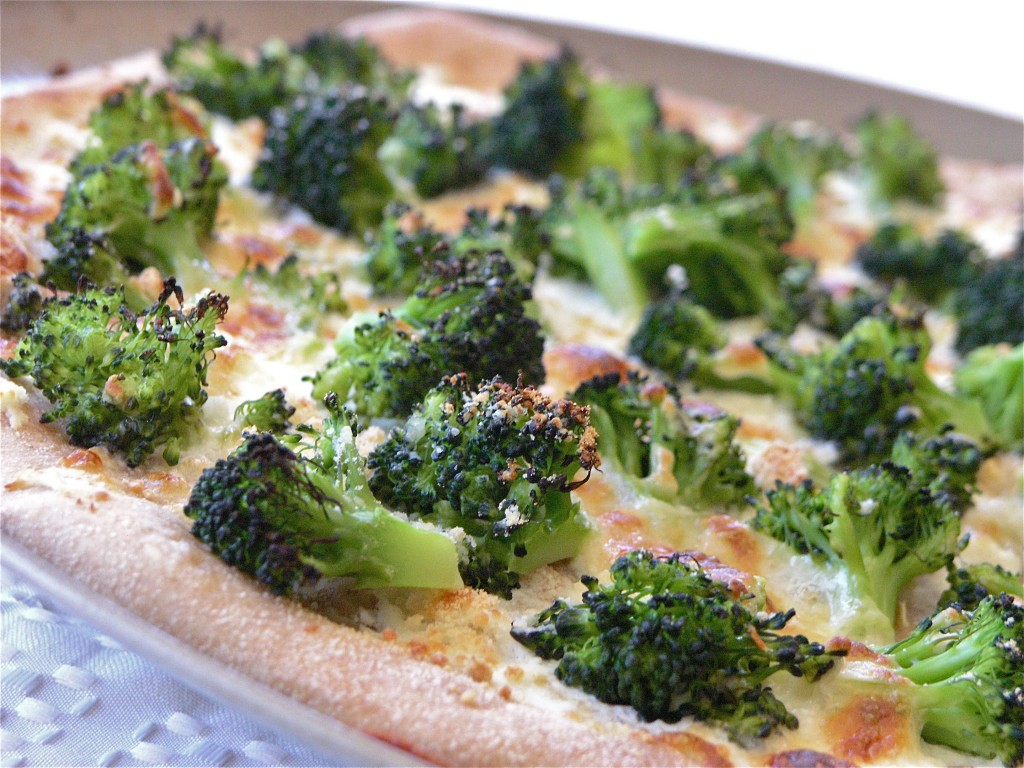
I must admit. I am a total broccoli addict. I eat broccoli every day. Roasted. Steamed. With cheese melted over it on a potato and this way: on a white pizza. This is pretty guilt free. As long as you don’t eat half the pizza, like I sometimes do. But because low-fat ricotta stands in for most of the cheese, the calorie count on this dish is not terrible.

I was first introduced to white pizza in college outside of Philadelphia. Renato’s in Swarthmore used to make an awesome pizza with ricotta, Mozzarella, and lots of garlic. I’m pretty sure there was broccoli on that one too. So basically, I wanted to recreate that pizza here.

I’ve been eating this broccoli pizza almost once a week for about a month now, so I figured it was time to do a post.

I use freeze-dried garlic in this recipe, because it’s so much faster to just sprinkle it over the pizza, than it is to chop fresh garlic. The flavor is great. I don’t miss the fresh garlic at all. I use Litehouse brand, but you can find this other brand at Amazon:

You can make the crust yourself, as I used to do a lot (I just realized I’ve never posted by pizza dough recipe, which is weird), but lately, I’ve just been buying whole wheat pizza dough at the grocery store. Mollie Stone’s now carries Il Fornaio pizza dough in the frozen section. It tastes just like my homemade version, so I’ve been hard pressed to go to all the trouble of making it from scratch. Just make sure that you let the dough sit out long enough to come to room temperature, because if you’re not careful, you can run into the problem of having the toppings cook before the dough is ready, and then it just sticks to the pizza pan like crazy.

To help with making sure the pizza doesn’t stick, I use a nonstick, perforated pizza pan like this one available at Amazon.com (just click on it). I also spray it with a little nonstick spray:

Broccoli Pizza Slice


Broccoli White Pizza With Whole Wheat Crust
 
Prep time
Cook time
Total time
 
White pizza with lots of broccoli and garlic
Author:
Recipe type: Entree
Serves: 4
Ingredients
  • 1 package of pizza dough (I use whole wheat)
  • Semolina or whole wheat flour to handle the dough
  • 2 heads of broccoli, chopped into florets (about 3 cups)
  • 1 Tablespoon freeze-dried garlic
  • ¾ cup reduced fat ricotta cheese
  • ½ cup shredded part-skim Mozzarella cheese
  • Salt to taste
Instructions
  1. Preheat the oven to 500˚F
  2. If you have purchased frozen pizza dough, make sure it thaws overnight. Then let it rest on the counter for at least 20 minutes before shaping it into a pizza.
  3. While the pizza dough is resting on the counter, you can steam the broccoli. Put the florets in a medium saucepan with 2 cups of rapidly boiling water. Steam for 3-4 minutes. Watch carefully. When the broccoli is ready, it will be bright green still, and tendercrisp. It is better for it to be undercooked than overcooked. Remove from the heat and drain completely. Then rinse with cold water to stop the cooking process and drain again. Pour the broccoli out onto some paper towels. You don't want to transfer any water to the surface of the pizza.
  4. When you are ready to shape the dough, put a couple of tablespoons of flour (semolina or wheat) onto a large cutting board. Coat the dough ball with the flour. Flatten the ball into a disc. Then with your fingertips, work your way around the edges, stretching it all out as you go. Put your fist in the middle of the growing circle and let the sides stretch down. Move your arm up and down to help it stretch out. Then work your fingers around the edge of the circle one more time.
  5. Spray the pizza pan with a little nonstick cooking spray and spread the circle of dough onto the pan. With the back of a spoon, spread the ricotta evenly over the pizza. Then sprinkle with the dried garlic. Arrange the broccoli pieces over the surface evenly. Sprinkle with the Mozzarella. Season with salt.
  6. Bake in the oven for 10-15 minutes. Watch carefully. If the cheese starts to brown too quickly (before the crust has had a chance to brown), back off the heat a little bit. When the cheese and the crust are just starting to brown, remove from the oven and let cool for 2 minutes. Then slice and serve immediately.


Categories
Fish & Shellfish Produce Salads Uncategorized

The Best Cinqo De Mayo Avocado Shrimp Tostadas

California Avocado Shrimp Tostadas

Cinqo de Mayo is just around the corner and we’re getting ready by enjoying California Avocados – back in season and perfect for bringing together your favorite Mexican flavors – lime, cilantro, and… avocado. Yum.

This shrimp tostada recipe, a light and healthy dish perfect for a weeknight or for a dinner party, was shared with us by the California Avocado Commission and was created for them by chefs Mary Sue Milliken and Susan Feniger, aka, the Too Hot Tamales of early Food Network fame. Known also for their fabulous Santa Monica restaurant Border Grill, the Too Hot Tamales have been partnering with the California Avocado Commission for some time now to bring fresh, flavorful, avocado forward dishes to all of us. Enjoy!

avocado commission
Avocado Trio
The Best Cinqo De Mayo Avocado Shrimp Tostadas
 
Prep time
Cook time
Total time
 
Bold flavors come together in this fresh take on the shrimp tostada
Author:
Recipe type: Entrée Salad
Serves: 4
Ingredients
  • ¾ cup beer
  • 3 bay leaves
  • ½ tsp. celery seeds
  • ½ tsp. cayenne
  • ½ tsp. salt
  • ½ lb. domestic, wild-caught jumbo shrimp, peeled and cleaned
  • 2 ripe, fresh California avocados, seeded, peeled and cut into ½-inch dice
  • 1 Roma tomato, finely diced
  • ¼ cup finely diced red onion
  • 1 small carrot, peeled and finely diced
  • 1 jalapeño, stem and seeds removed, finely diced
  • ½ bunch cilantro, finely chopped
  • 1½ limes, juiced
  • 3 Tbsp. extra virgin olive oil
  • Salt, to taste
  • Ground black pepper, to taste
  • Canola oil, for frying
  • 4 (6-inch) corn tortillas
  • 4 romaine lettuce leaves, finely julienned
Instructions
  1. Combine beer, bay leaves, celery seeds, cayenne and salt in a saucepan and bring to a boil. Add shrimp and cook 2 to 3 minutes, or until just turning pink and cooked through. Remove shrimp from liquid, cool to room temperature, and cut into ½-inch dice.
  2. In a large bowl, combine cooked shrimp with avocado, tomato, onion, carrot, jalapeño, cilantro, lime juice, olive oil, salt and pepper. Stir gently, taste, and adjust seasonings as necessary. Chill thoroughly.
  3. Meanwhile, pour oil to a depth of ½-inch in a small pan for frying. Fry the tortillas on both sides until crisp and drain on paper towels.
  4. To serve, divide julienned lettuce evenly between each crispy corn tortilla. Top with avocado shrimp mixture and serve immediately.
Notes
I substitute ¼ cup shredded carrots (in the bag) for the diced carrots in this recipe and I leave out the celery seeds.
Categories
Dessert Uncategorized Video How-to

Pumpkin Ricotta Cheesecake for an Elegant Thanksgiving Dinner Finale

Pumpkin Ricotta Cheesecake

Looking for an elegant alternative to pumpkin pie? Want to enjoy the holidays without ruining your waistline? I have the recipe for you and a book to recommend. Marisa Churchill, a contestant on Season 2 of Top Chef and San Francisco resident, has recently published an inspired collection of low calorie desserts, called, Sweet & Skinny: 100 Recipes for Enjoying Life’s Sweeter Side Without Tipping the Scales.
Click on the book to purchase it at Amazon.com.

I recently spent an evening with her since we share a mutual friend, and she told me that the Pumpkin Ricotta Cheesecake in the book is one of her favorites, so I made it for my annual Halloween Dinner Party (more recipes to follow from that event). It was divine. The flavor of the cheesecake is subtle and sophisticated. It’s not too sweet, but it still retains the yummy flavors reminiscent of your favorite pumpkin desserts.

Marisa Churchill

The book is full of fabulous recipes and Marisa really takes the time to explain the techniques. She provides sugar-free alternatives for each dessert as well as all of the nutritional information you need to stay on track (calories, grams of fat, etc.) and stay healthy. Get this book in time for the holidays! There are lots of cookie recipes to satisfy all of your Christmas cookie-baking needs!

Click here to Follow Marisa on Twitter.

Like Marisa Churchill’s page on facebook.

Pumpkin Ricotta Cheesecake
Serves 12
From the book, Sweet & Skinny: 100 Recipes for Enjoying Life’s Sweeter Side Without Tipping the Scales

Ingredients

For the Crust
Nonstick pan spray
6 oz honey graham crackers (about 10 cookie sheets)
2 Tbsp 1% or 2% milk

For the Cheesecake
8 oz (1 cup) reduced-fat Kraft cream cheese
1 cup sugar
1/3 cup nonfat sour cream, at room temperature
2 large eggs, at room temperature
2 egg whites from large eggs, at room temperature
1 tsp pure vanilla extract
2/3 cup canned pumpkin puree
1/2 tsp ground cinnamon
1/4 tsp ground nutmeg
1/4 tsp ground ginger
1/4 tsp salt
1/8 tsp ground cloves
1 cup plus 2 Tbsp reduced-fat ricotta cheese
2 Tbsp large pecan pieces, toasted for garnish (I used hazelnuts)
2 Tbsp pomegranate seeds for garnish

Method

For the crust

1. Coat 9-inch springform pan with pan spray. Break up the graham crackers and process them in a food processor until they are reduced to very fine crumbs. Add the milk and process for 30 seconds, or until the crumbs hold together when you squeeze them in your fist.

2. Transfer the mixture to the prepared pan. Press the crumbs firmly over the bottom and slightly up the sides of the pan, using your finger-tips to compress them.

For the cheesecake

1. Preheat the oven to 325˚F with a rack in the lower third of the oven.

2. Using an electric mixer, beat the cream cheese and sugar on medium speed for 2 to 3 minutes, until it is completely smooth and well blended. (If using a standing mixer, use the paddle attachment). Add the sour cream, eggs, egg whites, and vanilla; mix for 2 to 3 minutes longer to blend well. Scrape down the sides of the bowl as needed. Add the pumpkin, cinnamon, nutmeg, ginger, salt, and cloves and mix for 1 minute longer. Add the ricotta and mix just until it is incorporated.

3. Pour the batter over the crust and bake for 50 to 60 minutes, until the cheesecake jiggles only slightly in the center when you gently shake the pan. (If the cheesecake browns too quickly or begins to crack, tent a piece of aluminum foil over the top, without touching the filling, for the remaining baking time).

4. Transfer the pan to a wire rack and let it cool for 1 hour. Then run a knife around the edge of the pan if needed to loosen the cheesecake, remove the outer pan ring, and transfer the cake, on its base, to a serving plate. Cover the cake loosely with plastic film and refrigerate for at least 3 hours or overnight.

To serve: Cut the cheesecake into 12 wedges, and garnish them with the toasted pecans and pomegranate seeds.

Refrigerate any leftover cheesecake, tightly covered, for up to 3 days.

Nutritional Information:
Calories per serving: 221
Grams of fat: 9.5g

Watch Marisa whip up a Chocolate Mousse with Olive and Sea Salt:

Categories
Breads Breakfast/Brunch Dessert Pumpkin Uncategorized

The Best Pumpkin Chocolate Chip Cupcakes with Cream Cheese Frosting

[pinterest]

Pumpkin Chocolate Chip Cupcakes

There’s nothing likely whipping up a little quick bread (muffin, cupcake, bread, whatever) to satisfy the baking need. Mix the wet ingredients. Mix the dry ingredients. Put them together without overmixing, bake and voila! A sweet, sumptuous little treat in no time.

October = pumpkin for me, in case you didn’t know. Psst. There are like 40 pumpkin recipes in this blog. I’ve done pumpkin-chocolate chip cookies before, but never pumpkin chocolate chip muffins (or cupcakes as the case may be). Some people love the combo, and I am one of them. These are equally good with or without the icing, I think. So if you can’t be bothered with the icing, don’t be!

Pumpkin Chocolate Chip Cupcakes


The Best Pumpkin Chocolate Chip Cupcakes with Cream Cheese Frosting
 
Prep time
Cook time
Total time
 
Yummy pumpkin chocolate chip cupcakes - perfect for a Halloween party.
Author:
Recipe type: Dessert
Serves: 18-20
Ingredients
  • 4 eggs
  • 1½ cups granulated sugar
  • ½ cup light brown sugar
  • 2 cups canned pure pumpkin
  • 1 tsp vanilla extract
  • 1 cup vegetable oil
  • 3 cups all-purpose flour
  • 2 tsp baking soda
  • 2 tsp baking powder
  • 1 tsp ground cinnamon
  • ½ tsp ground nutmeg
  • pinch ground cloves
  • 1 tsp salt
  • 2 cups semi-sweet chocolate chips
  • For the frosting:
  • 1 (8 ounce) package cream cheese, softened
  • ¼ cup butter, softened
  • 1 teaspoon vanilla extract
  • 2 cups confectioners' sugar
Instructions
  1. Preheat oven to 350˚F. Prepare muffin tins by either spraying them with cooking spray or lining them with paper liners.
  2. In a large mixing bowl, beat together the eggs, white sugar, brown sugar, pumpkin, vanilla extract, and vegetable oil. Set aside.
  3. In a medium bowl, mix together the flour, baking soda, baking powder, cinnamon, nutmeg, cloves, and salt.
  4. In three batches, add the flour to the wet ingredients and stir to incorporate. Don't overmix, but incorporate thoroughly.
  5. Fold in the chocolate chips. Fill muffin cups at least ¾ of the way full. I like to create a big muffin top, so I fill them almost all the way.
  6. Bake for 25 minutes or until golden brown on top and a knife inserted comes out clean. If you have to have two layers of tins in your oven, rotate them halfway through the cooking time for even baking.
  7. To make the icing:
  8. While the muffins are baking, you can make the icing. With an electric hand mixer, cream together the cream cheese, butter, vanilla and confectioner's sugar until completely smooth, Allow to chill if need be.
  9. To ice the cupcakes:
  10. Once the cupcakes come out of the oven, they will need to cool before you can ice them. Once they are cooled, you can fill a pastry bag with your icing and pipe it out into large concentric circles.


Pumpkin Chocolate Chip Cupcakes
Categories
Rice and other Grains Salads Sides Uncategorized Vegetarian

Wild Rice, Cranberry and Almond Salad with a hint of Orange

Wild Rice, Cranberry & Almond Salad

My friend Raquel is the master of the wild rice salad. She tosses it up in huge quantities for party buffets at her house and there’s never any left over. I’ve been meaning to do a version of my own and today was the day. The only difference between my version and hers, is that I’ve added an orange juice-based vinaigrette – just a wee-tiny bit, because this salad can even stand on its own without any vinaigrette, but I love orange and cranberry flavors together, so I thought it would only make this great salad greater.

Hey, it’s vegan and gluten-free. Can’t beat that.

Wild Rice, Cranberry and Toasted Almond Salad with a hint of Orange
Serves 4 as a side

Ingredients

2 cups cooked wild rice (still warm)
3/4 cup dried cranberries
1/2 cup toasted almonds slivers

Vinaigrette:
1 Tbsp olive oil
1 Tbsp orange juice
1 tsp Dijon mustard
1 tsp finely diced onion

Optional addition: orange zest.

Method

1. Cook rice according to package directions (it takes about 45 minutes). Meanwhile, toast the almonds in a frying pan with no oil over medium high heat for about 5 minutes or until just starting to brown.

2. While the rice is still warm, toss it with the dried cranberries and the almonds. This will allow the cranberries to swell and their flavor to meld.

3. While the rice mixture is cooling, whisk together the ingredients for the vinaigrette until an emulsion is formed. Once rice mixture has cooled to room temperature toss the vinaigrette with the rice and mix thoroughly. Refrigerate and serve chilled.

Wild Rice Salad
Wild Rice Salad
Categories
Dessert Produce Uncategorized Vegetarian

Blueberry Cobbler: Fast, Fresh and Easy

Blueberry Cobbler
Blueberry Cobbler

Blueberries are in season and therefore, they’re on sale at Trader Joe’s for just $6.99 for a 2 lb basket. Time for cobbler when that happens.

I wanted to see if I could toss a bunch of fresh blueberries into pie plate with as few other ingredients as possible and come out with a tasty cobbler half an hour later. The answer is yes. Yes I can.

I use less sugar and butter in this recipe than most recipes out there, because I know that these berries can stand on their own. And I don’t stew them first, because I want them to maintain their structure. You can see in the photograph that the berries are still berries. That’s just how I like it.

See if you like it too. Subtract some berries and add peaches if you’ve got those lying around too.

Blueberry Cobbler: Fast, Fresh and Easy
Serves up to 9

Ingredients

2 1/2 cups Bisquick baking mix
2/3 cup reduced fat milk
4ish cups fresh blueberries
1/4 cup of sugar
2 Tbsp butter, cut into little pieces

Method

1. Preheat oven to 400˚F.

2. Put 3.5 – 4 cups of blueberries in a pie plate. Sprinkle 1/4 cup sugar (or a little more to taste) over the berries. Sprinkle the slices of butter around, evenly, on top of the berries.

3. If the oven is ready, put the pie plate with just the blueberry mixture into the over for 10 minutes to get the mixture heated through.

4. While berries are heating, mix together the Bisquick and the milk and stir until dough forms. Let sit for remaining time. (No kneading, no rolling – these will be like drop biscuits on top).

5. Remove berries from the oven at the end of 10 minutes. Increase the oven temperature to 425˚F. Drop the biscuit dough on top of the blueberries, trying to drop 8 dollups in a circle plus one in the middle. Bake uncovered for an additional 15 minutes or until biscuits are golden brown.

Serve immediately, if possible. Also sits well in the oven at low temperature. Cobbler is great with a scoop of vanilla ice cream too!

Blueberry Cobbler
Blueberry Cobbler w/Bisquick Biscuits
Home page basic 300 x 250
Categories
Dessert

Sharffen Berger Fudgy Brownies

Sharffen Berger Fudgy Brownies

You know, chocolate is a funny thing. It comes in so many flavors and textures and each person knows just how they like it. Me? I like rich, dark chocolate. Sharffen Berger gets my kind of chocolate just right. So I was lucky when the company just happened to sponsor a Food Blogging conference I attended and the goodie bag we got was filled with lots of Sharffen Berger baking chocolate. Like the 70% cacao bittersweet chocolate, which is the basis for these fudgy brownies. This recipe comes directly from the source. Sharffen Berger publishes this and lots of other recipes on their site. These are definitely the fudgiest, most decadent brownies I’ve ever had. Enjoy!

Sharffen Berger 70% Cacao Bittersweet Chocolate

Sharffen Berger Fudgy Brownies
Makes 9 two-inch square brownies
Ingredients

6 tablespoons (3 ounces) unsalted butter, cut into cubes, plus more for the pan
8 ounces SCHARFFEN BERGER 70% bittersweet chocolate, coarsely chopped
3/4 cup plus 2 tablespoons granulated sugar
1/4 teaspoon salt
2 large eggs
1/3 cup all-purpose flour

Method

1. Position a rack in the lower third of the oven and preheat the oven to 325°F. Cut an 8 by 16-inch piece of parchment paper. Lightly butter an 8 by 8 by 2-inch pan and line it with the parchment, allowing it to extend evenly over the opposite sides. Butter the parchment including the paper on the sides of the pan.

2. Place the chocolate and butter in a large heatproof bowl set over a pot of gently simmering water and stir occasionally until melted and smooth. Remove from the heat.

3. With a large rubber spatula or wooden spoon, beat the sugar and salt into the chocolate mixture. Beat in the eggs one at a time. Add the flour and mix vigorously until the batter is very glossy and pulls away from the sides of the bowl.

4. Pour the batter into the prepared pan and tap the pan bottom on the countertop to level the batter. Bake for 30 to 35 minutes, or until a skewer in the center comes out moist but clean.

Let cool in the pan on a cooling rack for 10 minutes. Remove the brownies from the pan using the parchment “handles,” and cool completely on the rack before cutting into 2-inch squares.

Categories
Appetizers Salads Sides Uncategorized Vegetarian

Lentil Salad Three Ways

Lentil Salad Three Ways

Buy a bag of lentils at Safeway for $1.49, or spend $8 for a fancy box of French Le Puy Lentils at Whole Foods. Either way, you can create a myriad of healthy salads that will keep in the fridge for about a week and work as main dishes, sides or snacks. Put the lentil salad on top of a bed of lettuce or the add arugula for bite. Roll the lentils up in a whole wheat tortilla for a healthy bean wrap. Serve warm with fish, like Salmon or Mahi Mahi. The possibilities are endless.

To prepare the lentils, follow the directions on the side of the package. Do not pre-soak lentils. They cook pretty quickly. Typically, for a 16 oz bag of lentils, bring 8-10 cups of water to boil in a large pot. Add the lentils and simmer gently for 25-30 minutes. For salads, you want the lentils to maintain a little bite so that they don’t get too mushy. Start checking them at 25 minutes to get the texture just right. A 16-oz bag of lentils will yield about six cups of cooked lentils.

Heirloom Tomato-Basil Lentil Salad

Heirloom Tomato-Basil Lentil Salad

Serves 4 as a side

Ingredients

2 cups cooked lentils
1 large or 2 small heirloom tomatoes, diced into small cubes.
2 Tbsp minced shallots or scallions
1/4 cup minced fresh basil and additional leaves for garnish
2 Tbsp balsamic vinegar
6 Tbsp extra-virgin olive oil
1/4 teaspoon black pepper
1 Tbsp of Crumbled Feta (optional) – I left it out because I like to try to be vegan when I can

Method

1. For the vinaigrette, whisk together the olive oil and vinegar into an emulsion. Toss lentils, tomatoes, shallots, minced basil, and oil vinegar to combine. Season with pepper and garnish with basil leaf and feta if using. Serve chilled.

Tarragon-Mustard Vinaigrette Lentil Salad

Tarragon-Mustard Vinaigrette Lentil Salad

Serves 4 as a side

Ingredients

2 cups cooked lentils
1/2 red bell pepper, diced
2 Tbsp red-wine vinegar
1 Tbsp minced shallot or scallions
Salt and pepper to taste
6 Tbsp extra virgin olive oil
2 tsp Dijon mustard
1 Tbsp minced tarragon

Method

1. Whisk together the vinegar, shallots, salt, pepper, olive oil, mustard and tarragon. Toss with red bell pepper and lentils to combine. Garnish with tarragon leaves. Serve chilled.

Lemon Dill Lentil Salad

Fresh Lemon-Dill Lentil Salad

Serves 4 as a side

Ingredients
2 cups cooked lentils
1/2 red bell pepper, diced
1/4 cup fresh dill, minced
2 Tbsp fresh-squeezed lemon juice
1 Tbsp minced shallot or scallions
Salt and pepper to taste
6 Tbsp extra virgin olive oil

Method

1. Whisk together lemon juice, shallots, salt, pepper, and olive oil. Toss with lentils, red bell pepper and fresh dill to combine. Garnish with sprigs of dill.

Categories
Casseroles Uncategorized Vegetarian

Engine 2 Diet Lasagna Featured by Dr. Oz

[pinterest]

Vegan Lasagne
Vegan Lasagne

Rip Esselstyn developed the “Engine 2 Diet” plan for a team of Texas firefighters, who were overweight and suffered from high cholesterol and high blood pressure. He found that eliminating meat and dairy (including chicken and fish, milk and cheese) from his diet, helped him and his team lose weight, lower their cholesterol numbers and turn the tide on high blood pressure.

He wrote The Engine 2 Diet: The Texas Firefighter’s 28-Day Save-Your-Life Plan that Lowers Cholesterol and Burns Away the Pounds to share his insights with the world.

I used to be a die-hard 3 meals a day with meat kind of gal. Well, maybe not breakfast with meat everyday, but still. I would make up for it later in the day. Heck, the post before this one is a burger with cheese. But I bring you this recipe because it is as satisfying as any meal I’ve had with meat, including meat lasagne, and packs more veggies per serving than any dish I’ve ever prepared. Talk about sneaking in veggies in your kids’ meals. This recipe does that in spades.

Dr. Oz endorsed this eating plan on his show in February 2010, just about the time my husband and I started exploring the benefits of a vegan diet. The timing was perfect. This is a great meal to transition effortlessly to a diet that treads more lightly on the earth and on your body.

In the photograph above, I have not yet sprinkled the top with the ground cashews, because that step occurs after you’ve baked it for 45 minutes. It’s amazing how the cashews successfully take the place of mozzarella cheese.

Engine 2 Diet Lasagna Featured by Dr. Oz
 
Who knew lasagna could be vegan?
Author:
Recipe type: Main
Cuisine: Vegan
Serves: 10-12
Ingredients
  • 1 onion, chopped
  • 1 small head of garlic, all cloves chopped or pressed
  • 8 ounces mushrooms, sliced
  • 1 head broccoli, chopped
  • 2 carrots, chopped
  • 2 red bell peppers, seeded and chopped
  • 1 can corn, rinsed and drained
  • 1 package firm tofu
  • ½ tsp cayenne pepper
  • 1 tsp oregano
  • 1 tsp basil
  • 1 tsp oregano
  • 1 tsp rosemary
  • 2 jars pasta sauce
  • 2 boxes whole grain lasagna noodles
  • 16 oz frozen spinach, thawed and drained
  • 2 sweet potatoes, cooked and mashed
  • 6 Roma tomatoes, sliced thin
  • 1 cup raw cashews, ground
Instructions
  1. Preheat oven to 400 ° F.
  2. Saute the onion and garlic on high heat for 3 minutes in a wok or nonstick pan. Add the mushrooms and cook until the onions are limp and the mushrooms give up their liquid. Remove them to a large bowl with a slotted spoon. Reserve the mushroom liquid in the pan.
  3. Saute the broccoli and carrots for 5 minutes and add to the mushroom bowl. Saute the peppers and corn until just beginning to soften. Add them to them to the vegetable bowl.
  4. Drain the tofu by wrapping in paper towels. Break it up directly in the towel and mix into the vegetable bowl. Add spices to the vegetable bowl and combine.
  5. Cover the bottom of a 9x13 inch casserole with a layer of sauce. Add a layer of noodles. Cover the noodles with sauce. This way the noodles cook in the oven, saving time and energy.
  6. Spread the vegetable mixture over the sauced noodles. Cover with a layer of noodles and another dressing of sauce.
  7. Add the spinach to the second layer of sauced noodles. Cover the spinach with the mashed sweet potatoes. Add another layer of sauce, the final layer of noodles, and a last topping of sauce.
  8. Cover the lasagna with thinly sliced Roma tomatoes. Cover with foil and bake in the oven for 45 minutes.
  9. Remove the foil, sprinkle with the cashews, and return to the over for 15 minutes.
  10. Let sit for 15 minutes before serving.

This post is part of Real Food Wednesdays hosted by KellyTheKitchenKop.com.

Categories
Beef Sandwiches Sauces Uncategorized

Béarnaise Burger

Béarnaise Burger

I’m going through a tarragon phase right now, and whenever I cook with tarragon, I think of Sauce Béarnaise. Sauce Béarnaise is a butter emulsion sauce like Hollandaise. Hollandaise is flavored with lemon juice while Béarnaise Sauce is flavored with shallots, chervil, pepper and tarragon.

Sauce Béarnaise on Asparagus

For this burger, I wanted the flavor profile of a Sauce Bérnaise without actually making Sauce Béarnaise. It’s a legendarily difficult sauce to get right and uses an entire stick of butter. It’s a great sauce that goes well with steak or asparagus or lots of other things. If you want to try making it yourself, try the recipe at Fine Cooking. Feel free to also pour the sauce over a burger, but in this recipe, we take the ingredients of Sauce Béarnaise and add them to ground beef, so they are right in the burger.

I used Gruyère Cheese on my burger and added sautéed onions and mushrooms. I used 85/15 ground beef to achieve a balance between fat and flavor.

Bérnaise Burger
Makes 4 Burgers

Ingredients

1-2 Tbsp diced shallots
1/2 tsp fresh chervil, finely chopped (optional)
1 1/2 Tbsp fresh tarragon, finely chopped)
1 egg
1 lb of ground beef (85/15 or 80/20)
Salt and pepper to taste
1 Tbsp butter
1/2 lb sliced mushrooms
2-3 Tbsp diced onion
4 slices of Gruyère cheese
4 slices of butter lettuce
4 hamburger buns – I used sandwich thins by Oroweat

Method

1. Mix the shallots, chervil, tarragon, egg, ground beef, salt and pepper in a large bowl. Form into 4 patties. Heat a grill pan over medium heat. Spray with cooking spray. Add the patties and cook for about 7 minutes on each side, depending on how well done you like your burgers and how hot your pan is. Cover, vented, while cooking.

2. Meanwhile, heat a medium sautée pan over medium heat. Melt the butter and add the onions. Sautée until just starting to soften, about 5 minutes. Add the mushrooms, and continue to sautée until mushrooms sweat out their moisture and start to brown.

3. Add the cheese to burgers and continue to cook, with the vented cover, until cheese has melted. Toast the buns. Prepare the lettuce slices.

4. Assemble the burgers with lettuce on the bottom, burger patty with cheese in the middle and mushrooms and onions on top. Serve immediately.

Blog Widget by LinkWithin