Day 18 of 31 days of pumpkin and I’ve decided to bring one of my favorite potato recipes into the world of pumpkin. The dish? Gratin Dauphinois or Potatoes Gratin. Thinly sliced potatoes baked in cream and Gruyére cheese. Surely pumpkin can adapt, but not on its own and so I’ve paired it with Garnet yams. One of my inspirations cooking this dish with pumpkins and yams comes from the fact that I always add a little nutmeg to dishes with melted Gruyére, like macaroni and cheese. It’s not a far jump from nutmeg to pumpkin, so I thought, maybe pumpkin and yams will stand up to the creamy cheesy sauce that is a gratin. I was right. This dish is great for confronting October’s chill.
Grilled Peaches with Toasted Almonds and Vanilla Ice Cream
I know, it’s late in the season to do a post about peaches, but I swear, local peaches are still on sale here at Paradise Market, so I didn’t hesitate when the dinner party menu I was using from the Williams-Sonoma Dinner Parties book included this Grilled Peaches dish for dessert. Once again, I adapted the recipe and made it my own.
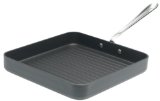
The method I used for each step of this recipe differed greatly from the one outlined in the Dinner Parties book, because I’m lazy and I like to keep the cleanup as simple as possible. Therefore, instead of using the oven and a cookie sheet to toast the almonds, I just toasted them in a sautée pan and rather than using my gas grill outside to grill the peaches, once again, I whipped out my All-clad non-stick grill pan. During the party, I had just grilled the Halibut, so I actually had to wash the pan between the main course and the dessert course before I could fire it back up, but because it’s a non-stick pan, washing it was a breeze and it was ready for another round of action in no time.
I have to say, the guests at the party went unexpectedly wild about this dessert. None of us were prepared for the peaches to cook all the way through in such a short amount of time, so we all took our first bite a bit tenatively. The peaches only grill for about 6-7 minutes, but they come out soft, warm and sweet – all they way through. Guests also commented enthusiastically about the contrast among textures with the crunch of the almonds, the creamy chill of the ice cream and the warm, soft texture of the peaches. A splash of Balsamic Vinegar lent tang and flavor. One guest, Steve, likes to make a Balsamic reduction for grilled fruit, because then it’s an amazingly sweet addition. See the links to other blogs at the bottom of this post to find out more about how to do that. For me, the Balsamic vinegar was a last minute thought, and I was just glad to have splashed it in.
Brush the peach halves with olive oil for grilling
Heat a 10-inch skillet over medium-high heat. Add almonds and toast, watching carefully so they don't burn. If the pan has truly had time to heat up, it takes about 2 minutes on the first side and then 1 minute after flipping them. Set almonds aside.
Brush both sides of each peach half lightly with extra virgin olive oil. Place peach halves in the pan, round side down and grill for about 3 minutes. Check one to see if grill marks have appeared. Turn them over and grill on the other side until grill marks appear, about 4 more minutes.
If peaches are large, place one half on each plate. For medium sized peaches, you could plate with two halves. Sprinkle with almonds and add a scoop of vanilla ice cream.
In my most recent post, I wrote about hosting a dinner party on Sunday night and using an entire menu from the Williams-Sonoma Dinner Parties book. In this installment, I bring you Fig & Gorgonzola Crostini with a Honey Drizzle. I changed the recipe slightly, so the one you see here is my own, but I was inspired by the Gorgonzola Bruschetta with Figs recipe in the book.
This hors d’oeuvre was particularly convenient because I could toast the baguette slices ahead of time, chop the figs ahead of time and assemble the crostini before the guests arrived. I felt very little stress.
Recently I decided to host a dinner party on Sunday night, hoping to stretch out the weekend a bit and squelch the Sunday night blues. It totally worked.
For inspiration, I turned to a book that has been sitting on my shelf for a couple of months: Williams-Sonoma Dinner Parties: Inspired Recipes and Party Ideas for Entertaining. I even found a menu that I wanted to cook from start to finish. I’m glad I decided to go all the way because it turned out to be the kind of menu that allows the cook/host to have fun at her own party, but it didn’t include a pot roast or a casserole. Au contraire. This menu was light, healthy, elegant AND easy. The main course was a Halibut fillet with herbed butter and that was served with this light, end-of-summer, orzo salad.
What I liked best about serving this salad with the fish is that it could be prepared ahead of time and served at room temperature, so I didn’t have to worry about making it at the last minute or reheating it at just the right time. Stay tuned for more recipes from this Sunday Night Dinner Party.
1 box (1 lb) of orzo
dash of salt for boiling water
1 Tbsp olive oil to coat orzo when finished cooking (to keep from sticking)
1 1/2 lbs Heirloom Tomatoes, chopped into 1/2 inch cubes (choose a variety of colors)
1/2 cup fresh basil leaves, chopped
2 Tbsp extra virgin olive oil
1 teaspoon white wine vinegar
1/2 teaspoon Dijon mustard
1/2 teaspoon salt
1 teaspoon freshly ground pepper
Method
1. Boil the orzo according to package instructions for an Al Dente texture, about 9 minutes. Drain pasta into a large bowl and toss with olive oil. Once the pasta cools a bit, you can cover it with plastic wrap and refrigerate it until its ready to mix in with the rest of the ingredients (up to several hours ahead of time).
2. Chop tomatoes and the basil and mix together in a large bowl.
3. In a small jar, mix the olive oil, white wine vinegar, mustard, salt and pepper. Close lid and shake until emulsified.
Final preparation: About 1 hour before the party, gently fold the orzo, tomato/basil and vinaigrette together and spoon into a serving bowl. Cover with a paper towel while salad reaches room temperature. Toss again before serving and garnish with fresh Basil leaves.
When I saw these gorgeous beans (still in the shell) at the market, I just had to buy them. I had no idea what they were or what I was going to do with them, but they were too beautiful to pass by. Turns out, their flavor is just as pleasing: nutty, rich, creamy. They’re like eating a bowl of health.
“What are they?” you ask? At the store, they were labeled “Raspberry Beans,” but my subsequent research has shown that they are more commonly called “Cranberry Beans.” They are related to the Italian ‘borlotti’ bean. The best explanation of the origin and history of the Cranberry Bean can be found over at The Culinary Addict. He explains how the Cranberry Bean was first cultivated by the Aztecs and the Incas thousands of years ago. It’s believed to have been crossed with the white bean to create today’s larger, kidney-shaped Cranberry Bean. It was brought to Italy in the 1500’s and has thrived there ever since. Check out The Culinary Addict’s photos of the beans still in their shell.
Cranberry Beans Just Shelled
Unfortunately, the beautiful marbled color does fade with cooking, but the flavor more than makes up for the lost colors. I decided to cook mine in a garlicky, low-fat broth. This would be great served with lamb shanks or osso bucco, but I’ll be honest. I ate mine without any accompaniment.
1. Bring 6 cups of salted water to boil. Add beans and simmer for 20 minutes. Remove from heat, drain, and rinse with cold water to stop the cooking. Set aside.
2. Heat olive oil in heavy-bottom medium sauce pan. Add leeks and sautée gently until starting to soften, about 2 minutes. Add garlic and sautée for 1 minute. Add cooked beans and stir to coat. Add broth, butter and salt and bring to a gentle simmer. Add bay leaf and let cook uncovered for 20 minutes, stirring as needed. Add additional chicken stock to keep beans moist, if necessary.
3. While beans are cooking, mix grated lemon zest, chives and minced garlic in a small bowl. Add this mixture to the beans near the very end of the cooking time. Remove bay leaf, add fresh ground pepper to taste and enjoy.
Recently, I decided it was time to reign in my appetite and focus on eating healthier, leaner, fresher food. I’ll be honest. I even signed up for the web-based version of Weight Watchers. As a lifetime member, I know the program, but paying a monthly fee again and tracking foods using the webtools have helped me shift my cooking energy in the right direction. I think the WW approach actually helps one adopt habits that are in line with what Mark Bittman and Michael Pollan advocate. In the first sentence of Food Matters: A Guide to Conscious Eating with More Than 75 Recipes, Bittman poses the question, “Could improved health for people and planet be as simple as eating fewer animals, less junk food and super-refined carbohydrates?” and in the first sentence of In Defense of Food: An Eater’s Manifesto, Pollan writes simply, “Eat food. Not too much. Mostly plants.” Either of these statements could be licensed by Weight Watchers as taglines, and so I’m using the WW framework and tools to help me do what Pollan and Bittman advise.
With that in mind, I returned from the market today with bags full of produce and set about making a low-point, satisfying lunch quickly. I like vegetables best when they are sautéed slightly – still crunchy, but the raw edge taken off. And most of the time, something warm just feels more filling. So for this dish, I did what is my favorite preparation of cabbage – chopped it and sautéed it in a little olive oil with salt and pepper. I topped the cabbage with a preparation of garlic and cannellini beans that had also been warmed and then garnished the dish with a few heirloom tomato chunks and chives. It was so easy and quick (and pretty cheap too), it just might become a staple.
Warm Cabbage and Cannellini Bean “Salad” Serves 2
1/2 Tbsp olive oil
1/2 medium onion, chopped
1/2 head of green cabbage, chopped into 1/2 inch pieces
salt and pepper to taste
1 tsp of olive oil
2 cloves garlic, chopped finely
1 15 oz can of cannellini beans, drained
1/4 cup 99% fat free chicken broth
1 Bay leaf
1/2 tomato, chopped into small cubes
chopped chives to garnish
Method
1. Heat oil in large, heavy bottomed frying pan or wok over medium-high heat. Add onion and sautée until softened, about 3 minutes. Add cabbage and toss. Continue to sautée gently for about 8 minutes In the meantime, heat oil in a small saucepan. Add garlic and sautée gently for 1 minute. Add beans and stir thoroughly. Add chicken broth and Bay leaf and bring to a near boiling simmer. Allow to simmer until cabbage is ready.
2. Spoon cabbage onto plate. Top with beans and sprinkle with chives. Add tomatoes, and season with salt and pepper. Enjoy immediately.
I wasn’t kidding when I said that I was adding broccoli to everything right now. I’m still working through this 5lb bag of broccoli wokly florets.
I’ve been wanting to conquer quiche for awhile. Achieving just the creamy, cheesy consistency is not trivial. Today, I feel more successful than ever. I’ve made quiche before and blogged about it, but I must admit that this recipe tops the Salmon one for smooth, rich, creamy texture. Finally!
The trick? Heavy cream, for one, and lots of it. Also, a mixture of Monterrey Jack cheese (which is supremely meltable) and cheddar. And finally, I believe putting the grated cheese in the bottom of the crust and then layering everything else on top of it, rather than mixing the cheese in with the eggs and cream, helped create this exemplary texture. See what you think.
Broccoli Quiche with Monterry Jack and Cheddar Serves 4-6
Ingredients
1/2 cup of diced onion
1 tsp olive oil
1 generous cup of broccoli florets
3 large eggs
1 cup heavy cream
1/2 cup whole milk
pinch of freshly ground nutmeg
salt and pepper to taste
1/3 cup shredded Monterrey Jack cheese
1/3 cup shredded Cheddar Cheese
1 frozen, 9-inch deep-dish pie crust, thawed
Method
1. Pull the pie crust out of the freezer to let it thaw and preheat your oven to 400˚F.
2. Heat olive oil in a small frying pan and sautée onions gently until starting to brown, about 8 minutes.
3. Pick over the broccoli florets and trim to them to ensure that they are small enough and of uniform size. Bring a small amount of water to boil in a small saucepan and add the broccoli florets. Boil/steam for 2 minutes tops. Remove from heat, drain water and set aside.
4. Beat together the eggs, cream, milk, salt, pepper and nutmeg. Leave on counter during the rest of the preparation to allow it to come to room temperature.
5. Prick the bottom of the pie crust to prevent air bubbles from forming. Bake crust for 11-15 minutes or until golden brown. Remove from oven and allow to cool.
6. Change oven temperature to 375˚F. Spread cheeses evenly along the bottom of the pie crust. Distribute broccoli florets and cooked onions evenly over the cheese. Pour milk and egg mixture on top. Season with a bit more salt and pepper. Place on a baking sheet and bake for 35 – 40 minutes. Allow to cool a bit before serving. I actually turned off my oven a few minutes early and allowed the quiche to sit in the cooling oven for awhile, which kept it warm and cooking without overdoing it.
Looking for more broccoli recipes? Check out ComfyCook’s collection of Broccoli recipes from BSI participants around the blogosphere.
My four-year old is a very picky eater. If he could have macaroni and cheese at every meal, he would. So I’ve taken to hiding healthy foods in the mac-n-cheese to ensure he’s getting enough nutrition. This version worked pretty well. If I were making it for myself, I would have used stronger cheeses like (you guessed it) Gruyére, and I would have added other punchy flavors like garlic or nutmeg. But I wanted this dish to go down without a fuss, so cheddar ruled the day.
I didn’t conceal from him the fact that I was concealing healthy foods in his macaroni and cheese. In fact, I enlisted his help during the broccoli and cauliflower grinding process. He loves to push the button. We used my new Cuisinart mini chopper. It’s a snap to pull out, use, and clean up.
Available at Amazon - Click here
My son
Broccoli Chopped in the Mini Prep
Macaroni & Cheese with Broccoli and Cauliflower Serves 4
Ingredients
1 1/2 cups broccoli florets
1 1/2 cups cauliflower florets
1 tsp olive oil
1/2 lb elbow macaroni
3 Tbsp butter
2 Tbsp flour
1 1/4 cup whole milk (or heavy cream to make it really decadent)
2 cups shredded sharp cheddar cheese (we had fun shredding ours in a vintage Mouli)
1 tsp salt
1/2 cup bread crumbs
1 Tbsp melted butter
Broccoli & Cauliflower sautéeing
Method
1. Preheat oven to 350˚F. Put broccoli florets into food processor and grind into teeny weeny pieces. Remove to a bowl. Repeat with cauliflower.
2. Heat olive oil in a skillet over medium heat. Add broccoli and cauliflower and toss. Basically, we’re browning these vegetables just a little bit to enhance the nutty sweet flavors they bring to the dish. After a few minutes, turn off the heat and leave for later.
3. Bring salted water to boil in a large pot and boil the macaroni. Since you’re going to be baking this dish, you can shave off a minute from the boiling time recommended on the package.
4. In the meantime, for the roux, heat the milk in a saucepan to almost boiling. Remove from heat for later. Melt butter in a heavy-bottom saucepan. Add flour and whisk continuously. Sautée flour for 3 minutes. Don’t let it brown or it will get bitter. Add the warm milk in a steady stream and whisk continuously. Simmer gently (no boiling!) until thickened, about 2 minutes. Add shredded cheese in small batches, incorporating each batch completely. Season with salt. Add broccoli and cauliflower and stir until well combined. At this stage, you have a kind of broccoli-cheddar cream soup. You could use this sauce for lots of different things. I put it over a baked potato and it was awesome.
5. Mix bread crumbs and melted butter in a small bowl.
6. To assemble, pour macaroni into a baking dish that has been sprayed with non-stick cooking spray. I used this small Le Creuset dish. Stir in the sauce, coating all of the macaroni completley. Top with the buttered bread crumbs. Bake uncovered for 25 minutes or until bubbly. If topping is not already browned, you can put it under the broiler for a minute at the end.
Le Creuset. Available at Amazon
Want to see a bunch more macaroni and cheese ideas? Check out this video collection at StreamingGourmet.com:
Looking for more broccoli recipes? Check out ComfyCook’s collection of Broccoli recipes collected from BSI participants around the blogosphere.
It’s Gruyère week here at StreamingGourmet. I just can’t get enough of the stuff. I guess it’s also heavy cream week. Sorry! But since I bought these items for the Tarragon Chicken dish the other day, I’m determined not to waste them.
I became a fan of creamed spinach while waiting tables at the now defunct Ingleneuk Tea House in Swarthmore, PA. I was a vegetable girl there in 1991. As the main dishes were served, I offered each guest one of the evening’s side dishes from a large bowl I carried from table to table. I regularly ladled out maccaroni and cheese, stewed tomatoes, or creamed spinach. The restaurant served family-style meals from its opening in 1916 until its demise in a fire in 2000. With whom do I share the distinction of having served vegetables at the Ingleneuk? That would be none other than James A. Michener, a 1929 graduate of Swarthmore College. Swarthmore is a dry town, so there never were any restaurants of consequence there. Renato’s pizza and the Ingleneuk were the extent of the culinary scene in the early nineties. Except, come to think of it, for Occasionally Yours, a little café and catering company that served very decent food.
So it was at the Ingleneuk that I first learned about adding fresh grated nutmeg to creamy dishes like macaroni and cheese and creamed spinach, an addition I am quick to include in these dishes today.
Creamed Spinach 2 – 4 servings
Ingredients
2 Tablespoons butter
1 medium yellow onion, diced or 3/4 cup minced shallots
(For more flavor, add garlic too – Emeril does)
2 Tablespoons all-purpose flour
1/4 cup heavy cream
1/2 cup whole milk
1 6 oz bag pre-washed baby spinach
pinch of freshly grated nutmeg
1 Tablespoon freshly grated Gruyère cheese
Salt and pepper to taste
The Cream Sauce
Method
1. Heat milk and cream over low heat in a small saucepan. Make sure the milk doesn’t get scalded on start to boil. Meanwhile, melt the butter in a large, deep frying pan over medium-high heat. Add diced onion and sautée until the pieces are starting to turn brown, about 6 minutes. (You could cook them more gently until softened, but I like the nutty, sweet flavor that results from browning them in the butter). Reduce the heat to medium and add the flour. Mix thoroughly with a wooden spoon and allow flour, butter and onion mixture to brown for 3 minutes. This is a roux and is the basis for so many cream sauces (including my favorite mac n cheese sauces).
Throw the raw spinach right in the pan
2. Whisk in the heated milk. Reduce heat and stir continuously while incorporating. Add pinch of nutmeg and blend. Simmer gently until sauce thickens. Add Gruyère and stir until completely melted and blended. Add salt and pepper to taste. Pour the raw spinach directly into the pan (this might break some rules, but it sure simplifies things and worked for me). Stir spinach to coat with sauce and watch the spinach wilt. Once spinach is thoroughly wilted but still a vibrant green color, remove pan from heat and serve.