Buy a bag of lentils at Safeway for $1.49, or spend $8 for a fancy box of French Le Puy Lentils at Whole Foods. Either way, you can create a myriad of healthy salads that will keep in the fridge for about a week and work as main dishes, sides or snacks. Put the lentil salad on top of a bed of lettuce or the add arugula for bite. Roll the lentils up in a whole wheat tortilla for a healthy bean wrap. Serve warm with fish, like Salmon or Mahi Mahi. The possibilities are endless.
To prepare the lentils, follow the directions on the side of the package. Do not pre-soak lentils. They cook pretty quickly. Typically, for a 16 oz bag of lentils, bring 8-10 cups of water to boil in a large pot. Add the lentils and simmer gently for 25-30 minutes. For salads, you want the lentils to maintain a little bite so that they don’t get too mushy. Start checking them at 25 minutes to get the texture just right. A 16-oz bag of lentils will yield about six cups of cooked lentils.
Heirloom Tomato-Basil Lentil Salad
Heirloom Tomato-Basil Lentil Salad
Serves 4 as a side
Ingredients
2 cups cooked lentils
1 large or 2 small heirloom tomatoes, diced into small cubes.
2 Tbsp minced shallots or scallions
1/4 cup minced fresh basil and additional leaves for garnish
2 Tbsp balsamic vinegar
6 Tbsp extra-virgin olive oil
1/4 teaspoon black pepper
1 Tbsp of Crumbled Feta (optional) – I left it out because I like to try to be vegan when I can
Method
1. For the vinaigrette, whisk together the olive oil and vinegar into an emulsion. Toss lentils, tomatoes, shallots, minced basil, and oil vinegar to combine. Season with pepper and garnish with basil leaf and feta if using. Serve chilled.
Tarragon-Mustard Vinaigrette Lentil Salad
Tarragon-Mustard Vinaigrette Lentil Salad
Serves 4 as a side
Ingredients
2 cups cooked lentils
1/2 red bell pepper, diced
2 Tbsp red-wine vinegar
1 Tbsp minced shallot or scallions
Salt and pepper to taste
6 Tbsp extra virgin olive oil
2 tsp Dijon mustard
1 Tbsp minced tarragon
Method
1. Whisk together the vinegar, shallots, salt, pepper, olive oil, mustard and tarragon. Toss with red bell pepper and lentils to combine. Garnish with tarragon leaves. Serve chilled.
Lemon Dill Lentil Salad
Fresh Lemon-Dill Lentil Salad
Serves 4 as a side
Ingredients
2 cups cooked lentils
1/2 red bell pepper, diced
1/4 cup fresh dill, minced
2 Tbsp fresh-squeezed lemon juice
1 Tbsp minced shallot or scallions
Salt and pepper to taste
6 Tbsp extra virgin olive oil
Method
1. Whisk together lemon juice, shallots, salt, pepper, and olive oil. Toss with lentils, red bell pepper and fresh dill to combine. Garnish with sprigs of dill.
Rip Esselstyn developed the “Engine 2 Diet” plan for a team of Texas firefighters, who were overweight and suffered from high cholesterol and high blood pressure. He found that eliminating meat and dairy (including chicken and fish, milk and cheese) from his diet, helped him and his team lose weight, lower their cholesterol numbers and turn the tide on high blood pressure.
I used to be a die-hard 3 meals a day with meat kind of gal. Well, maybe not breakfast with meat everyday, but still. I would make up for it later in the day. Heck, the post before this one is a burger with cheese. But I bring you this recipe because it is as satisfying as any meal I’ve had with meat, including meat lasagne, and packs more veggies per serving than any dish I’ve ever prepared. Talk about sneaking in veggies in your kids’ meals. This recipe does that in spades.
Dr. Oz endorsed this eating plan on his show in February 2010, just about the time my husband and I started exploring the benefits of a vegan diet. The timing was perfect. This is a great meal to transition effortlessly to a diet that treads more lightly on the earth and on your body.
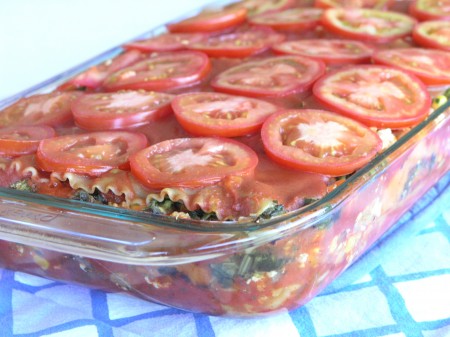
In the photograph above, I have not yet sprinkled the top with the ground cashews, because that step occurs after you’ve baked it for 45 minutes. It’s amazing how the cashews successfully take the place of mozzarella cheese.
1 small head of garlic, all cloves chopped or pressed
8 ounces mushrooms, sliced
1 head broccoli, chopped
2 carrots, chopped
2 red bell peppers, seeded and chopped
1 can corn, rinsed and drained
1 package firm tofu
½ tsp cayenne pepper
1 tsp oregano
1 tsp basil
1 tsp oregano
1 tsp rosemary
2 jars pasta sauce
2 boxes whole grain lasagna noodles
16 oz frozen spinach, thawed and drained
2 sweet potatoes, cooked and mashed
6 Roma tomatoes, sliced thin
1 cup raw cashews, ground
Instructions
Preheat oven to 400 ° F.
Saute the onion and garlic on high heat for 3 minutes in a wok or nonstick pan. Add the mushrooms and cook until the onions are limp and the mushrooms give up their liquid. Remove them to a large bowl with a slotted spoon. Reserve the mushroom liquid in the pan.
Saute the broccoli and carrots for 5 minutes and add to the mushroom bowl. Saute the peppers and corn until just beginning to soften. Add them to them to the vegetable bowl.
Drain the tofu by wrapping in paper towels. Break it up directly in the towel and mix into the vegetable bowl. Add spices to the vegetable bowl and combine.
Cover the bottom of a 9x13 inch casserole with a layer of sauce. Add a layer of noodles. Cover the noodles with sauce. This way the noodles cook in the oven, saving time and energy.
Spread the vegetable mixture over the sauced noodles. Cover with a layer of noodles and another dressing of sauce.
Add the spinach to the second layer of sauced noodles. Cover the spinach with the mashed sweet potatoes. Add another layer of sauce, the final layer of noodles, and a last topping of sauce.
Cover the lasagna with thinly sliced Roma tomatoes. Cover with foil and bake in the oven for 45 minutes.
Remove the foil, sprinkle with the cashews, and return to the over for 15 minutes.
I am totally into this focaccia. This recipe has been tested and tested. Use fresh rosemary. Don’t hold back on the oil and salt and eat it while it’s still warm.
Rosemary Focaccia
Ingredients
1/2 cup high quality extra-virgin olive oil
2-4 whole cloves garlic, cracked
2 sprigs of rosemary
1 (1/4-ounce) package rapid rise dry yeast
4 cups unbleached all-purpose flour plus additional for kneading
2 tsp table salt
2 tablespoons chopped fresh rosemary
1 teaspoon coarse sea salt
Method
For the garlic-rosemary infused olive oil:
1. Heat 1/2 cup of olive oil, the rosemary sprigs and garlic cloves in a small saucepan over medium-low heat. Heat until just starting to bubble, remove from heat and allow to sit and cool for at least 30 minutes or longer.
For the focaccia:
1. Stir together 1 2/3 cups lukewarm water and yeast in bowl of mixer. Add 4 cups flour, 1/4 cup of the rosemary-garlic infused oil, and the table salt and beat with the paddle attachment at medium speed until a dough forms. Replace paddle with dough hook and knead dough at high speed until soft, smooth, and sticky, 3 to 4 minutes.
2. Turn dough out onto a lightly floured surface. Knead in 1 – 2 more tablespoons of flour for about a minute then transfer to an oiled bowl and turn to coat it with the oil. Let rise, covered with plastic wrap, at warm room temperature, until doubled in bulk, 1 to 1 1/2 hours.
3. Press dough evenly into a generously oiled 15 x 10 inch baking pan. Let dough rise, covered with a kitchen towel, until doubled in bulk, about 1 hour.
4. Preheat oven to 500°F. Stir together rosemary and remaining 3 tablespoons oil. With a fork, make shallow pin pricks all over the dough, then brush with rosemary oil. Sprinkle sea salt over the focaccia. Bake at 500˚F for 5 minutes and then reduce to 475˚F for another 15 minutes or until golden brown.
5. Remove from oven and invert onto a rack and flip over. Eat immediately, if possible.
At our house, we go through phases where we make smoothies every morning. When bananas start to turn brown, we throw them in the freezer, so we can use them in a smoothie later. We have an entire shelf in the freezer devoted to frozen fruit. There are the bananas we’ve rescued, bags of frozen fruit, and even bags of frozen spinach. There are strawberries, blueberries, raspberries, and… peaches.
Of all of the smoothies we make, this one is my favorite.
Peach Smoothie Serves One
Ingredients
1/2 banana
1/2 container peach yogurt
1/2 10 oz bag of frozen peaches
1/2 cup orange juice
Method
Put all of the ingredients in a blender and blend until smooth. Serve immediately.
You say Garbanzo Bean, I say Chickpea, but in India, it is “Chana.”
Chana Masala is one of the most popular Indian dishes. Since it’s vegan and spicy, it falls into the category of “dishes my husband likes.” I hope you enjoy it too.
Chana Masala Serves 4-6
Ingredients
1 1/2 tablespoons vegetable oil
1 whole cardamom pod
1 whole cinnamon stick
1 whole Bay Leaf
A few whole cloves
1 tsp whole cumin seeds
2 medium onions, diced
2 cloves garlic, minced
2 teaspoons grated fresh ginger
1 teaspoon ground turmeric
1 15-ounce can of diced tomatoes
chopped green chilis
1 teaspoon garam masala
1/4 tsp chili powder
1/2 tsp ground coriander
1/4 tsp turmeric
1/2 tsp cumin powder
2 (15-ounce) cans chickpeas, rinsed and drained
Salt to taste
Squeezes of lemon juice
Fresh cilantro to garnish
Method
1. Heat oil in a large skillet. Add whole spices (cadamom pod, cinnamon stick, Bay Leaf, whole cloves, cumin seeds) to the pan and sautée for 2 minutes over medium-high heat. Add onion and sautée until softened and browned, about 8 minutes. Add garlic, ginger and turmeric. Stir to combine. Sautée for a minute or two.
2. Add the canned tomatoes and green chilis. Simmer until thickened slightly, about 3 minutes. While tomatoes are simmering, mix together the garam masala powder, chili powder, ground coriander, turmeric, and cumin powder. Add this mixture to the simmering tomatoes and stir to combine.
3. Add the chickpeas. If the dish is getting dry, add up to 2/3 cup of water. Simmer uncovered for 5-10 minutes or until chickpeas are soft, but not mushy. Season with salt.
4. Fish out the Bay Leaf and cinnamon stick. Serve over rice. Squeeze lemon on top and garnish with lots of fresh cilantro.
Here is a version of Chana Masala demonstrated by ShowMeTheCurry. Their version involves using tea bags to enhance flavor and color. Cool!
Did you know that 90% of the nation’s avocados are hand-grown by farmers in California? Many of the California avocado groves are multi-generational and family operated. Randy Axell is one of those growers. As a third generation avocado grower, Axell and his wife, Joanna, have raised their family on 40 acres of land in Santa Paula, Calif. called Rancho Rodoro. It is named from a combination of Axell’s parents’ names, Ross and Dorothy. Axell feels privileged to have grown up on a farm and to have provided the same opportunity to his children.
CA Avocado Grower, Randy Axelle
“I love being able to spend every day on a farm and in the groves. It’s very satisfying to be able to grow something from a tiny seed to a full tree,” explains Axell when asked about his favorite part of being a California avocado grower.
Randy’s passion for growing California avocados is clear in the quality of his trees and the fruit he harvests each season. His farm is operated to the standards of Good Agricultural Practices (GAP) certification, a program that requires Randy to document everything he does on the farm as well as implement the best possible management practices to aid in preventing food safety issues. He sees these practices as a natural thing to do, to focus on food safety and sell the perfect piece of fruit.
Axell Family California Avocado Grilled Cheese Sandwich
Recipe created by California avocado grower Randy Axell for the California Avocado Commission, used by permission.
Serves: 4
Prep Time: 5 minutes; Cook Time: 5 minutes
Ingredients
4 slices cheddar cheese
8 slices whole wheat or honey wheat bread
1 ripe, fresh California avocado, peeled, seeded and sliced
1 medium tomato, sliced
4 slices red onion
Chili sauce, to taste
4 slices pepper jack cheese
Olive oil cooking spray
Instructions
On each sandwich, place a slice of cheddar cheese, a layer of avocado, tomato, and onion slices. Add chili sauce to taste. Top with pepper jack cheese, and finish with remaining bread slices.
Heat a large skillet over medium heat. Spray skillet with olive oil cooking spray. Place sandwiches in skillet and cook until bread is browned. Turn and cook until cheese has melted. Serve immediately.
Nutrition Information Per Serving: Calories 350; Total Fat 18 g (Sat 6 g, Trans 0 g, Poly 1.5 g, Mono 6 g); Cholesterol 25 mg; Sodium 610 mg; Total Carbohydrates 33 g; Dietary Fiber 7 g; Protein 19 g;
Pumpkin month continues here at StreamingGourmet. I love to make savory pumpkin dishes and this is one of my favorites. You can use this sauce with Gnocchi or Ravioli stuffed with squash or pumpkin, or penne, shells or spaghetti. You can make a vegan version (see the link at the bottom) or you can load it up with butter, cream, and cheese. Either way, go easy on the nutmeg. A pinch goes a long way. You could add a little cinnamon, but I don’t like it when these sauces start to taste like pie. We’ll get to pie later.
Pasta with Pumpkin Sauce Serves 4
Ingredients
1 lb pasta (spaghetti or penne or shells)
1 Tbsp olive oil
2 garlic cloves, minced
2 tsp chopped fresh sage or 1 tsp dried sage
1 large onion, chopped
2 large carrots, finely diced
1/2 cup white wine
I cup canned puréed pumpkin
3/4 cup vegetable stock
1 tsp salt
Pepper to taste
1/2 cup heavy cream
1/4 tsp grated nutmeg
1/4 cup fresh grated Parmesan cheese
Additional Parmesan cheese for garnish
Additional fresh sage for garnish
Method
1. Heat the oil in a heavy-bottom stock pot over medium-high heat. Add the garlic and sautée for one minute. Add the sage, onion, and carrot and sautée until softened and slightly browned, about five minutes. Add the white wine and simmer until reduced by half. Add the pumpkin and vegetable stock and stir well to combine. Season with salt and pepper. Reduce heat to medium-low. Simmer uncovered for 10 minutes.
2. While the sauce is simmering, cook your pasta according to package directions.
3. Once the sauce has simmered, reduce the heat even further. Add heavy cream and nutmeg. Stir well and heat through for about 3 minutes. Add Parmesan cheese and stir. Add pasta to the pan and allow the sauce to soak in. Spoon into bowls. Garnish with additional Parmesan cheese and sprigs of fresh sage.
For over 80 years, the Thrasher’s French Fries stand at 401 South Atlantic Avenue, in Ocean City, MD, has served as a kind of gatekeeper to the famous boardwalk. At Thrasher’s, the potatoes are cut fresh, fried twice, doused with vinegar, and served in buckets. Big buckets. With only three sizes available (16 oz, 32 oz and 53 oz buckets), the smallest serving you can buy is a pound. But, there is something about these fries that makes them so addictive that a pound often is not enough and Thrasher’s fans are adamant. These are the best fries on the planet. Always a line of people waiting for their fries
With more than eight decades of frying and over 22,000 fans of the unofficial facebook page, who’s to argue? In 1933, Thrasher’s weathered a hurricane that not only destroyed vast sections of the boardwalk, but actually severed off Assateague peninsula to create the now-famous Assateague island across the inlet. Thrasher’s then went on to survive the Great Depression, two World Wars, Reaganomics, and the “freedom fries” era. Featured in countless magazine and newspaper articles, like the Woman’s Day 8 Best Boardwalk Food in the U.S., and inevitably found in the comments section of any web article about the “best fries,” these fries inspire a fanaticism usually reserved for politics and religion.
So, when I was heading back to my native Maryland Eastern Shore, I knew that it was time to make a pilgrimage to the place where I first learned what a French fry is supposed to taste like. Sure enough, there is something irresistible about these fries. They aren’t particularly crispy, but the flavor is pure potato. In fact, Thrasher’s is so proud of the fresh potato flavor, they don’t provide (or even allow) ketchup.
NO KETCHUP.
Katherine Bunting-Howarth of Delaware remembers using so much vinegar once, she soaked a hole through the bottom of the bucket and she’s not the only who considers the vinegar to be an essential element of the Thrasher’s experience. 939 people on facebook have “liked” the Thrasher’s facebook update, “[…] diggin’ the Apple Cider Vinegar with no ketchup!” and dozens more have added their two cents.”
OC, MD 3073 miles
After returning to California, more than 3000 miles away, I began to wonder. Can I recreate true Thrasher’s French Fries at home? I know the basic ingredients: Russet potatoes, peanut oil, salt and vinegar. But can I get that same balance of tender and crispy? And can I reproduce the rich, potato flavor? I set out to find the answer. But it would not come directly from the source. Thrasher’s is part of the Bayshore Development Corporation which also owns the Jolly Roger amusement parks. My attempts to reach someone at Bayshore willing to talk about Thrashers Fries were unsuccessful. Buddy Jenkins, chair of the board of the Bayshore Development Corporation, has always been secretive about the magic of these fries. According to a 2004 Washington Post article, Jenkins said, “We have a process that I certainly don’t intend to divulge,” but that the secret involves a “recipe and cooking times.”
Well, a recipe and cooking times were just what I set out to develop. I knew that part of what makes boardwalk fries, boardwalk fries is that they are soaked in a brine solution before they are fried twice, so I knew that I would try brining the potatoes as part of the solution. But how hot should the oil be? How long should the fries, well, fry? To find some answers, I turned to The Food Lab at SeriousEats.com. In May, J. Kenji Lopez-Alt set out to determine what makes a McDonald’s french fry so darn good and I have applied some of his learnings to this project. But Thrasher’s French Fries are not like McDonad’s French Fries. They’re thicker for one thing, and they’re served in buckets; they’re never frozen, and, must I say it again? They’re eaten with vinegar, not ketchup. But, they do need to come out with a crispy exterior and a fluffy, fully-cooked interior and that is where the “recipe and cooking times” come in. In his article, Lopez-Alt discovers that McDonald’s actually blanches its fries in nearly-boiling water before frying them, so I decided to add this step to my process as well. Blanching them at 170˚F rinses off excess sugars and starch which in turn prevents over-browning later. It also strengthens the cell walls of the potato so it doesn’t completely lose its structure during the frying process. Again, Lopez-Alt explains all of this really well here.
Following the multi-step process of brining, blanching, frying, cooling, frying meant that I could enjoy something approaching a bucket of Thrasher’s French Fries without having to leave the state of California. And that, my friends, is worth a day’s effort. Are you with me on this one? If you are, read on for the complete recipe.
Homemade French Fries
My best attempt at recreating Thrasher’s French Fries at Home Serves 2 (or one, really)
Ingredients
4 Russet potatoes, peeled and sliced into 3/4-inch thick slices
Peanut Oil, enough for fries to be submerged
Sea Salt
Apple Cider Vinegar (or malt vinegar, if you prefer)
For the brine
2 quarts water
1 cup salt
Tools
I don’t have a lot of deep-frying tools in my kitchen. No wire basket, no electric fryer. But the one instrument that is indispensable for this recipe is a Candy/Deep Fry Thermometer, like the one pictured here:
Russet Potatoes
Method
1. Mix the water and salt in a large glass bowl. Stir to dissolve salt. Add potato slices and allow to sit for 30 minutes. Drain in a colander and rinse.
2. In a large stock pot over medium heat, bring a bath of water to 170˚F. Remember, the boiling point of water is 212˚F, so you don’t want to let it boil. There will just be a few bubbles. Add the potatoes and let them sit in this warm bath for 17 minutes. Continue to check the temperature periodically to ensure that you are spot on. Remove potato slices to a paper towel-lined cutting board or cookie sheet and allow them to dry. They must be completely dry before submerging them in the hot oil, so do what you need to do to ensure that they are dry.
3. In a dutch oven or heavy-bottom pot, heat the peanut oil to a whopping 400˚F. Beware. Hot oil is hot. Wear protective clothing and make sure you do not allow any drop of water to fall into the hot oil bath. It will splatter and burn you. Don’t ask me how I know this. Carefully lower about 1/3 of the potato slices into the oil and allow them to fry for 80 seconds. Make sure they are not sticking to each other during this process. If you notice them starting to turn brown, remove them immediately. During this stage of the process, they should only just begin to take on a golden color. Remove them to a paper-towel lined surface and repeat with two more batches. Allow the oil to come back to the proper temperature between batches. This is what they look like after the first frying session:
After the first fry
4. Allow the fries to cool for at least 30 minutes. Then, bring the oil back up to a temperature of 375˚F. Again, in batches, allow the fries to cook for 3 – 4 minutes. Watch carefully so that they don’t get too brown. Remove them to a paper-toweled lined surface and salt immediately. They can be kept warm in a 200˚F oven on a parchment-lined cookie sheet while you are frying the other batches, but I found it wasn’t necessary because everything moved so fast.
5. Serve in paper-lined cups (I used tall coffee cups) and sprinkle with salt and, of course, cider vinegar! Enjoy immediately. Perfect French Fries at Home
What are your memories of Thrasher’s French Fries? What tips do you have for making the best fries at home? What boardwalk food do you love the best? Share your memories, tips and opinions in the comment section below.
Over the past six days, I’ve shared each course of a five-course dinner I cooked for my husband’s recent birthday party. Looking at the array of photos below, would it occur to you that this is a collection of vegan, gluten-free recipes? Think of it. No cheese. No pasta. No fish or fowl. If you had asked me on my husband’s birthday last year whether I could (or would even want to) make a dinner like this, I would have answered, “no,” flatly. Now, I can barely imagine eating any other way. Well, almost barely.
Yes, we are happily joining the national craze of eating in a sustainable, healthful way. In fact, just yesterday, I planted a whole pallet of seeds which means we’re joining the garden-at-home craze too. Count on a whole host of blog entries about this new adventure. When I was on the outside looking in at this fad, I thought it was a bit of overblown malarky, and, well, just a fad. Now that I’m joining in, I can feel myself transforming into an evangelist. I guess 38 per cent of Americans (the number of people who had a vegetable garden last year) can’t be wrong. Well, sometimes they can, but not this time.
Seeds germinating after just 24 hours
I absolutely must thank Viviane Bauquet Farre for her inspiration and help on this birthday dinner project. If you haven’t seen her blog yet, you are really missing out. You can find her at food and style and please, go “Like” her facebook fan page. Viviane creates the most original and beautiful recipes. She also produces some of the highest quality cooking instructional videos on the web. See them all on StreamingGourmet.com. It took me months to figure out that her recipes are vegetarian, so they will appeal to you whether you are a vegetarian, a vegan, an omnivore or someone determined to subsist on truffles and scotch. Seriously. Thanks again, Viviane!
It’s day five of my blogging event: “How to host an elegant, flavorful, vegan, gluten-free dinner party” in which I feature recipes created by the wonderful Viviane Bauquet Farre of food and style. My husband and several of his friends have transitioned to a vegetarian diet and several of them are also avoiding dairy and gluten, so when I decided to celebrate G’s birthday with a dinner party, I knew I needed to turn to my friend Viviane who features such refined recipes which also happen to be meat free. Today’s installment is the fourth of that five-course meal – the main course, in fact. For dessert, you’ll just have to check back tomorrow.
For this course, I got to experiment with fresh vegetables from the farmer’s market I’ve been dying to use, like English peas and fava beans. If you’re going to choose between the two, English peas are way easier to prepare. You just have to pop the peas out of the pod and they’re ready to go. Fava beans, on the other hand, require several steps. The beans within the pods are coated with a little jacket that needs to be removed as well. For this recipe, I actually prepared both and it took all day. Luckily, I was able to stream three episodes of This American Life while I shucked, blanched and peeled.
Fresh Peas
I prepared the fava beans by following the first part of a recipe by LocalLemons. First I had to remove the beans from their pods. Rinse them. Blanch them for 30 seconds and then pull off the outer layer from each bean. The inner bean is bright green and more fragile. After 3 hours of work, I forgot to photograph the bright green inner beans, but you can see what they look like over at the LocalLemons post. Here’s what they look like during step one and two.
Fava Beans removed from the podFava Beans after blanching
This dish is truly scrumptious. It is lighter than risotto because there is no butter and no Parmesan cheese, but the saffron, wine and garlic more than make up for flavor. I would make this dish again in a minute and look forward to varying the vegetables depending on what’s in season.
For the vegetables
1/4 cup extra virgin olive oil
2 large shallots – skinned, quartered and finely sliced
1 teaspoon saffron threads – gently pounded in a mortar to a coarse powder
1 1/2 cups dry white wine
2 garlic cloves – skinned and finely chopped
2 medium, young carrots – peeled and cut in 1/8″ x 1″ sticks
4 oz shelled fresh English peas
8 oz asparagus – stalk ends snapped off and spears cut on the diagonal in 1″ pieces
1/2 teaspoon sea salt
freshly ground black pepper to taste
A handful of fresh baby arugula
For the quinoa-millet pilaf
1 Tbsp extra virgin olive oil
1-2 shallots, diced finely
1 clove of garlic, peeled and bashed
½ cup millet
½ cup quinoa (rinsed well)
2 ½ cups vegetable stock
Sea salt to taste (about 1/2 tsp)
About a cup of shelled fava beans
Method
1. To get the quinoa-millet pilaf started, put the quinoa in a fine-mesh strainer and place a bowl underneath. Rinse with cold water while rubbing the quinoa between your fingers. The water will become cloudy. Drain, and repeat this process with fresh water two more times. Strain excess water and set aside. Heat the olive oil in a saucepan over medium heat. Add the shallots and sauté for about 4 minutes, or until soft. Add the garlic and sautée for another minute. Now we are going to toast the grains so that they have a rich, nutty flavor. Add the millet, and sauté for 5 minutes, stirring frequently. Now add the quinoa and sauté for 2 to 3 minutes more. Again, stirring frequently to coat the grains with the olive oil, shallots and garlic. Add the vegetable stock and salt and bring to a boil. Reduce heat, simmer, covered for about 30 minutes, or until the water is absorbed. Fluff before serving
2. Now that the quinoa-millet is cooking, it’s time to do the vegetables. Heat the olive oil in a wide, heavy-bottomed skillet over medium-high heat. Add the shallots and sauté for 1 to 2 minutes until they have softened. Add the wine, saffron, and garlic. Bring to a full boil and then reduce heat to between medium and medium-low. Cover the pan and simmer for 5 minutes. Add the carrots, toss well, cover the pan and simmer for 10 minutes. During my dinner party, I actually paused the dish here while we were eating and the carrots steeped in the saffron-wine-garlic sauce (with no heat) for about 20 minutes. This had the delightful effect of infusing them with intense saffron flavor. You could try it that way.
3. Add the peas and asparagus, toss well, cover the pan and continue to simmer for 5 minutes until the asparagus are tender but still a bit crunchy. Uncover the pan. Raise heat to high, add the salt, black pepper to taste and the arugula. Toss until the arugula has wilted, about 30 seconds to 1 minute. Immediately remove from heat.
4. To serve, spoon the pilaf into shallow bowls. Top with the braised vegetables. Drizzle with the pan juices. Garnish with a drizzle of olive oil. Serve immediately.
Optional fava bean addition:
Sautée the fava beans over medium high heat in a separate sautée pan, with some olive oil and pepper for about 3 minutes. Serve as a garnish on top.