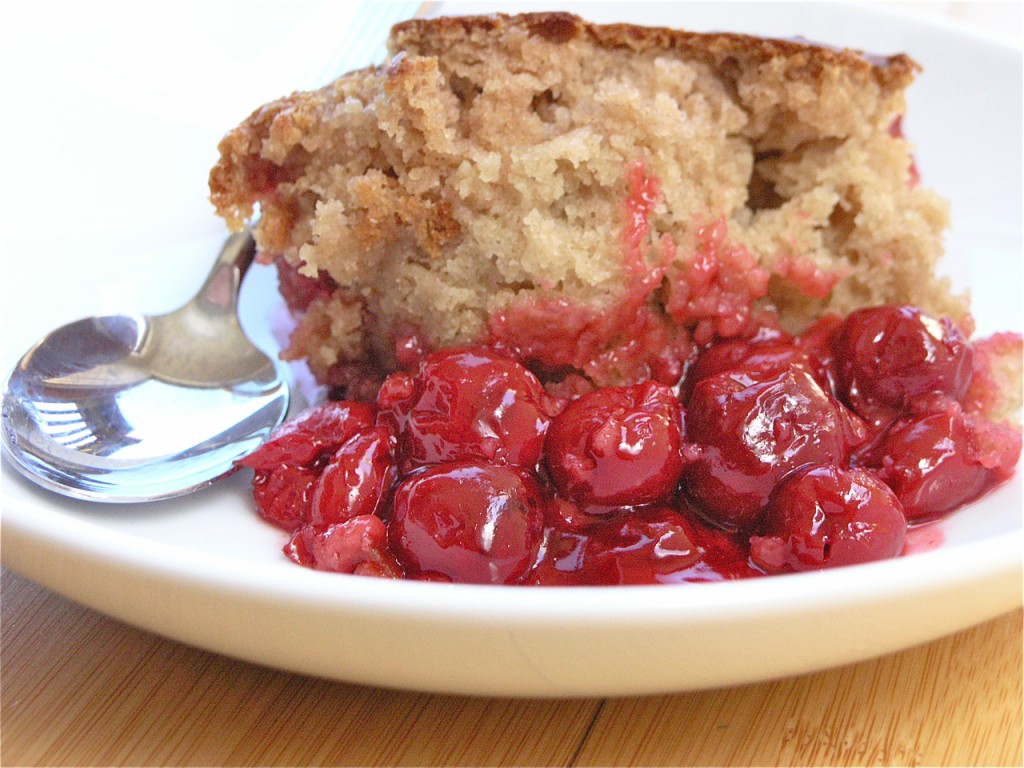
May 17 is National Cherry Cobbler Day! I decided to make an easy cherry cobbler with more than a hint of cinnamon. I prefer the real “biscuity” kind of topping on cobbler, rather than a streusel, or sugar crusted type topping. Using the Stonewall Kitchen Cherry Pie Filling saves one from having to pit the cherries and cook them just right. My easy cobbler recipe takes about 10 minutes to prep and 20 minutes to cook. Done and done!
Add pie filling to a 9 x 12 casserole dish. While preparing the batter, put the dish in the oven for about 10 minutes so that the fruit has a chance to warm up.
Meanwhile, in a standup mixer, cream together the butter and the sugar until fluffy.
In a separate bowl, mix together the dry ingredients. Add the dry ingredients to the butter-sugar mixture and mix in the mixer until a crumbly dough starts to form. Don't over mix.
Add the milk and stir with a spoon until mixture is a smooth batter. Again be careful not to overmix it.
Remove casserole dish from the oven and spread batter over the top, trying to reach all of the corners.
Bake at 425˚F for 15-20 minutes or until biscuit topping is golden brown. The cinnamon in the mixture will make it appear more brown than a normal biscuit.
Serve with vanilla ice cream or just on its own. Best when served warm.
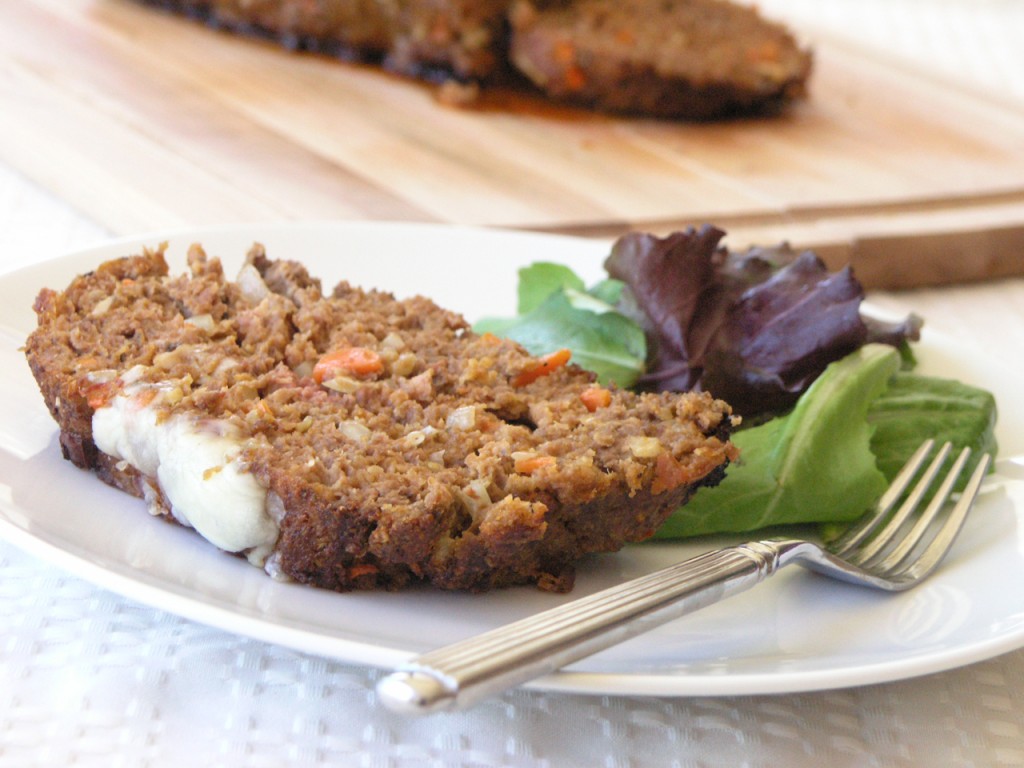
When Mooney Farms contacted me asking if I would be interested in trying out some of their Sun Dried Tomato products, I said, “Yes. Yes!” Shortly after, a goodie box arrived chock full of tantalizing jars and packets. I’m inspired. Stay tuned for more recipes, but today I made Meatloaf with their Sun Dried Tomato Pesto.
Family owned in Chico, CA, Mooney Farms produces high quality sun-dried tomatoes and uses premium 100% pure olive oil. I can definitely vouch for the rich flavor.
Today, I made a recipe that was attached to the top of the jar of the Sun-Dried Tomato Pesto. Man, was it delicious. I don’t normally make meatloaf. My husband doesn’t really eat meat and my kids woud be scared of it in this form. Since they’re not interested, if I’m not careful, I’m going to sit here and eat all 3 lbs of it myself this afternoon. Seriously. It’s that good. If your family likes meatloaf, this is going to be a winner. There is melted Mozzarella on top, no less!
If your market doesn’t carry their products, you can purchase them directly from the Mooney Farms Wesbite.
Bella Sun Luci Sun Dried Tomato Pesto kicks up Italian Meatloaf a notch
Author: Bella Sun Luci
Recipe type: Main
Serves: 6
Ingredients
2½ lbs lean ground beef
1 lb pork sausage (I used Sweet Italian Sausage)
2½ cloves garlic minced
2 large carrots, chopped finely
1 tsp basil
1 tsp oregano
¼ tsp salt
pepper, to taste
2½ cups bread crumbs
3 eggs
½ cup tomato ketchup
½ cup red wine
4 oz Bella Sun Luci Sun Dried Tomato Pesto
¾ lb Mozzarella cheese
Instructions
Combine all ingredients, except cheese, in a large bowl. Then place meatloaf in a pan. Bake for 70 minutes at 375˚F. Remove from oven and top with Mozzarella cheese. Return to oven for 5-10 minutes or unti cheese is melted. Garnish with additional pesto, if desired.
Whenever I watch Mad Men, I wish I could be transported back in time to the New York City restaurants featured on the show. Of course, many of them are still open and thriving, and NY Eater has indexed them beautifully, here. But alas, I live in San Fracisco, and my time machine is in the shop, so I am reduced to trying to recreate the recipes of the day here at home.
I worked at a restaurant in the early eighties that made Caesar Salad table-side. It’s definitely food as theater when the waiter cracks the egg over the salad and mixes it in or lifts his arm high in the air to drizzle in the olive oil. Entertain your family at home with a similar preparation. It was in Season 1, episode 2 (The Ladies’ Room) that Betty and Don Draper dine with Roger Sterling at the restaurant Toots Shor, where a Caesar Salad is prepared table-side. Also in Season 3, Episode 4 (The Arrangements), Pete Campbell, Don Draper, and a potential client, Horace “Hoho” Cook dine at Keen’s where Caesar Salads are prepared table side even today.
Betty and Don Draper at Dinner
Nowadays, people are a little spooked by the raw egg mixed into the dressing, but I’m someone who has eaten raw cookie dough my whole life and never -knock on wood – suffered from salmonella poisoning. This Caesar Salad recipe also calls for a coddled egg (boiled in rapidly boiling water for 40 seconds) which may comfort those who are nervous. The US Department of Agriculture measures the risk encountering a contaminated at 1 in 30,000. Coddling doesn’t quite bring the temperature of the egg to the 160˚F required to kill the bacteria, but it makes for a creamier dressing.
And what about anchovies? They weren’t a part of the orginial Caesar Cardini salad recipe, so I haven’t included them here, but if you want to add them in, just chop a few of them finely to mix into the dressing and then garnish with a few more on top.
For more about the food of Mad Men, check out The Unofficial Mad Men Cookbook, available at Amazon.com:
Dressing:
1 clove garlic crushed
1 egg yolk that has been coddled (boil in rapidly boing water for 40 seconds)
2 tsp Dijon mustard
1 lemon, juiced
1 tsp Worcestershire Sauce
1 pinch of salt
1/3 cup extra-virgin olive oil
Freshly shaved Parmesan cheese, plus extra for garnish
Freshly ground black pepper
2 heads romaine lettuce
Great croutons (if you have to make them yourself, toast cubed bread in olive oil and minced garlic until golden brown).
Method
1. In a large wooden bowl, spread the crushed garlic around. Crack a coddled egg into the bowl. Add mustard, lemon juice, Worcestershire Sauce and salt. Beat with a fork. Pour the oil in a steady slow stream while continuing to beat the mixture. Tear the lettuce into the bowl and toss. Grind fresh pepper on top. Add the croutons and freshly shaved Parmesan. Toss and transfer to plates. Then shave additional Parmesan on top.
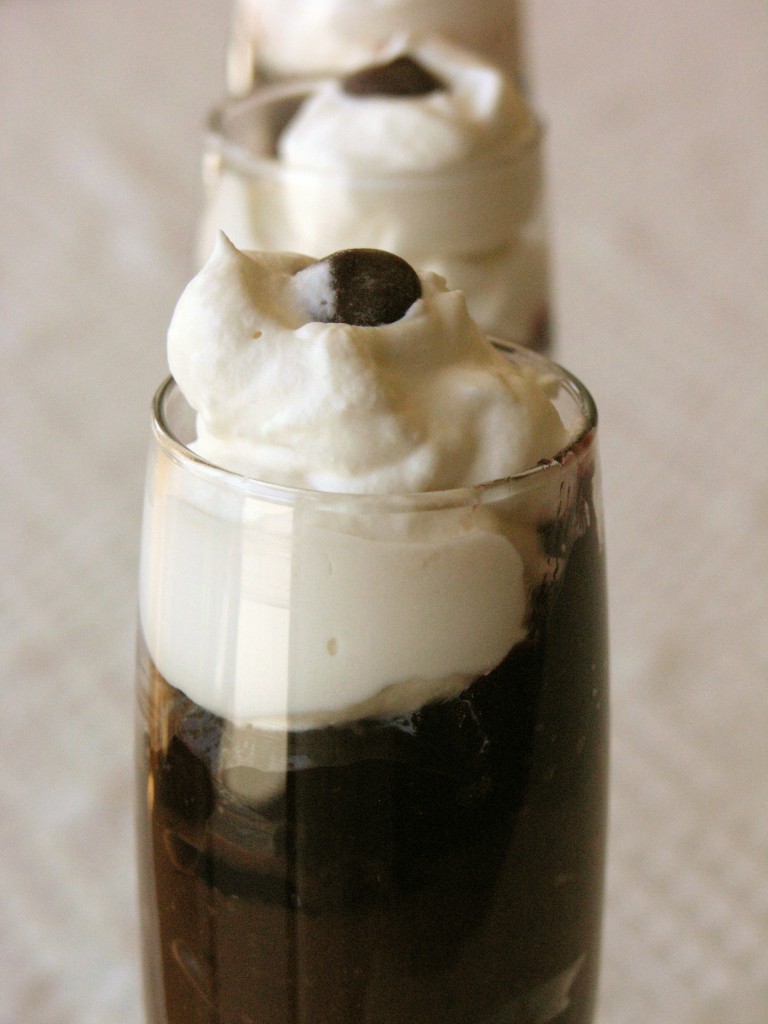
It’s National Chocolate Parfait Day, so I was inspired to run to the grocery store and whip up a parfait. My goal was to make some delicious and fast. So I opted for instant pudding today, but when I have more time, I’ll go for the home-made version. I did make my own whipped cream, because although most people don’t realize it, making real whipped cream is just about as fast as pulling the canned stuff out of the fridge.
I do have this great tool that enables me to whip with little effort and no noise. It’s a rotary egg beater and they have them on Amazon:
I used the rotary egg beater to whip up the instant pudding and during the 2 minutes that was chilling in the refrigerator I used it to whip up the whipped cream. Done and done.
Now for the layering. I love the flavors of chocolate and cherry together, so I used this lovely Black Cherry jam as one of the layers. It’s difficult to see in the photograph, but it’s lodged between the chocolate pudding and the whipped cream. It’s also available on Amazon if you can’t find it in your local grocery store:
Chocolate pudding, cherry jam and real whipped cream come together for a National Chocolate Parfait Day treat.
Author: Amy Wilson
Recipe type: Dessert
Serves: 6
Ingredients
1 package Jell-O instant chocolate pudding
2 cups milk (I use 2%)
1 cup heavy whipping cream
1 Tbsp confectioner's sugar
1 tsp vanilla
6 Tbsp Black Cherry Jam
Instructions
Using a rotary egg beater (or a whisk), beat the instant pudding mix and milk together for 2 minutes. Let chill and set in the refrigerator for 5 minutes.
While the pudding is setting, use a rotary egg beater to beat together the cream, sugar and vanilla. It takes about 3-4 minutes to get nice peaks to form.
Spoon pudding into the bottom of a champagne flute or other tall, narrow glass. Wipe rim with a paper towel to remove chocolate smudges. Spoon in a tablespoon of the jam into each flute, then top with whipped cream and garnish with a chocolate chip or a cherry or anything you like!
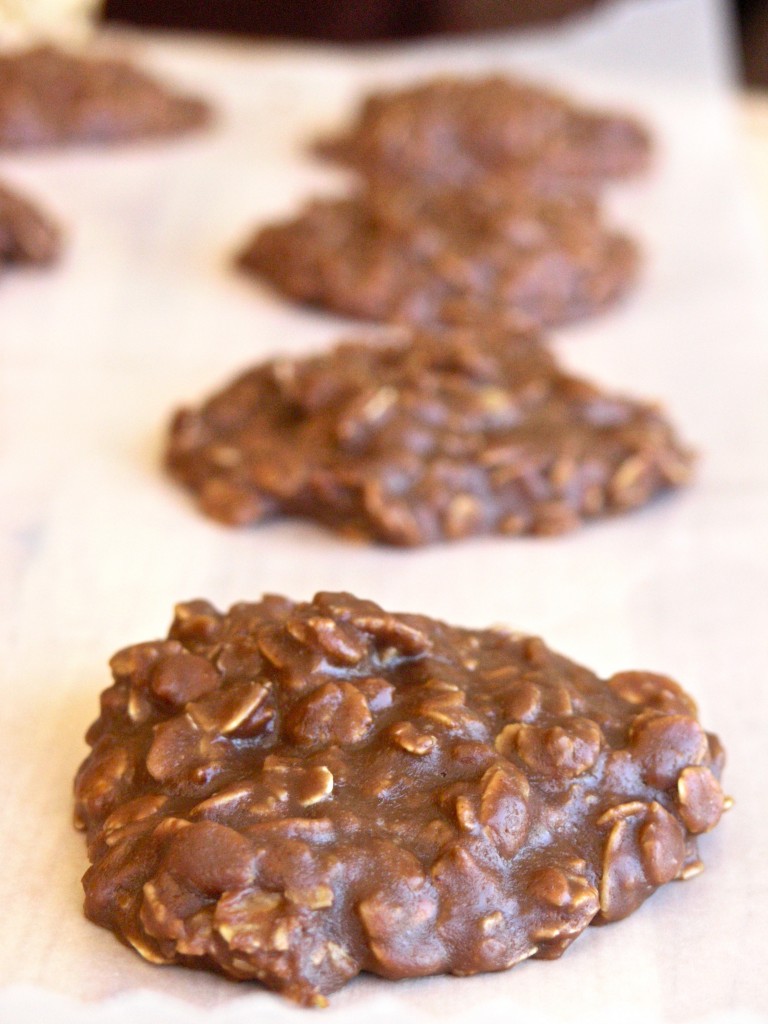
Today is National Oatmeal Cookie Day, so I thought it would be perfect to celebrate with these fudgy, chocolate, peanut butter oatmeal cookies that can be made with ingredients typically found in your pantry and cooked (from start to finish) in about 10 minutes. This video below, from the Food Network doesn’t demonstrate the proper technique for making these cookies at all. It’s funny to watch if you know how they’re really made. Read on for the proper technique!
I first learned this recipe in my 7th grade home economics class at Wicomico Junior High School in Maryland in 1983. I remember distinctly our teacher stressing two important factors in the preparation of these cookies. First, you must boil the mixture for exactly one minute. If you boil it for under a minute, the cookies won’t harden. If you boil it for longer than a minute, they will come out dry.
Well, to boil something for exactly one minute requires that you know exactly when to start counting. You need to know what “boiling” looks like. Is it when the bubbles to start to appear around the edge the pan? No. In this case, boiling means that there are bubbles all the way across the surface. Start your stopwatch then.
Once it’s boiled for one minute, then you add the oats, peanut butter and vanilla. It’s important to work quickly, because as it cools, it starts to harden into fudge and you want to have all of your spoonfuls onto the wax paper before it gets too hard.
In a medium saucepan stir add the sugar, cocoa, butter and milk. Over medium-high heat, bring it to a boil, stirring to help the butter melt. Boiling means that there are bubbles all the way across the top of the liquid. Start your stopwatch now and boil it for exactly 1 minute. Remove from heat and quickly add the peanut butter, vanilla and oatmeal and stir to combine.
Working quickly, drop spoonfuls of the mixture onto a sheet of waxed paper. They will cool and harden within a few minutes. Voila. You're done!
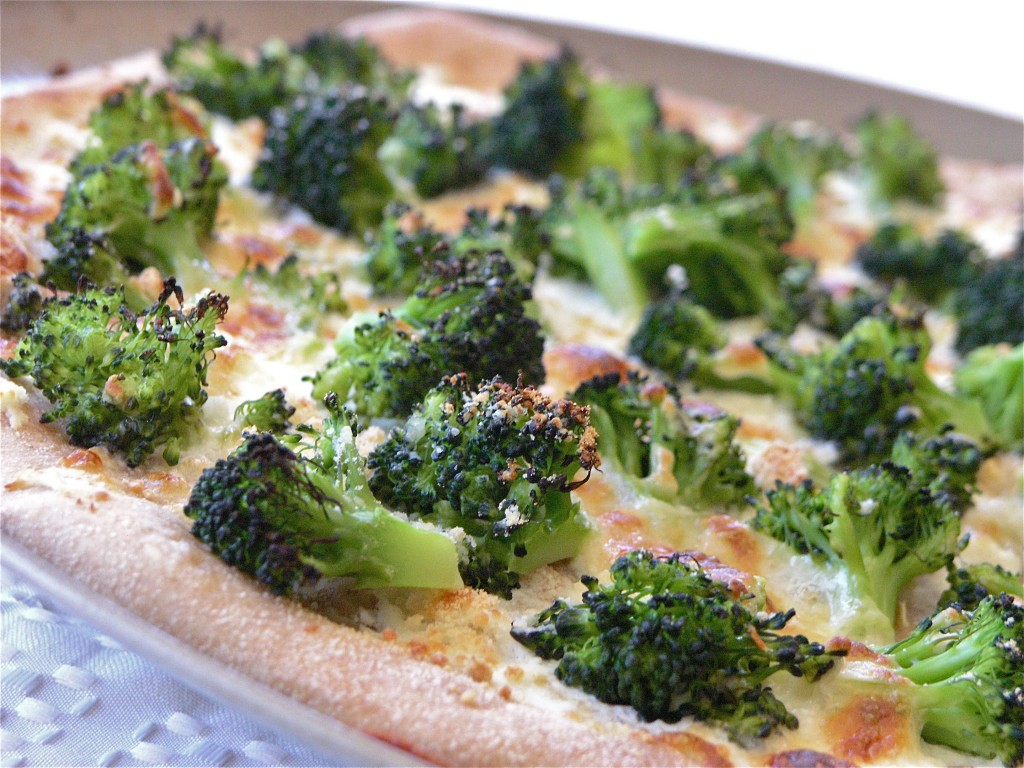
I must admit. I am a total broccoli addict. I eat broccoli every day. Roasted. Steamed. With cheese melted over it on a potato and this way: on a white pizza. This is pretty guilt free. As long as you don’t eat half the pizza, like I sometimes do. But because low-fat ricotta stands in for most of the cheese, the calorie count on this dish is not terrible.
I was first introduced to white pizza in college outside of Philadelphia. Renato’s in Swarthmore used to make an awesome pizza with ricotta, Mozzarella, and lots of garlic. I’m pretty sure there was broccoli on that one too. So basically, I wanted to recreate that pizza here.
I’ve been eating this broccoli pizza almost once a week for about a month now, so I figured it was time to do a post.
I use freeze-dried garlic in this recipe, because it’s so much faster to just sprinkle it over the pizza, than it is to chop fresh garlic. The flavor is great. I don’t miss the fresh garlic at all. I use Litehouse brand, but you can find this other brand at Amazon:
You can make the crust yourself, as I used to do a lot (I just realized I’ve never posted by pizza dough recipe, which is weird), but lately, I’ve just been buying whole wheat pizza dough at the grocery store. Mollie Stone’s now carries Il Fornaio pizza dough in the frozen section. It tastes just like my homemade version, so I’ve been hard pressed to go to all the trouble of making it from scratch. Just make sure that you let the dough sit out long enough to come to room temperature, because if you’re not careful, you can run into the problem of having the toppings cook before the dough is ready, and then it just sticks to the pizza pan like crazy.
To help with making sure the pizza doesn’t stick, I use a nonstick, perforated pizza pan like this one available at Amazon.com (just click on it). I also spray it with a little nonstick spray:
2 heads of broccoli, chopped into florets (about 3 cups)
1 Tablespoon freeze-dried garlic
¾ cup reduced fat ricotta cheese
½ cup shredded part-skim Mozzarella cheese
Salt to taste
Instructions
Preheat the oven to 500˚F
If you have purchased frozen pizza dough, make sure it thaws overnight. Then let it rest on the counter for at least 20 minutes before shaping it into a pizza.
While the pizza dough is resting on the counter, you can steam the broccoli. Put the florets in a medium saucepan with 2 cups of rapidly boiling water. Steam for 3-4 minutes. Watch carefully. When the broccoli is ready, it will be bright green still, and tendercrisp. It is better for it to be undercooked than overcooked. Remove from the heat and drain completely. Then rinse with cold water to stop the cooking process and drain again. Pour the broccoli out onto some paper towels. You don't want to transfer any water to the surface of the pizza.
When you are ready to shape the dough, put a couple of tablespoons of flour (semolina or wheat) onto a large cutting board. Coat the dough ball with the flour. Flatten the ball into a disc. Then with your fingertips, work your way around the edges, stretching it all out as you go. Put your fist in the middle of the growing circle and let the sides stretch down. Move your arm up and down to help it stretch out. Then work your fingers around the edge of the circle one more time.
Spray the pizza pan with a little nonstick cooking spray and spread the circle of dough onto the pan. With the back of a spoon, spread the ricotta evenly over the pizza. Then sprinkle with the dried garlic. Arrange the broccoli pieces over the surface evenly. Sprinkle with the Mozzarella. Season with salt.
Bake in the oven for 10-15 minutes. Watch carefully. If the cheese starts to brown too quickly (before the crust has had a chance to brown), back off the heat a little bit. When the cheese and the crust are just starting to brown, remove from the oven and let cool for 2 minutes. Then slice and serve immediately.
Cinqo de Mayo is just around the corner and we’re getting ready by enjoying California Avocados – back in season and perfect for bringing together your favorite Mexican flavors – lime, cilantro, and… avocado. Yum.
This shrimp tostada recipe, a light and healthy dish perfect for a weeknight or for a dinner party, was shared with us by the California Avocado Commission and was created for them by chefs Mary Sue Milliken and Susan Feniger, aka, the Too Hot Tamales of early Food Network fame. Known also for their fabulous Santa Monica restaurant Border Grill, the Too Hot Tamales have been partnering with the California Avocado Commission for some time now to bring fresh, flavorful, avocado forward dishes to all of us. Enjoy!
Bold flavors come together in this fresh take on the shrimp tostada
Author: Recipe created by chefs Mary Sue Milliken and Susan Feniger for the California Avocado Commission
Recipe type: Entrée Salad
Serves: 4
Ingredients
¾ cup beer
3 bay leaves
½ tsp. celery seeds
½ tsp. cayenne
½ tsp. salt
½ lb. domestic, wild-caught jumbo shrimp, peeled and cleaned
2 ripe, fresh California avocados, seeded, peeled and cut into ½-inch dice
1 Roma tomato, finely diced
¼ cup finely diced red onion
1 small carrot, peeled and finely diced
1 jalapeño, stem and seeds removed, finely diced
½ bunch cilantro, finely chopped
1½ limes, juiced
3 Tbsp. extra virgin olive oil
Salt, to taste
Ground black pepper, to taste
Canola oil, for frying
4 (6-inch) corn tortillas
4 romaine lettuce leaves, finely julienned
Instructions
Combine beer, bay leaves, celery seeds, cayenne and salt in a saucepan and bring to a boil. Add shrimp and cook 2 to 3 minutes, or until just turning pink and cooked through. Remove shrimp from liquid, cool to room temperature, and cut into ½-inch dice.
In a large bowl, combine cooked shrimp with avocado, tomato, onion, carrot, jalapeño, cilantro, lime juice, olive oil, salt and pepper. Stir gently, taste, and adjust seasonings as necessary. Chill thoroughly.
Meanwhile, pour oil to a depth of ½-inch in a small pan for frying. Fry the tortillas on both sides until crisp and drain on paper towels.
To serve, divide julienned lettuce evenly between each crispy corn tortilla. Top with avocado shrimp mixture and serve immediately.
Notes
I substitute ¼ cup shredded carrots (in the bag) for the diced carrots in this recipe and I leave out the celery seeds.
With Cinqo de Mayo around the corner, what better way to celebrate the flavors of Mexico than to try out new recipes featuring the avocado, now back in season, here in California.
This year, Americans will consume 81 million pounds of avocados on Cinco de Mayo alone! That’s more than 160 million avocados in one day. Get in on the fun by trying this recipe, created for the California Avocado Commission by celebrity chefs, Mary Sue Milliken and Susan Feniger, known as the “Too Hot Tamales,” and co-chef/owners of the popular Border Grill restaurants in Santa Monica, Calif., Downtown Los Angeles and Las Vegas. This dynamic duo were Food Network pioneers when their show “Too Hot Tamales” premiered in 1995. They’ve gone on to compete on Bravo’s “Top Chef Masters,” and have now partnered with the California Avocado Commission to create innovative, fresh recipes featuring California avocados.
I love how this recipe is new and different and yet reminiscent of food I love. It reminds me of falafel of course, but there is also something very sushi maki about it too – like, if you were to take a california roll and fry it. Hey wait a minute. I think I’m onto something.
The recipe uses quinoa (pronounced “KEEN wah”), the high-protein, ancient Andean grain everyone is eating these days. It also calls for Cotija (pronounced “ko-TEE-hah”) cheese, a Mexican cheese with a grainy texture used as an accent by adding a tangy saltiness to dishes when grated on top. If your local grocer doesn’t sell Cotija cheese, order it on Amazon or substitute grated Parmesan.
Author: Recipe created by chefs Mary Sue Milliken and Susan Feniger for the California Avocado Commission
Recipe type: Appetizer
Serves: 8
Ingredients
⅔ cup white or black quinoa, rinsed and well drained
1⅓ cups water
¼ cup all-purpose flour
¼ cup grated cotija cheese
¾ tsp salt
4 green onions, white and light green parts only, finely chopped
½ bunch Italian parsley
1 egg
1 egg yolk
¾ cup canola or grape seed oil for frying
1 ripe, fresh California avocado, seeded, peeled and cut in ½-3/4 inch dice
Salt to taste
Ground black pepper, to taste
1 cup Aji Amarillo Aioli (see make-ahead recipe below)
Instructions
Place a small, dry saucepan over high heat. Add quinoa and toast for about 5 minutes, shaking and stirring constantly to prevent scorching. Transfer to a large saucepan and add water. Bring to a boil, reduce to a simmer and cook, covered, until water is absorbed, about 10 minutes. Set aside to cool.
In a large bowl, combine cooked quinoa, flour, cheese and salt. Add onions, parsley, egg and yolk. Stir thoroughly with a spoon until the mixture has the consistency of soft dough. Chill for 30 minutes.
Heat oil in a large skillet over medium heat.
In a small mixing bowl, season avocado with salt and pepper to taste and toss gently to coat.
Using hands, create round fritters about the size of a walnut shell with a piece of avocado in the center of each fritter.
Working in batches, gently slide fritters into the hot oil. Fry until golden brown, about 3 to 4 minutes, turning as necessary. Drain on paper towels and serve warm, topped with Aji Amarillo Aioli.
Notes
If cotija cheese is not available, parmesan cheese can be substituted
Yields about 24 fritters
I recently spent an evening with her since we share a mutual friend, and she told me that the Pumpkin Ricotta Cheesecake in the book is one of her favorites, so I made it for my annual Halloween Dinner Party (more recipes to follow from that event). It was divine. The flavor of the cheesecake is subtle and sophisticated. It’s not too sweet, but it still retains the yummy flavors reminiscent of your favorite pumpkin desserts.
Marisa Churchill
The book is full of fabulous recipes and Marisa really takes the time to explain the techniques. She provides sugar-free alternatives for each dessert as well as all of the nutritional information you need to stay on track (calories, grams of fat, etc.) and stay healthy. Get this book in time for the holidays! There are lots of cookie recipes to satisfy all of your Christmas cookie-baking needs!
For the Crust
Nonstick pan spray
6 oz honey graham crackers (about 10 cookie sheets)
2 Tbsp 1% or 2% milk
For the Cheesecake
8 oz (1 cup) reduced-fat Kraft cream cheese
1 cup sugar
1/3 cup nonfat sour cream, at room temperature
2 large eggs, at room temperature
2 egg whites from large eggs, at room temperature
1 tsp pure vanilla extract
2/3 cup canned pumpkin puree
1/2 tsp ground cinnamon
1/4 tsp ground nutmeg
1/4 tsp ground ginger
1/4 tsp salt
1/8 tsp ground cloves
1 cup plus 2 Tbsp reduced-fat ricotta cheese
2 Tbsp large pecan pieces, toasted for garnish (I used hazelnuts)
2 Tbsp pomegranate seeds for garnish
Method
For the crust
1. Coat 9-inch springform pan with pan spray. Break up the graham crackers and process them in a food processor until they are reduced to very fine crumbs. Add the milk and process for 30 seconds, or until the crumbs hold together when you squeeze them in your fist.
2. Transfer the mixture to the prepared pan. Press the crumbs firmly over the bottom and slightly up the sides of the pan, using your finger-tips to compress them.
For the cheesecake
1. Preheat the oven to 325˚F with a rack in the lower third of the oven.
2. Using an electric mixer, beat the cream cheese and sugar on medium speed for 2 to 3 minutes, until it is completely smooth and well blended. (If using a standing mixer, use the paddle attachment). Add the sour cream, eggs, egg whites, and vanilla; mix for 2 to 3 minutes longer to blend well. Scrape down the sides of the bowl as needed. Add the pumpkin, cinnamon, nutmeg, ginger, salt, and cloves and mix for 1 minute longer. Add the ricotta and mix just until it is incorporated.
3. Pour the batter over the crust and bake for 50 to 60 minutes, until the cheesecake jiggles only slightly in the center when you gently shake the pan. (If the cheesecake browns too quickly or begins to crack, tent a piece of aluminum foil over the top, without touching the filling, for the remaining baking time).
4. Transfer the pan to a wire rack and let it cool for 1 hour. Then run a knife around the edge of the pan if needed to loosen the cheesecake, remove the outer pan ring, and transfer the cake, on its base, to a serving plate. Cover the cake loosely with plastic film and refrigerate for at least 3 hours or overnight.
To serve: Cut the cheesecake into 12 wedges, and garnish them with the toasted pecans and pomegranate seeds.
Refrigerate any leftover cheesecake, tightly covered, for up to 3 days.
Nutritional Information:
Calories per serving: 221
Grams of fat: 9.5g
Watch Marisa whip up a Chocolate Mousse with Olive and Sea Salt:
There’s nothing likely whipping up a little quick bread (muffin, cupcake, bread, whatever) to satisfy the baking need. Mix the wet ingredients. Mix the dry ingredients. Put them together without overmixing, bake and voila! A sweet, sumptuous little treat in no time.
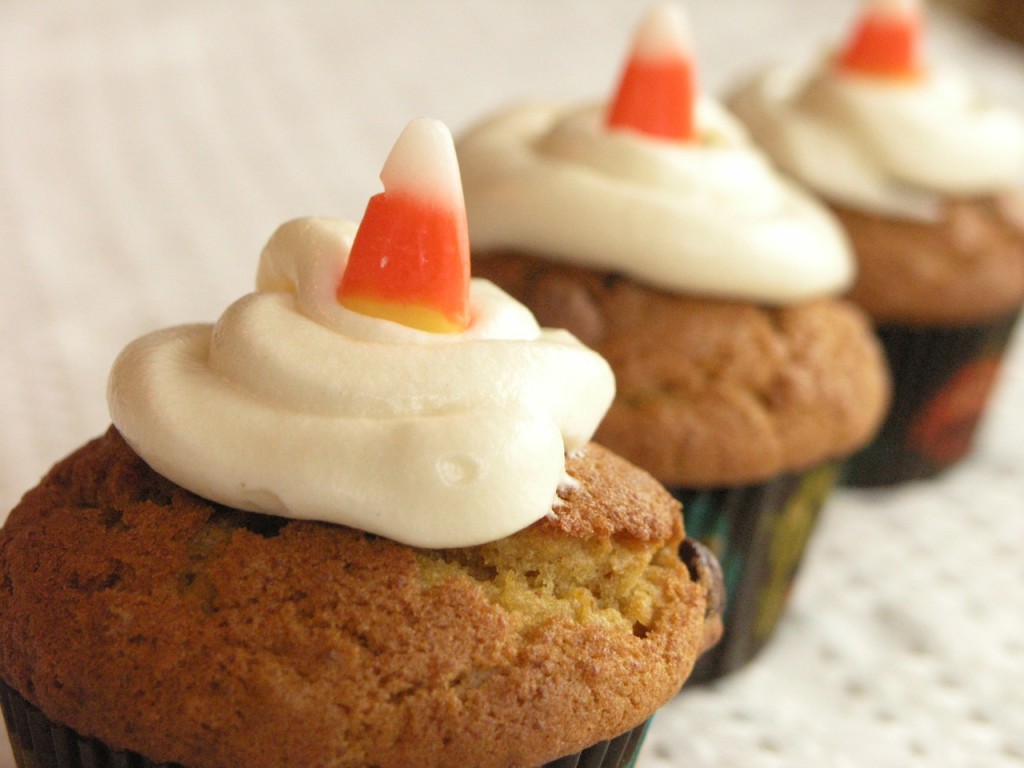
October = pumpkin for me, in case you didn’t know. Psst. There are like 40 pumpkin recipes in this blog. I’ve done pumpkin-chocolate chip cookies before, but never pumpkin chocolate chip muffins (or cupcakes as the case may be). Some people love the combo, and I am one of them. These are equally good with or without the icing, I think. So if you can’t be bothered with the icing, don’t be!
Pumpkin Chocolate Chip Cupcakes
The Best Pumpkin Chocolate Chip Cupcakes with Cream Cheese Frosting
Yummy pumpkin chocolate chip cupcakes - perfect for a Halloween party.
Author: StreamingGourmet/Amy
Recipe type: Dessert
Serves: 18-20
Ingredients
4 eggs
1½ cups granulated sugar
½ cup light brown sugar
2 cups canned pure pumpkin
1 tsp vanilla extract
1 cup vegetable oil
3 cups all-purpose flour
2 tsp baking soda
2 tsp baking powder
1 tsp ground cinnamon
½ tsp ground nutmeg
pinch ground cloves
1 tsp salt
2 cups semi-sweet chocolate chips
For the frosting:
1 (8 ounce) package cream cheese, softened
¼ cup butter, softened
1 teaspoon vanilla extract
2 cups confectioners' sugar
Instructions
Preheat oven to 350˚F. Prepare muffin tins by either spraying them with cooking spray or lining them with paper liners.
In a large mixing bowl, beat together the eggs, white sugar, brown sugar, pumpkin, vanilla extract, and vegetable oil. Set aside.
In a medium bowl, mix together the flour, baking soda, baking powder, cinnamon, nutmeg, cloves, and salt.
In three batches, add the flour to the wet ingredients and stir to incorporate. Don't overmix, but incorporate thoroughly.
Fold in the chocolate chips. Fill muffin cups at least ¾ of the way full. I like to create a big muffin top, so I fill them almost all the way.
Bake for 25 minutes or until golden brown on top and a knife inserted comes out clean. If you have to have two layers of tins in your oven, rotate them halfway through the cooking time for even baking.
To make the icing:
While the muffins are baking, you can make the icing. With an electric hand mixer, cream together the cream cheese, butter, vanilla and confectioner's sugar until completely smooth, Allow to chill if need be.
To ice the cupcakes:
Once the cupcakes come out of the oven, they will need to cool before you can ice them. Once they are cooled, you can fill a pastry bag with your icing and pipe it out into large concentric circles.